A Step-by-Step Safety Guide to Identify, Remove, and Prevent Mold—Without Risking Your Health or Home
That faint musty odor in the basement. The dark speckles creeping along bathroom grout. The discolored patch on the ceiling after last week’s rainstorm. Discovering mold in your home triggers an immediate cascade of concerns: Is this dangerous? Can I handle it myself? How urgent is this really? The truth is, not all mold demands emergency remediation teams or significant restoration costs. Yet misjudging the situation—attempting to scrub away hidden structural growth or ignoring a small surface issue until it escalates—carries real risks to your health and home integrity. This guide delivers a precise, safety-centered framework to confidently distinguish between surface mold you can address with methodical DIY protocols and structural mold requiring certified professional intervention. Grounded in current environmental health standards and building science principles, you’ll gain actionable identification criteria, material-specific removal techniques, unmistakable red flags, and prevention strategies that transform uncertainty into empowered, informed action.
Introduction
Mold exists everywhere—in soil, air, and even within our bodies in balanced amounts. It becomes a household concern only when moisture, organic material, and time converge to create ideal growth conditions indoors. The critical misunderstanding plaguing most homeowners isn’t whether mold is present (microscopic spores always are), but what type of infestation they’re facing and what response it warrants. A small patch of surface mold on shower tile poses fundamentally different risks and solutions than hidden growth within wall cavities feeding on chronic plumbing leaks. Yet search results often conflate these scenarios, offering oversimplified advice for situations requiring containment protocols or dismissing minor surface issues that, left unaddressed, evolve into structural problems.
This resource synthesizes current guidance from the U.S. Environmental Protection Agency (EPA), the Centers for Disease Control and Prevention (CDC), and the Institute of Inspection, Cleaning and Restoration Certification (IICRC) to establish a clear, safety-prioritized decision framework. We move beyond fear-based messaging to deliver nuanced, material-specific protocols that respect both homeowner capability and the biological realities of mold. You’ll learn precisely when DIY is appropriate—and equally important, when it is not—with zero ambiguity. Whether you’re standing before a suspicious stain right now or building long-term home maintenance knowledge, this guide provides structured clarity to protect what matters most: your family’s health and your home’s structural integrity. Understanding begins not with eradication, but with accurate identification.
The Two Faces of Mold: Understanding Surface vs Structural Infestation
Before any cleaning solution is mixed or professional is called, accurate classification is non-negotiable. Misidentification leads to two dangerous outcomes: unnecessary expense and stress from overreacting to minor surface growth, or severe health risks and property damage from underestimating invasive structural colonization. The distinction rests on four interconnected pillars: location accessibility, material penetration depth, moisture source chronology, and physical evidence of substrate compromise. Let’s dissect each with concrete examples.
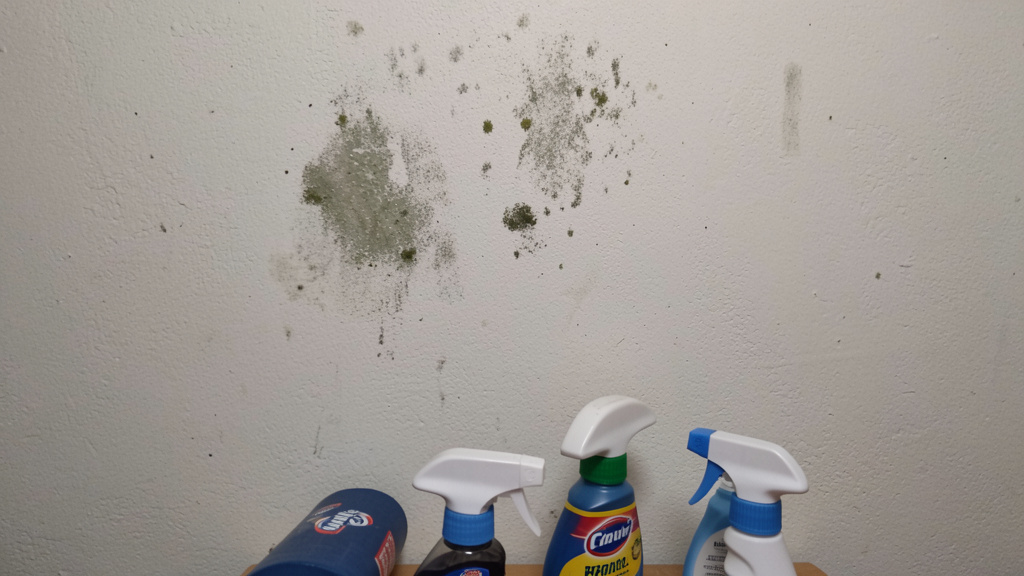
Surface Mold: The Manageable Intruder
Surface mold remains confined to the outermost layer of non-porous or semi-porous materials. It has not penetrated deeply, the underlying substrate remains structurally sound and dry, and the moisture source is typically transient or easily corrected. This is the only category where careful, safety-conscious DIY remediation is generally appropriate.
Defining Characteristics:
– Location: Fully visible and accessible—bathroom tile grout, exterior of appliance seals (washing machine door gasket), window sills with condensation, painted walls in high-humidity zones with intact paint and dry substrate beneath.
– Appearance: Discrete patches (black, green, white, orange, or pink) that appear fuzzy or slimy. When gently wiped with a damp microfiber cloth, significant discoloration transfers to the cloth, leaving minimal residual staining on the underlying material. No softening, bubbling, or texture change in the substrate.
– Odor Profile: Mild, localized mustiness detectable only when very close to the growth (e.g., leaning into the shower stall). Odor dissipates quickly with ventilation and does not permeate adjacent rooms.
– Extent: Typically isolated to areas smaller than 10 square feet (approximately a 3×3 foot section). The EPA’s A Brief Guide to Mold, Moisture, and Your Home uses this threshold as a general benchmark for homeowner-manageable scenarios, though material type and location modify this guideline.
– Moisture Context: Linked to temporary, correctable conditions: recent high humidity events, condensation from daily showers, minor splashing, or seasonal dampness in basements with functioning dehumidifiers. The moisture source is identifiable and addressable before remediation begins.
Real-World Scenario: After a humid week with frequent rain, you notice faint black speckling along the silicone caulk where your bathtub meets the wall. Pressing the caulk reveals firmness—no sponginess or separation. Wiping with a vinegar-dampened cloth removes most discoloration. The adjacent painted drywall feels dry to the touch, shows no bubbling, and the room’s exhaust fan was recently verified functional. This is textbook surface mold. The moisture source (bathroom humidity) is transient and correctable via ventilation habits. The material (silicone caulk) is non-porous and cleanable. DIY remediation is appropriate with proper safety measures.
Structural Mold: The Hidden Threat
Structural mold (also termed invasive, hidden, or systemic mold) has penetrated beyond surface layers into porous building materials. It signifies an unresolved moisture problem persisting long enough for colonization deep within walls, under floors, above ceilings, or within insulation. This mold compromises material integrity, significantly impacts indoor air quality, and always requires professional assessment and remediation. Attempting DIY removal risks severe cross-contamination, health exposure, and incomplete treatment.
Defining Characteristics:
– Location: Primarily hidden—inside wall cavities (visible only after removing outlet covers or cutting inspection holes), beneath flooring/subflooring, within ceiling plenums, inside HVAC ductwork, embedded in insulation, or on structural framing members (joists, studs). Visible signs are often secondary indicators: water stains on ceilings/walls, peeling paint, or warped baseboards.
– Material Penetration: Growth has rooted into cellulose-based materials (drywall paper facing, wood framing, insulation) or deeply saturated porous substrates. Affected materials feel soft, crumble easily, show deep discoloration that cannot be wiped away, or emit a persistent damp odor even when surface-cleaned.
– Odor Profile: Strong, pervasive musty or earthy odor detectable throughout a room or multiple areas of the home, persisting despite surface cleaning and ventilation. Often described as “damp basement” or “rotten wood” smell. Odor intensifies after rain or during high-humidity periods.
– Extent: Frequently exceeds 10 square feet, but even smaller areas qualify as structural if located in critical zones (near electrical components, load-bearing elements) or associated with documented water intrusion history. Air sampling by professionals often reveals elevated spore counts beyond the visible area.
– Moisture Context: Linked to chronic, unresolved moisture sources: roof leaks (even small, intermittent ones), plumbing failures inside walls, foundation seepage, condensation within wall cavities due to poor insulation/vapor barriers, or prior flooding events where drying was incomplete. The moisture problem predates the visible mold and remains active or unresolved.
Real-World Scenario: You notice a persistent brownish water stain spreading across your living room ceiling below the upstairs bathroom. Pressing the drywall feels spongy. Using a utility knife (with extreme caution and full PPE), you carefully cut a small inspection hole adjacent to the stain. Inside, you observe thick black, fuzzy growth covering the backside of the drywall and extending onto the wooden floor joists above. A musty odor intensifies near the hole. Upstairs, the bathroom floor feels slightly soft near the toilet base. This is unequivocal structural mold. The moisture source (likely a slow toilet seal leak or supply line drip) has been active long enough to saturate multiple building layers. DIY intervention is dangerous and ineffective. Professional remediation is mandatory.
Why This Distinction is Non-Negotiable: Consequences of Misidentification
Confusing these categories has tangible, serious repercussions. Consider two contrasting outcomes:
Case Study: The Overreaction
Situation: Surface mold on bathroom grout (3 sq ft).
Misstep: Homeowner panics, hires remediation company for a costly quote involving full bathroom encapsulation.
Outcome: Significant unnecessary expense. While work was performed, the scope was disproportionate to the risk. The homeowner’s anxiety was exploited due to lack of clear identification criteria.
Correct Path: Identify as surface mold. Fix ventilation issue (clean exhaust fan grille). Clean grout with vinegar solution using proper PPE. Monitor. Cost: minimal materials and under 30 minutes of effort.
Case Study: The Underestimation
Situation: Structural mold inside wall cavity behind kitchen sink (hidden growth).
Misstep: Homeowner sprays visible edge of stain with bleach, scrubs surface, repaints. Ignores persistent musty odor and soft spot on cabinet base.
Outcome: Mold continues growing unseen. Spores circulate through HVAC. Family experiences worsening respiratory symptoms. Months later, cabinet collapses, revealing extensive rot. Full wall replacement, professional remediation, and HVAC cleaning required. Total costs escalate significantly. Health impacts prolonged.
Correct Path: Recognize red flags (persistent odor, soft material, hidden location). Cease DIY attempts. Contact certified mold inspector. Address plumbing leak source. Hire IICRC-certified remediation firm. Costs remain contained, health risks minimized.
The Fundamental Principle: Mold is a symptom of moisture; removal without moisture source elimination is temporary theater. Your primary objective shifts from “killing mold” to “managing the environment that allows mold to thrive.” Identification determines whether you can manage that environment or whether professional intervention is required to access and correct hidden conditions.
The Safety-First Framework: Before You Touch Anything
Safety is not an optional add-on; it is the foundational layer of every decision regarding mold. Even minor surface mold remediation releases spores and microbial fragments into the air. Without proper protocols, you risk personal exposure, cross-contamination of clean areas, and ineffective treatment. This framework, aligned with occupational safety standards referenced in IICRC S520 guidelines, provides a sequential checkpoint system. Complete every step before proceeding. If any checkpoint fails, stop and reassess—this is wisdom, not weakness.
Step 1: Initial Assessment Without Disturbance (The 5-Minute Observation Protocol)
Your first instinct may be to touch, sniff, or immediately spray the area. Resist. Disturbance aerosolizes spores. Instead, conduct a calm, methodical observation:
- Visual Scan (Do Not Touch): Note exact location, color, texture, and estimated size. Is growth fuzzy, slimy, powdery? Measure against a known object (e.g., “size of a dinner plate”). Photograph from multiple angles without flash (flash can disturb spores). Look for secondary clues: water stains radiating outward, peeling paint, warped wood, bubbling wallpaper, or visible moisture droplets.
- Odor Assessment: Stand 3-4 feet away. Breathe normally. Does a musty odor register? Move closer slowly. Does intensity increase significantly within 12 inches? Note if odor persists after leaving the room for 2 minutes and returning. Persistent, pervasive odor is a major red flag for hidden growth.
- Moisture Source Hunt: Trace outward from the mold. Check for: active leaks (dripping pipes, roof stains), condensation patterns (window frames, cold water pipes), signs of past water damage (discolored baseboards, lifted flooring), or humidity indicators (foggy windows, damp clothing in closets). Use a simple moisture meter (affordable models are available) on adjacent materials. Readings consistently above 16% moisture content in drywall or wood indicate active moisture intrusion requiring source identification before any cleaning.
- Health Symptom Check: Honestly assess household members. Are unexplained symptoms present only when in this area or home? (e.g., nasal congestion clearing upon leaving work, headaches worsening evenings at home, child’s cough improving on weekends away). Document patterns. While not diagnostic, symptom correlation strengthens the case for professional evaluation.
Why This Step is Crucial: This non-invasive assessment gathers critical data without escalating risk. It prevents the common error of “cleaning first, asking questions later,” which often masks evidence needed for accurate classification. A moisture meter reading significantly above normal on drywall behind surface mold confirms underlying saturation—immediately elevating the scenario from surface to potential structural concern.
Common Mistake to Avoid: Using your finger to “test” if mold wipes off. This transfers spores to your skin, risks inhalation of disturbed particles, and provides unreliable data. Use visual cues and tool-assisted assessment only.
Step 2: Personal Protective Equipment (PPE) – Your Non-Negotiable Barrier
PPE is mandatory for any mold interaction beyond passive observation—even for small surface areas. Mold spores are microscopic (2-10 microns); inhaling them can trigger allergic reactions, respiratory irritation, or exacerbate asthma. Skin contact may cause dermatitis. Proper PPE creates a physical barrier. Never skip this step.
Minimum PPE for Surface Mold (<10 sq ft, confirmed non-porous surface):
– Respiratory Protection: N95 respirator mask (NIOSH-approved). Critical distinction: A simple surgical mask or cloth face covering offers zero protection against mold spores. An N95 filters 95% of airborne particles 0.3 microns and larger. Ensure proper fit: seal checks by covering mask and inhaling sharply (mask should pull inward) and exhaling (no air leaks at edges). Discard after single use.
– Eye Protection: Tight-fitting safety goggles that seal completely around the eyes (ANSI Z87.1 rated). Regular safety glasses with side vents allow spore entry. Goggles prevent irritation and accidental transfer to eyes.
– Hand Protection: Disposable nitrile gloves (minimum 5 mil thickness), extending well past the wrist. Nitrile resists degradation from cleaning solutions better than latex. Change gloves if torn or heavily soiled.
– Body Protection: Disposable coveralls with hood and booties (optional for very small jobs but highly recommended). Prevents spores from contaminating personal clothing, which could spread mold to vehicles, other rooms, or laundry areas. If unavailable, wear old long-sleeved shirt and pants dedicated solely to this task, to be washed immediately after.
Upgraded PPE Considerations (Consult Professional If Needed):
– For areas approaching 10 sq ft, semi-porous materials, or if immunocompromised household members exist: Upgrade to a half-face respirator with P100 (HEPA) filters. Provides higher filtration efficiency and better seal.
– If structural mold is suspected at any point: Cease activity. Do not attempt enhanced PPE as a solution. Evacuate the area and contact professionals. DIY PPE cannot replicate containment protocols used by remediation teams.
Analogy for Clarity: Approaching mold without PPE is like gardening without gloves—you might avoid immediate harm, but you’re exposing yourself unnecessarily to irritants and pathogens. PPE is the gardener’s gloves, long sleeves, and hat: basic, respectful preparation for the task.
Real-Life Example: A homeowner cleaned bathroom grout mold wearing only latex gloves. Days later, they developed a persistent cough and itchy eyes. Investigation revealed spores had contaminated their clothing during cleaning, transferring to bedding and car seats. Proper coveralls and respirator would have contained exposure. This underscores that PPE protects beyond the immediate task—it prevents secondary contamination pathways.
Step 3: Area Containment – Containing the Battlefield
Mold spores travel effortlessly on air currents. Without containment, cleaning one area can spread contamination throughout your home via HVAC systems, foot traffic, or simple air movement. Containment strategies scale with the job size.
For Confirmed Small Surface Mold (<10 sq ft, non-porous surface):
– Isolate the Room: Close all doors and windows to the affected area. Place damp towels along the bottom of the door to reduce air exchange.
– HVAC Shutdown: Turn off heating/cooling systems to prevent spore circulation through ducts. Cover supply and return vents in the room with plastic sheeting secured tightly with painter’s tape.
– Negative Air Pressure (Simple Method): Place a box fan in a window blowing air OUTSIDE. This creates slight negative pressure, drawing air (and any disturbed spores) out of the room rather than into hallways. Ensure window is sealed around fan edges with plastic sheeting taped securely. Only use if weather permits and safety allows.
– Work Zone Definition: Use painter’s tape to mark a 3-foot perimeter around the work area. Keep all cleaning supplies, trash bags, and removed PPE within this zone.
Critical Containment Exceptions – STOP and Call a Professional:
– Mold is visible inside HVAC ducts, on air handler components, or near vents.
– Growth is suspected within wall cavities, under flooring, or above ceilings (even if small visible patch exists).
– Area exceeds 10 square feet.
– Home has central HVAC and you cannot isolate the room’s vents effectively.
– Any household member is immunocompromised, has severe asthma, or is an infant/elderly with respiratory vulnerabilities.
Why Containment Matters: Research in occupational hygiene indicates that uncontained mold cleaning can lead to a substantial increase in airborne spore counts in adjacent rooms within minutes. Implementing basic containment measures significantly reduces the risk of cross-contamination. This isn’t theoretical—it’s measurable protection for your entire living environment.
Common Mistake: “I’ll just be quick—no need to tape vents.” Speed does not negate physics. Spores become airborne the moment cleaning begins. Taking 5 minutes to seal vents prevents hours of potential remediation elsewhere.
Step 4: The Stop Signs – Knowing Your Absolute Limits
Before mixing a single drop of cleaner, answer these questions honestly. If any answer is “Yes,” cease all DIY efforts immediately. This is not failure; it is responsible risk management.
- [ ] Is the visible moldy area larger than 10 square feet (roughly a standard sheet of drywall)?
- [ ] Is the mold located inside walls, under flooring, above ceilings, within insulation, or inside HVAC components?
- [ ] Does the affected material feel soft, spongy, crumble easily, or show deep discoloration that won’t wipe off?
- [ ] Is there a persistent, strong musty odor throughout the room or home that doesn’t diminish with ventilation?
- [ ] Have multiple household members experienced unexplained respiratory symptoms (coughing, wheezing, congestion), headaches, or fatigue that improve when away from home?
- [ ] Is the moisture source unknown, unresolved, or involves significant water intrusion (roof leak, plumbing burst, flooding)?
- [ ] Are you pregnant, immunocompromised, have severe asthma, or caring for infants/elderly with health vulnerabilities?
- [ ] Does the affected area involve structural elements (load-bearing walls, floor joists, roof sheathing)?
If you checked any box, your next action is clear: Contact a certified mold inspection professional. Provide them with your observation notes and photos. Their role is assessment and scope definition; remediation should be performed by a separate, certified remediation firm to avoid conflict of interest (a key industry best practice). Documenting this decision protects your health and provides clear justification if insurance claims arise later. True competence includes knowing the boundaries of your expertise.
Step-by-Step: Removing Surface Mold on Common Household Materials
Prerequisite: You have completed the Safety-First Framework (Steps 1-4), confirmed the mold is surface-level on a cleanable material, the moisture source is identified and corrected (e.g., exhaust fan repaired, leak fixed), and area is contained. Proceed only if all conditions are met. This section details material-specific protocols. Never use bleach as a first-line solution—safer, more effective alternatives exist for nearly all scenarios.
Non-Porous Surfaces: Tile, Glass, Metal, Plastic, Sealed Countertops
These materials have no pores for mold to penetrate. Growth remains entirely on the surface, making removal highly effective with minimal risk of regrowth if the surface remains intact and dry.
Materials Needed:
– N95 respirator, sealed goggles, nitrile gloves, coveralls
– Spray bottle with chosen cleaning solution (see below)
– Soft-bristled nylon brush (dedicated to cleaning only) or microfiber cloths
– Clean water in separate spray bottle
– Dry microfiber towels or paper towels
– Sealable plastic bag for waste disposal
Recommended Cleaning Solutions (Test in inconspicuous area first):
– Undiluted White Vinegar (5% Acidity): Highly effective against most common household molds. Acetic acid disrupts mold cell structures. Non-toxic, no harsh fumes, leaves no harmful residue. Ideal for bathrooms, kitchens. Note: Strong initial odor dissipates completely upon drying.
– 70% Isopropyl Alcohol: Kills mold on contact, evaporates rapidly minimizing residual moisture. Excellent for metal fixtures, glass, electronics housings (apply to cloth, not directly). Less effective on heavy buildup than vinegar.
– Hydrogen Peroxide (3% Solution): Oxidizing agent that kills mold and helps lift stains. Test on colored grout first—can cause bleaching. Apply, wait 10 minutes, wipe. Avoid mixing with vinegar.
– Commercial Mold Remover (EPA Safer Choice Listed): Choose products specifically labeled for your surface type (e.g., “for tile and grout”). Verify active ingredients avoid chlorine bleach where possible. Follow label instructions precisely.
Step-by-Step Protocol:
1. Ventilate: Open windows if weather permits. Ensure exhaust fan is running (if functional and not part of contamination source).
2. Apply Solution: Generously spray cleaning solution onto moldy area. Avoid oversaturating—solution should coat, not pool. For grout lines, use an old toothbrush dipped in solution to apply directly.
3. Dwell Time: Allow solution to sit undisturbed for 10-15 minutes. Do not let it dry. Dwell time is critical for the solution to penetrate mold biofilm and kill roots. Vinegar requires full 15 minutes for maximum efficacy.
4. Agitate Gently: Using soft brush or microfiber cloth, scrub in small circular motions. For grout, brush along the line. Apply minimal pressure—aggressive scrubbing damages surfaces and aerosolizes spores. Focus on lifting, not grinding.
5. Rinse (If Applicable): For surfaces tolerant of moisture (tile, glass), lightly mist with clean water and wipe with fresh microfiber cloth. For alcohol-treated surfaces, rinsing is unnecessary due to quick evaporation.
6. Dry Immediately: Thoroughly dry the area with clean, dry microfiber towels. Follow with a fan directed at the area for 30-60 minutes to ensure complete desiccation. Mold cannot regrow without moisture.
7. Waste Disposal: Place used cloths, gloves, and towels into sealable plastic bag. Seal tightly and discard with regular household trash. Wipe down brush/tool with alcohol before storing.
Why This Protocol Works: Non-porous surfaces allow cleaning agents full contact with all mold structures. The dwell time ensures biocidal action beyond surface spores. Immediate, thorough drying eliminates the moisture mold requires to reestablish. This sequence addresses the entire mold lifecycle—not just visible growth.
Common Mistake to Avoid: Using abrasive pads (steel wool, harsh scouring pads) on tile or fixtures. This scratches surfaces, creating micro-grooves where moisture and spores can accumulate, making future cleaning harder and regrowth more likely. Soft brushes preserve surface integrity.
Material-Specific Nuance – Grout: Cementitious grout is technically semi-porous but behaves like non-porous when sealed. If grout is unsealed or cracked, mold can penetrate slightly. After cleaning, once completely dry (wait 24 hours), apply a grout sealer to create a protective barrier against future moisture absorption. This transforms vulnerable grout into a more mold-resistant surface.
Semi-Porous Surfaces: Painted Drywall (Intact Paint), Finished Wood, Concrete
These materials have a surface layer that can be cleaned, but underlying pores may absorb minimal moisture. Success depends on paint/coating integrity and ensuring no moisture has penetrated beneath. Extreme caution is required—aggressive cleaning can damage the surface barrier, inviting future problems.
Critical Pre-Cleaning Verification for Painted Drywall:
– Press firmly on the wall around and behind the moldy area. Does it feel solid and dry? Or soft, spongy, or crumbly?
– Check paint integrity: Is paint bubbling, peeling, or cracked near the mold? Use a fingernail to gently scratch paint edge near mold. Does paint lift easily?
– If drywall feels soft OR paint is compromised: STOP. This indicates moisture penetration and potential structural mold. Cut out and replace the drywall section (professional task). Do not attempt cleaning.
Protocol for Intact Painted Drywall (Surface Mold Only):
1. Solution Choice: Mild detergent solution (1 teaspoon dish soap per quart of warm water) OR diluted vinegar (1 part vinegar to 1 part water). Avoid strong solvents that can strip paint.
2. Application: Dip microfiber cloth lightly into solution—wring until nearly dry. Damp, not wet, is critical. Excess moisture wicks into drywall paper facing.
3. Cleaning Motion: Gently wipe mold area using light pressure. Work from outer edges inward to avoid spreading spores. Use a clean section of cloth frequently. Never scrub.
4. Drying: Immediately dry wiped area with clean, dry microfiber cloth. Position fan to blow air across (not directly onto) the wall for 1-2 hours. Verify dryness by touch—no coolness or damp feeling.
5. Post-Cleaning: If discoloration remains (often a water stain, not active mold), and area is confirmed dry and solid, prime with mold-inhibiting primer (e.g., Zinsser Mold Killing Primer) before repainting. This seals residual stains and adds protective layer.
Protocol for Finished Wood (Window Frames, Trim, Furniture):
– Solution: Tea tree oil solution (1 teaspoon pure tea tree oil per cup of water) OR diluted vinegar. Tea tree oil is a potent natural fungicide with residual protective properties. Test in hidden area first—can darken some woods.
– Application: Apply solution to cloth, not directly to wood. Wipe gently along wood grain. Avoid saturating joints or cracks.
– Drying: Dry immediately with soft cloth. Follow with fan for several hours. Wood must be bone-dry to prevent regrowth within grain.
– Protection: Once completely dry (wait 24 hours), apply a wood sealant or furniture wax appropriate for the finish. This reduces future moisture absorption at the surface.
Protocol for Indoor Concrete (Basement Floors, Garage Floors):
– Solution: Vinegar solution OR commercial concrete mold remover. Avoid acid-based cleaners on sealed concrete—they can etch the surface.
– Application: Spray solution, dwell 15 minutes. Scrub with stiff nylon brush (concrete tolerates more agitation). For textured surfaces, brush thoroughly into pores.
– Rinsing & Drying: Rinse minimally with clean water if using detergent-based solution. Use wet/dry vacuum to extract rinse water if possible. Dry aggressively with fans and dehumidifier for 24-48 hours. Concrete retains moisture internally; surface dryness is misleading. Use moisture meter to confirm readings match surrounding dry areas before considering area “dry.”
– Prevention Focus: Address root cause—improve drainage, fix foundation cracks, install interior drainage system or sump pump if chronic. Apply concrete sealer after area is fully dry and moisture source controlled.
Real-Life Example – Bathroom Window Frame: Surface mold appears on painted wood window frame due to condensation. Homeowner verifies frame feels solid, paint is intact. Cleans with diluted vinegar on damp cloth, dries immediately with towel and fan. Next day, applies clear wood sealant to frame. Additionally, installs magnetic window insulation kit for winter to reduce condensation formation. This addresses both immediate mold and the contributing moisture condition.
Porous Materials: The Absolute DIY Boundary
Materials like unpainted drywall, insulation (fiberglass, cellulose), carpet, carpet padding, upholstery fabric, and particleboard are highly absorbent. Mold penetrates deep into fibers and matrix structures. Surface cleaning is futile—it removes visible growth but leaves roots and spores embedded, guaranteeing rapid regrowth. Worse, cleaning attempts aerosolize massive spore loads. The universal rule: When mold affects porous materials, removal and replacement is the only effective solution. DIY cleaning is never appropriate.
Material-Specific Guidance:
– Drywall (Unpainted or Compromised Paint): If mold is visible on the paper facing and substrate feels soft or shows deep staining, the drywall section must be cut out and replaced. This requires creating containment barriers, HEPA vacuuming surrounding areas, and precise cutting techniques to avoid spreading contamination. This is a professional remediation task. For very small areas (<1 sq ft) on intact, painted drywall with confirmed dry substrate, the semi-porous protocol above may apply—but extreme caution is warranted. When in doubt, replace.
– Insulation: Any visible mold on insulation mandates full removal and replacement. Fiberglass batts trap spores irreversibly. Cellulose insulation becomes a nutrient source for mold. Disturbing moldy insulation without full containment releases enormous spore quantities. Professionals use negative air machines and full encapsulation during removal.
– Carpet and Padding: Surface mold on carpet pile with dry, clean padding underneath might be salvageable by professional hot-water extraction with antimicrobial agents. However, if padding is damp, stained, or shows mold, both carpet and padding must be removed and replaced. DIY shampooing spreads spores deep into padding and aerosolizes them. Remove contaminated carpet/padding carefully (roll inward to contain spores), seal in heavy plastic bags, and discard immediately. Subfloor must be cleaned and dried thoroughly before new installation.
– Upholstered Furniture: Generally not salvageable if mold has penetrated beyond surface fabric. Surface cleaning risks driving spores deeper. Consider replacement. For valuable pieces, consult a professional textile conservator—standard remediation firms rarely handle furniture.
Counter-Example to Remember: A homeowner discovered mold on basement carpet after a minor sump pump overflow was resolved within hours. They rented a carpet cleaner and “cleaned” the area. Within days, mold returned aggressively. Investigation revealed the padding underneath remained saturated and moldy. The cleaning process had forced moisture deeper and spread spores. Full removal of carpet and padding, subfloor cleaning, and professional drying were required—costing far more than initial replacement would have. This illustrates why porous materials demand replacement, not cleaning.
Post-Cleaning Verification and Long-Term Prevention Integration
Completion of cleaning is only step one. Verification ensures success; prevention ensures permanence.
Verification Protocol:
– Visual Inspection: Area should be free of visible mold, discoloration, or residue. Use a bright flashlight at a low angle to reveal texture changes or residual staining.
– Tactile Check: Surface should feel completely dry and smooth. No tackiness, coolness, or texture anomalies.
– Odor Test: No musty odor should remain at the cleaned site after 24 hours of normal ventilation. Persistent odor indicates hidden growth or incomplete drying.
– Moisture Confirmation: For semi-porous materials (drywall, wood), use moisture meter 24 hours post-cleaning. Readings should match surrounding unaffected areas.
– Monitor Closely: Re-inspect the area daily for 7 days, then weekly for one month. Early detection of recurrence allows prompt, minor intervention.
Integrating Prevention at the Source:
Cleaning without addressing why mold grew is temporary. Attach each remediation to a specific prevention action:
– Bathroom mold? Install timer switch on exhaust fan (runs 30 mins post-shower). Add squeegee to post-shower routine. Replace cracked caulk annually.
– Window condensation mold? Apply weatherstripping. Use moisture-absorbing products (silica gel) on sills. Install storm windows or thermal curtains.
– Basement concrete mold? Run dehumidifier set to 50% RH. Seal foundation cracks. Ensure gutters direct water 6+ feet from foundation.
– Under-sink mold? Fix leaky faucet immediately. Place moisture-absorbing pouches under sink. Check supply lines quarterly for bulges/cracks.
This transforms a reactive cleanup into a proactive home maintenance upgrade. Each resolved surface mold incident becomes an opportunity to strengthen your home’s resilience against future moisture challenges.
Red Flags: When Mold is Structural and Requires a Professional
Even with meticulous assessment, some scenarios present unequivocal evidence that mold has progressed beyond surface contamination. Recognizing these red flags isn’t about inducing fear—it’s about exercising prudent judgment to protect health, safety, and property value. Ignoring these signs risks severe consequences: widespread contamination requiring extensive remediation, persistent health issues for occupants, or structural weakening of building components. This section details unmistakable indicators, explains the professional remediation process you should expect, and provides criteria for selecting qualified experts. When these red flags appear, your role shifts from “doer” to “informed client”—a critical and valuable position.
Unmistakable Signs of Structural Mold Infestation
These indicators, individually or collectively, signal that mold has colonized hidden areas or compromised building materials. DIY intervention is ineffective and dangerous. Cease all activity and contact certified professionals.
1. Visible Growth in Inaccessible Locations
Finding mold inside a wall cavity (after carefully removing an outlet cover plate while wearing PPE), under lifted flooring, above a ceiling tile, or within insulation is definitive proof of structural infestation. Surface cleaning is impossible; the growth is embedded within the building assembly. Action: Do not attempt to “clean what you see.” Seal the inspection hole with tape. Contact a mold inspector.
2. Material Degradation and Substrate Compromise
Materials affected by prolonged moisture and mold lose structural integrity. Key signs:
– Drywall: Feels soft, spongy, or crumbles when pressed. Paper facing is bubbled, separated, or discolored deep beneath surface. Tapping produces a hollow or dull sound versus solid thud of dry drywall.
– Wood Framing (Studs, Joists): Shows deep black/green staining that won’t wipe off. Surface is fuzzy with active growth. Wood feels soft when probed with a screwdriver (should meet firm resistance). Visible cracking, warping, or “checking” (surface splits).
– Insulation: Appears matted, discolored (yellow/brown/black), or has visible fuzzy growth. Fiberglass loses loft; cellulose feels damp or clumped.
– Subflooring: Warped, buckled, or spongy underfoot. Visible staining or growth between floorboard gaps.
Why it matters: Compromised materials cannot be “cleaned.” They must be removed and replaced. Structural elements like load-bearing studs with significant decay threaten building safety. Only professionals can assess structural impact and execute safe removal.
3. Persistent, Unexplained Musty Odor Without Visible Source
You’ve cleaned all visible surface mold meticulously. Ventilated thoroughly. Yet a distinct musty, earthy, or “rotten wood” odor lingers in a room or permeates the home, intensifying after rain or during humid weather. This is a hallmark of hidden mold growth. Spores and microbial volatile organic compounds (mVOCs) emitted by hidden colonies travel through wall cavities, electrical chases, and HVAC systems. Action: Do not dismiss as “old house smell.” Odor is data. Contact an inspector with odor-locating tools (borescopes, thermal imaging).
4. Documented History of Significant Water Intrusion
Past events create high-risk conditions for hidden mold:
– Roof leaks (even small, intermittent ones repaired months ago)
– Plumbing failures inside walls (supply line bursts, slow leaks behind toilets/sinks)
– Basement flooding or foundation seepage
– Appliance overflows (washing machine, dishwasher) where water penetrated under flooring
– Condensation issues within wall cavities due to poor insulation/vapor barriers (common in older homes with added insulation)
Critical Insight: Mold can begin growing within 24-48 hours of moisture exposure. If water intrusion was not addressed with thorough drying (using moisture meters to verify dryness in all materials), hidden mold is highly probable. A past water event + current odor/stains = professional assessment required.
5. HVAC System Contamination
Mold within ductwork, on evaporator coils, in air handler units, or on vents is a severe contamination vector. Signs include:
– Visible mold growth inside supply registers or return grilles
– Musty odor only when HVAC system is running
– Increased dust accumulation on surfaces shortly after filter change
– Unexplained respiratory symptoms worsening when system operates
Why DIY Fails: HVAC systems are complex, interconnected networks. Attempting to clean ducts without specialized equipment (rotating brushes, HEPA-filtered negative air machines) spreads contamination. Coil cleaning requires precise techniques to avoid damage. Action: Turn off HVAC system immediately. Contact a NADCA (National Air Duct Cleaners Association) certified HVAC hygiene specialist. Do not run the system until cleared.
6. Health Symptom Correlation
While not diagnostic alone, symptom patterns warrant serious attention:
– Multiple household members experience similar symptoms: persistent cough, wheezing, nasal congestion, throat irritation, headaches, fatigue, or skin rashes.
– Symptoms consistently improve when away from home (at work, on vacation) and return upon re-entry.
– Symptoms worsen in specific rooms or during humid weather.
– Individuals with asthma, allergies, or compromised immune systems experience notable exacerbation.
Professional Path: Consult a healthcare provider to rule out other causes. Simultaneously, hire an industrial hygienist for air quality testing. Correlating medical evaluation with environmental testing provides the strongest case for remediation, especially for insurance purposes.
The Professional Remediation Process: What to Expect
Understanding the standard protocol demystifies the process and helps you evaluate contractor proposals. Reputable firms follow a phased approach aligned with IICRC S520 standards. Here’s the typical sequence:
Phase 1: Inspection and Assessment
– Certified inspector conducts visual assessment, moisture mapping (using meters, thermal imaging cameras), and may take air/surface samples for lab analysis.
– Detailed scope of work is developed: extent of contamination, materials to be removed, containment requirements, moisture source identification.
– Your Role: Provide access, share history of water events, note health concerns. Request written report with photos and scope.
Phase 2: Containment and Setup
– Critical step often skipped by unqualified contractors.
– Physical barriers (6-mil poly sheeting) seal off work area from rest of home.
– Negative air machine with HEPA filtration creates air pressure differential, pulling contaminated air through filter and exhausting clean air outside.
– Decontamination chamber (plastic “airlock”) set up for worker entry/exit.
– Your Role: Verify containment is installed before demolition begins. Ask to see HEPA filter certification.
Phase 3: Source Removal and Cleaning
– Contaminated materials (drywall, insulation, etc.) carefully removed, double-bagged, and sealed for disposal.
– Remaining structural elements (studs, joists) HEPA-vacuumed and treated with antimicrobial solution.
– All tools and equipment cleaned before leaving containment zone.
– Your Role: Ensure workers wear full PPE (respirators, coveralls). No materials should leave containment unbagged.
Phase 4: Moisture Source Correction
– Reputable firms coordinate with plumbers, roofers, or contractors to fix the underlying leak before rebuilding.
– Critical Question to Ask: “Is moisture source correction included in your scope, or do I need separate contractor?” Never rebuild over an active leak.
Phase 5: Restoration
– New drywall installed, taped, mudded, painted.
– Insulation replaced. Flooring reinstalled.
– Final cleaning of area.
– Your Role: Verify all replaced materials are dry before covering (moisture meter check).
Phase 6: Post-Remediation Verification (PRV)
– Non-negotiable step. Independent third-party industrial hygienist (not employed by remediation company) conducts air sampling inside and outside work area.
– Compares spore counts to outdoor baseline and unaffected areas of home.
– Provides clearance certificate confirming remediation success.
– Your Role: Insist on PRV. Do not accept “visual clearance” alone. This protects you if mold returns.
Choosing a Reputable Professional: Your Due Diligence Checklist
The remediation industry has variable standards. Protect yourself with these vetting steps:
- Certifications Matter: Verify IICRC certification (specifically Applied Microbial Remediation Technician – AMRT) for the company and lead technician. Check license status with your state contractor licensing board. For HVAC work, require NADCA certification.
- Avoid Testing/Remediation Conflicts: Never hire a company that both performs testing and remediation. They have financial incentive to find more problems. Hire an independent industrial hygienist for assessment and PRV; hire a separate remediation firm for work.
- Demand Detailed Written Estimates: Scope should specify: containment methods, materials to be removed/replaced, antimicrobial products used, moisture correction steps, PRV process, timeline, and total cost. Vague estimates (“mold cleanup”) are red flags.
- Check References and Reviews: Ask for 2-3 recent client references for similar projects. Read online reviews critically—look for patterns regarding communication, cleanliness, and follow-through. Verify BBB accreditation and complaint history.
- Insurance Verification: Confirm the company carries general liability insurance and workers’ compensation. Request certificate of insurance. This protects you if a worker is injured on your property.
- Warranty Clarity: Understand what is warranted (workmanship, materials) and for how long. Reputable firms offer multi-year warranties on remediation work. Get warranty terms in writing.
Red Flag Phrases to Avoid:
❌ “We can start tomorrow—no need for testing.” (Skipping assessment)
❌ “Our special chemical kills 99.9% of mold instantly.” (Overpromising; mold removal is physical, not just chemical)
❌ “We’ll handle the insurance claim for you.” (Potential for fraud; work with your adjuster directly)
✅ “We follow IICRC S520 standards and require independent post-remediation verification.” (Professional standard)
Prevention: Stopping Mold Before It Starts
The most effective mold strategy requires zero remediation: prevention through proactive moisture management. This shifts your mindset from reactive crisis response to sustainable home stewardship. Prevention isn’t a single action—it’s a layered system of habits, maintenance routines, and environmental controls. Implementing even 2-3 key strategies significantly reduces risk. This section provides actionable protocols organized by priority, frequency, and home zone.
The Core Triad: Moisture Control Fundamentals
All mold prevention hinges on these three non-negotiable principles. Master these first.
1. Fix Leaks Immediately—Within 24 Hours
Water intrusion is the primary catalyst for mold. Response time is critical:
– Plumbing Leaks: Shut off water supply. Dry area thoroughly with towels, fans, dehumidifier. Repair leak. Monitor for 72 hours.
– Roof Leaks: Place bucket/container under drip. Cover affected ceiling area with plastic sheeting taped at edges to catch debris. Contact roofer immediately—even small leaks cause significant hidden damage over time.
– Appliance Overflows: Shut off appliance. Extract standing water with wet/dry vacuum. Remove baseboards if water penetrated wall cavity. Use air movers and dehumidifier on affected area for 48+ hours. Verify dryness with moisture meter before replacing materials.
Pro Tip: Keep emergency supplies accessible: wet/dry vacuum, moisture meter, heavy-duty fans, dehumidifier, plastic sheeting, duct tape. Knowing where they are saves critical time.
2. Maintain Indoor Relative Humidity Below 60% (Ideally 30-50%)
Mold struggles to grow below 60% RH. Consistent control is key:
– Basements & Crawlspaces: Install dedicated dehumidifier (adequate capacity for space). Set to 50% RH. Empty regularly or use continuous drain hose. Place hygrometer (inexpensive humidity monitor) to verify levels.
– Whole-House Control: In humid climates, use air conditioning (AC removes moisture as it cools). Ensure AC drain line is clear. Consider whole-house dehumidifier integrated with HVAC system for comprehensive control.
– Seasonal Adjustments: During winter, indoor humidity can rise from cooking/showering. Use exhaust fans. In summer, monitor basement humidity closely after rain events.
Tool Recommendation: Smart hygrometers send phone alerts when humidity exceeds set thresholds—ideal for vacation homes or busy households.
3. Ventilate Moisture-Generating Activities
Remove moisture at the source before it disperses:
– Bathrooms: Run exhaust fan during shower/bath and for at least 30 minutes after. If no fan, open window and use portable fan blowing outward. Install timer switch or humidity-sensing fan auto-switch.
– Kitchens: Use range hood vented outside while cooking, especially boiling water or using dishwasher. Keep hood running 15 minutes post-cooking.
– Laundry: Ensure dryer vent exhausts outside (never into attic or crawlspace). Clean lint trap after every load. Inspect vent hose annually for kinks/cracks.
– General: Open windows when weather permits for cross-ventilation. Avoid drying clothes indoors on racks.
Home Zone Prevention Checklist
Implement these targeted actions for high-risk areas. Print and post this checklist in your utility room or garage.
| Home Zone | Daily/Weekly Actions | Monthly Actions | Seasonal/Annual Actions |
|---|---|---|---|
| Bathrooms | Wipe shower walls/tub after use; squeegee glass doors; run exhaust fan during/after use | Inspect caulk/grout for cracks; clean fan grille; check under sink for leaks | Re-caulk tub/shower surround if cracked; deep clean grout; verify exhaust fan airflow (hold tissue to vent—it should stick) |
| Kitchen | Wipe sink/counters; run range hood during cooking; empty trash regularly | Check under sink for leaks/dampness; clean refrigerator drip pan; inspect dishwasher hose connections | Clean range hood filter; verify dryer vent exhausts outside; check window seals for condensation |
| Basement/Crawlspace | Monitor dehumidifier; check for standing water after rain | Inspect foundation walls for new cracks/stains; check sump pump operation; verify dehumidifier drain | Seal foundation cracks; clean gutters/downspouts; ensure soil slopes away from foundation (6+ inches over 10 feet); inspect vapor barrier in crawlspace |
| Attic | (During access) Note musty odors or visible mold | Check for daylight through roof (indicates missing shingles); inspect insulation for dampness/staining | Professional roof inspection; verify soffit/ridge vent airflow; check attic insulation depth/R-value |
| Windows/Doors | Wipe condensation from sills; open curtains to reduce condensation | Inspect weatherstripping for gaps; check caulk around frames | Re-caulk exterior frames; replace worn weatherstripping; consider storm windows for single-pane units |
| HVAC System | Change air filters (mark calendar!) | Vacuum supply/return grilles; check condensate drain pan for standing water | Schedule professional HVAC maintenance (clean coils, check drain line, inspect ducts); consider duct cleaning if >5 years old or after renovation |
Advanced Prevention Strategies for High-Risk Homes
If your home has recurring moisture challenges, elevate your approach:
- Crawlspaces: Install 6-mil poly vapor barrier over entire dirt floor, overlapping seams by 12 inches and sealing to foundation walls with mastic. This blocks ground moisture evaporation—the primary source of crawlspace humidity. Add crawlspace dehumidifier if humidity remains high. Ensure adequate ventilation per local building codes; some climates require sealed, conditioned crawlspaces.
- Attics: Critical for preventing condensation on roof sheathing. Verify soffit vents are unobstructed (no insulation blocking airflow). Ensure ridge or gable vents provide balanced exhaust. Add baffles (rafter vents) if insulation touches roof deck. Proper ventilation maintains attic temperature close to outside air, preventing warm, moist indoor air from condensing on cold roof surfaces in winter.
- After Water Events: For any significant water intrusion (flood, major leak):
- Extract standing water immediately.
- Remove wet porous materials (carpet, padding, drywall below water line).
- Set up industrial air movers and dehumidifiers.
- Monitor moisture levels daily with meter until all materials read dry.
- Do not rebuild until verified dry. When in doubt, hire a water restoration professional certified by IICRC (WRT – Water Restoration Technician). Their equipment and expertise prevent mold before it starts.
Real-Life Success Story: A family in a humid climate battled recurring basement moisture issues. They implemented a layered prevention system: sealed foundation cracks, installed interior drainage with sump pump, added vapor barrier over crawlspace dirt floor, and ran a dehumidifier set to 50% RH. They placed a smart hygrometer in the basement that alerts their phones if humidity rises. Within two years, they experienced no further mold issues. Their investment prevented repeated remediation costs and protected their health. Prevention paid for itself rapidly.
Your Questions, Answered
Homeowners face countless uncertainties about mold. These answers synthesize current scientific consensus and industry standards to dispel myths and provide clarity. Each response includes the “why” behind the guidance.
Q: Can I use bleach to kill mold?
A: The EPA, CDC, and IICRC no longer recommend bleach for routine mold remediation, especially on porous materials. Bleach is mostly water—when applied, the water component soaks deep into materials like drywall or wood, feeding mold roots while the chlorine evaporates quickly from the surface. It does not penetrate to kill embedded growth. Bleach also produces harmful fumes, can corrode surfaces, and creates dangerous chemical reactions if mixed with ammonia or vinegar. For non-porous surfaces, detergent and water or vinegar are safer and equally effective. Bleach may be appropriate in specific scenarios (e.g., sanitizing after sewage backup), but only with professional guidance, full PPE, and proper ventilation. Focus on physical removal and moisture control—not chemical killing.
Q: How do I know if the mold in my home is “toxic black mold”?
A: The term “toxic black mold” is a media-driven misnomer that causes unnecessary panic. While Stachybotrys chartarum (a greenish-black mold) can produce mycotoxins under very specific, chronically wet conditions, not all black mold is Stachybotrys, and color alone is meaningless for risk assessment. Many common molds (like Cladosporium) are black but pose minimal risk. Conversely, some hazardous molds are white or green. All molds can trigger allergies or respiratory irritation in sensitive individuals. Instead of fixating on species identification: 1) Address visible mold growth using safety protocols, 2) Eliminate the moisture source, and 3) If you suspect Stachybotrys (typically in areas with prolonged, severe water damage like flooded drywall), treat it as structural mold requiring professional remediation. Health impacts depend more on exposure level, duration, and individual susceptibility than mold species.
Q: Will painting over mold kill it or stop it from growing?
A: Absolutely not. Painting seals mold between the wall and new paint layer, creating a dark, potentially moist environment where it continues to grow unseen. Mold metabolites and spores can bleed through paint, causing discoloration and bubbling. Always remove mold completely and ensure the substrate is 100% dry before priming and painting. For areas prone to moisture (bathrooms, basements), use a mold-inhibiting primer followed by mildew-resistant paint. But remember: paint is not a moisture barrier. If the underlying moisture issue isn’t fixed, mold will return regardless of paint type.
Q: Can mold grow in my HVAC system, and how do I prevent it?
A: Yes—HVAC systems are prime mold habitats due to condensation on cooling coils, standing water in drain pans, and dust accumulation in ducts. Prevention is multi-layered: 1) Change air filters every 1-3 months (use MERV 8-13 filters to capture spores), 2) Ensure condensate drain lines are clear and slope downward (pour vinegar down drain line quarterly to prevent clogs), 3) Schedule annual HVAC maintenance where technician cleans coils, checks drain pan, and inspects ducts, 4) Keep indoor humidity below 60% to reduce condensation, 5) Never run AC with frozen coils—thaw completely first. If you see visible mold in vents or smell mustiness when system runs, turn it off and contact a NADCA-certified HVAC hygiene specialist. Do not attempt DIY duct cleaning—it often worsens contamination.
Q: Is it safe to stay in my home during mold remediation?
A: For small, contained DIY surface mold projects with proper PPE and ventilation: yes. For professional remediation of structural mold: it depends on scope, location, and household vulnerabilities. Reputable firms set up rigorous containment (plastic barriers, negative air machines) that isolates the work area. However, if remediation involves large areas, HVAC systems, or if infants, elderly, pregnant individuals, or immunocompromised persons reside in the home, temporary relocation may be recommended. Always discuss this with your remediation contractor before work begins. They should provide a clear safety plan. Never enter the contained work area during active remediation.
Q: How long does it take for mold to start growing after a water leak?
A: Under ideal conditions (warm temperature, organic material, moisture), mold spores can begin germinating within 24 to 48 hours. This is why immediate action is critical. The EPA emphasizes: “Dry water-damaged areas and items within 24-48 hours to prevent mold growth.” However, growth speed varies: cold temperatures slow it; highly porous materials accelerate it; and some molds require longer saturation periods. Never assume “it’s been dry for a day—safe.” Thorough drying verified by moisture meter is the only reliable prevention.
Q: Are DIY mold test kits from hardware stores reliable?
A: Generally, no. Air sampling kits sold to consumers lack laboratory-grade calibration and are highly susceptible to user error (improper placement, timing, handling). They may indicate elevated spore counts but cannot identify hidden sources, distinguish between mold types reliably, or assess health risks. If you see visible mold, testing is usually unnecessary—focus on safe removal. If you suspect hidden mold due to persistent odors or health symptoms, hire a certified industrial hygienist for professional assessment. They use calibrated pumps, multiple sample types, and accredited labs for accurate analysis. Save your money—skip the DIY kit.
Q: What health symptoms are commonly associated with mold exposure?
A: Symptoms vary widely based on individual sensitivity, mold type, concentration, and exposure duration. Common reactions include: nasal stuffiness, throat irritation, coughing or wheezing, eye irritation, skin irritation (like eczema), and headache. People with allergies to mold or asthma may experience more severe reactions: asthma attacks, difficulty breathing, or hypersensitivity pneumonitis (a rare lung inflammation). The CDC states: “Molds can produce allergens… irritants… and, in some cases, potentially toxic substances (mycotoxins). Inhaling or touching mold or mold spores may cause allergic reactions in sensitive individuals.” If you experience persistent symptoms, consult a healthcare provider. Do not self-diagnose mold illness—many symptoms overlap with other conditions (dust mites, pollen, VOCs).
Q: How should I dispose of materials cleaned during DIY surface mold removal?
A: For small surface mold projects (<10 sq ft on non-porous surfaces): Place used gloves, cloths, and paper towels into a sealable plastic bag. Seal tightly and discard with regular household trash. Wash reusable tools (brushes) thoroughly with soap and hot water, then disinfect with alcohol. For any materials removed during structural mold scenarios (drywall, insulation): Professionals handle disposal per local regulations. Never place large amounts of moldy porous materials in regular trash without double-bagging and sealing—this risks exposing sanitation workers and contaminating your vehicle.
Q: Can mold return after professional remediation?
A: Yes—if the underlying moisture source is not permanently fixed. Reputable remediation companies address the source as part of their scope, but ongoing home maintenance is your responsibility. For example: remediation fixes mold from a roof leak, but if the roof isn’t repaired, rain will cause regrowth. Similarly, remediation in a damp basement won’t last if humidity isn’t controlled. A quality remediation firm provides a warranty covering workmanship. However, warranties typically exclude new water events. Prevention through moisture control is your ongoing role. Request post-remediation verification (PRV) to confirm initial success.
Q: Are air purifiers effective for controlling mold spores?
A: HEPA air purifiers can supplement mold prevention by capturing airborne spores, but they do not address the root cause: moisture and existing growth. A purifier in a room with active mold growth is like bailing water from a boat with a hole—you’re managing symptoms while the problem worsens. Use purifiers after mold is removed and moisture controlled to improve air quality. Choose units with true HEPA filters (captures 99.97% of particles 0.3 microns) and appropriate CADR rating for room size. Place near potential spore sources (e.g., basement). Remember: purifiers don’t kill mold on surfaces or stop growth. Fix moisture first; use purifiers as a secondary layer.
Q: What’s the difference between mold and mildew?
A: In household contexts, “mildew” typically refers to surface-level mold growth on organic materials like shower grout, fabrics, or paper. It’s often white or gray initially, turning brown/black. True mildew (a specific fungal subgroup) is less common indoors. Practically speaking: all visible fungal growth in homes should be treated as mold with the same safety protocols. Don’t waste energy distinguishing—they require identical moisture-focused solutions. Focus on removal and prevention, not taxonomy.
Conclusion and Next Step
Mold in the home is not a verdict of failure or neglect. It is a natural biological process responding to environmental conditions—primarily moisture. Your journey through this guide has equipped you with a precise, actionable framework to navigate mold encounters with clarity and confidence. You now understand the critical distinction between surface mold (manageable with methodical DIY protocols) and structural mold (requiring professional expertise). You possess safety-first assessment checklists, material-specific remediation techniques, unmistakable red flags, and layered prevention strategies. This knowledge transforms uncertainty into empowered decision-making.
Recap: The Three Pillars of Confident Mold Management
- Accurate Identification Precedes Action: Never clean first. Use the location, material penetration, odor, and moisture source criteria to classify the mold. When in doubt, stop and seek professional assessment. This single step prevents costly errors.
- Safety is Non-Negotiable: PPE, containment, and knowing your limits protect your health and prevent cross-contamination. Respect mold as a biological agent—not a mere stain. Your caution is wisdom, not fear.
- Moisture Control is the Ultimate Solution: Removal without moisture source elimination is temporary. Shift your focus from “killing mold” to “managing your home’s moisture environment.” Prevention through humidity control, ventilation, and prompt leak repair is sustainable, cost-effective stewardship.
The 24-Hour Rule: Your Tiny, Transformative Action
Knowledge without action remains potential. Within the next 24 hours, complete one concrete step to strengthen your home’s mold resilience. Choose the option that fits your reality:
– If you have a bathroom exhaust fan: Turn it on now. Hold a tissue near the vent grille. Does it stick firmly? If not, clean the grille with a damp cloth and vacuum the fan housing. Schedule deep cleaning if airflow remains weak.
– If you have a basement or crawlspace: Place a hygrometer (or smart sensor) in the area. Note the current humidity reading. If above 60%, run a dehumidifier for a few hours and recheck. Commit to monitoring weekly.
– If you’ve had past water issues: Spend 10 minutes inspecting the area. Press on walls/floors for softness. Smell for mustiness. Document findings. If concerns exist, contact a professional for assessment.
– If your home feels generally humid: Open two windows on opposite sides of your home for cross-ventilation for 30 minutes. Notice the air quality shift. Make this a daily habit during mild weather.
This micro-action builds momentum. It moves you from passive reader to active home steward. Small, consistent steps create lasting change.
The Big Picture: Cultivating a Resilient Home Ecosystem
Mold management is not an isolated task—it’s one thread in the larger tapestry of home health. By mastering moisture awareness, you simultaneously improve indoor air quality, protect structural integrity, reduce allergen loads, and create a more comfortable living environment. This mindset extends beyond mold: checking for leaks prevents water damage; controlling humidity preserves wood furniture and musical instruments; proper ventilation reduces cooking odors and VOC buildup. You are not just fighting mold; you are cultivating a home that supports well-being through intentional environmental stewardship. The confidence gained here applies to countless other home challenges—approach them with the same structured curiosity, safety priority, and solution-focused mindset.
You now hold the compass for navigating mold encounters wisely. Trust your assessment. Honor your limits. Act with purpose. Your home—and those within it—are worth this thoughtful care.
Explore Our Complete Home Health System:
Understanding Indoor Air Quality: A Practical Homeowner’s Guide | The Home Moisture Audit: Find Hidden Leaks in 60 Minutes | Choosing the Right Dehumidifier: Capacity, Features, and Placement | Bathroom Ventilation Mastery: Beyond the Basic Exhaust Fan | Water Damage Response Protocol: What to Do in the First 24 Hours | Building Science Basics: How Your Home Breathes (and Why It Matters) | Creating a Home Maintenance Calendar That Actually Works