A Complete, Room-by-Room Guide to Creating Spaces That Welcome All Ages, Abilities, and Life Stages—Without Sacrificing Style, Function, or Budget
Imagine walking into a home where a grandparent using a walker moves effortlessly from the kitchen to the garden patio. Where a teenager carrying laundry doesn’t fumble with a doorknob. Where a visitor with low vision navigates confidently without asking for help. Where a parent pushing a stroller enters without struggling with steps. This isn’t a futuristic fantasy—it’s the tangible reality of universal design. Far beyond ramps and grab bars, universal design weaves inclusivity into the very DNA of a home, creating environments that adapt to human needs across a lifetime. This comprehensive guide transforms established principles into actionable strategies you can implement today, whether you’re building new, renovating a single room, or making thoughtful tweaks that compound into profound accessibility.
Introduction
Homes should be sanctuaries of comfort and independence, not obstacle courses requiring constant adaptation. Yet traditional housing often forces compromises: narrow doorways block mobility devices, slippery floors threaten stability, complex controls frustrate users of all ages. Universal design dismantles these barriers at the source. Rooted in research from institutions like North Carolina State University’s Center for Universal Design and validated through decades of real-world application by organizations including the National Association of Home Builders (NAHB) and the American Institute of Architects (AIA), this approach recognizes a fundamental truth: human ability exists on a dynamic spectrum. A sprained ankle, pregnancy, carrying groceries, aging eyesight, or neurodivergence—all represent temporary or permanent shifts in how we interact with our surroundings. Drawing from established frameworks like the Seven Principles of Universal Design and cross-referenced with international building science standards, this guide synthesizes evidence-based practices into a cohesive roadmap. It’s not about designing for a hypothetical “average” person—a concept that excludes nearly everyone at some point—but for the beautiful, unpredictable diversity of human experience. Whether you’re a homeowner planning for the future, a designer seeking deeper impact, a caregiver supporting a loved one, or simply someone who believes good design should serve everyone, this resource meets you where you are with practical, dignified solutions.
The Inclusive Habitat Framework: Seven Principles in Action
Universal design isn’t a checklist of modifications; it’s a proactive philosophy embedded from the earliest planning stages. Developed by pioneers like Ronald Mace at NC State University, the original Seven Principles provide the foundation. Here, we reimagine them not as academic concepts but as living, breathing strategies for modern homes—interconnected layers that compound in value. Think of this framework as your design compass: refer to it when evaluating products, layouts, or renovations. When all seven principles harmonize, spaces don’t just accommodate—they empower.
Principle 1: Equitable Use – Design That Welcomes Without Stigma
Equitable use ensures methods of operation are identical for all users, avoiding segregation or “special” solutions that single people out. This principle combats the historical pitfall of accessibility features feeling clinical or institutional. Instead of a separate “accessible entrance” around the back of a house, universal design integrates a zero-step entry at the main door used by everyone. Instead of bright yellow grab bars that scream “medical device,” choose brushed nickel or matte black fixtures matching your bathroom’s aesthetic—functional for someone with arthritis, reassuring for a child learning to stand, and elegant for all.
Why this matters profoundly: When features benefit multiple user groups simultaneously, adoption increases, costs decrease through standardization, and dignity is preserved. A lever-style door handle isn’t just easier for arthritic hands; it’s simpler for a child, more efficient when your arms are full of groceries, and intuitive for visitors unfamiliar with your home. Contrast this with a round knob requiring fine motor skills and grip strength—a barrier for many yet rarely questioned in conventional design.
Implementation in practice: Select hardware, controls, and pathways usable by people with diverse abilities without disadvantaging any group. In a kitchen, this means placing frequently used drawers and shelves between 15 and 48 inches high—accessible from a seated position yet comfortable for standing adults. Avoid “accessible” versus “standard” versions of the same item; choose one inclusive solution.
Common pitfalls to avoid: Installing a ramp that feels like an afterthought (steep, narrow, visually disconnected from the home’s architecture). Using contrasting colors only for safety elements (like a bright red handrail) which can feel stigmatizing. Instead, integrate color contrast thoughtfully: a subtly darker threshold strip between rooms aids depth perception for those with low vision while adding visual interest for everyone.
Principle 2: Flexibility in Use – Adapting to Individual Preferences and Abilities
Life changes. Bodies change. Needs change. Flexible design anticipates this fluidity. It provides choice in methods of use, accommodates a wide range of preferences (right- or left-handed), and allows for adjustment over time. This principle moves beyond “one-size-fits-all” rigidity toward responsive environments.
Why this matters profoundly: Flexibility future-proofs your investment. A kitchen island with adjustable-height sections (via electric lift mechanisms or modular components) serves a seated chef today and a standing baker tomorrow. It accommodates children growing into adulthood, temporary injuries, or evolving family dynamics. In a bathroom, a handheld showerhead on a sliding bar allows use while standing, seated on a bench, or assisting someone else—without requiring a complete remodel later.
Implementation in practice: Prioritize adaptable elements during planning phases where changes are least disruptive. Install reinforced blocking inside bathroom walls before tiling to support future grab bars anywhere they might be needed. Choose closet systems with adjustable shelving and rods. In living areas, design furniture layouts with multiple circulation paths—avoiding a single narrow “channel” that becomes impassable if furniture shifts.
Common pitfalls to avoid: Assuming flexibility means complexity. A simple, well-placed shelf is often more flexible than a motorized system prone to failure. Avoid over-engineering; focus on key leverage points (like bathroom blocking or kitchen counter heights) where small investments yield decades of adaptability. Don’t confuse flexibility with clutter—every adjustable feature should have a clear, intuitive purpose.
Principle 3: Simple and Intuitive Use – Eliminating Unnecessary Complexity
Clarity is kindness. This principle demands that design communicates its function effortlessly, regardless of the user’s experience, knowledge, language skills, or current concentration level. In a world of smart-home apps and multi-button remotes, simplicity is revolutionary. A light switch should be obvious. A faucet handle should signal “hot” or “cold” through position or shape, not tiny engraved letters.
Why this matters profoundly: Cognitive load—the mental effort required to operate something—impacts safety and independence. For someone with dementia, a complex thermostat can contribute to temperature errors. For a tired parent at 2 a.m., intuitive controls prevent frustration. For a visitor, clear wayfinding reduces anxiety. Simple design also benefits neurodiverse individuals who may experience sensory overload from ambiguous interfaces.
Implementation in practice: Apply consistent logic throughout the home. Place all light switches on the latch side of doors (standard in many regions, but verify local practice). Use rocker switches instead of toggles—they’re easier to operate with a closed fist, elbow, or adaptive device. Label controls with universally recognized symbols (a sun for heat, a snowflake for cool) alongside text. In kitchens, group related functions: all cooking controls near the cooktop, all cleaning supplies under the sink.
Common pitfalls to avoid: Over-reliance on technology without physical backups. A voice-activated light is ineffective during a power outage or for someone uncomfortable with tech. Always provide a manual override. Avoid “hidden” features (like touch-latch cabinets that require precise pressure) that confuse users. Test designs with people outside your household—what seems obvious to you may not be to others.
Principle 4: Perceptible Information – Communicating Effectively Through Multiple Senses
Information must be communicated effectively to the user, regardless of ambient conditions or the individual’s sensory abilities. This means reinforcing critical cues through sight, sound, and touch. It’s not just about adding braille (though that has its place); it’s about layered communication that serves everyone.
Why this matters profoundly: Visual cues alone fail in low light, for those with color blindness, or during moments of distraction. Tactile feedback provides certainty. Auditory signals offer confirmation. In a stairwell, a contrasting nosing strip (visual) combined with a slightly textured edge (tactile) significantly reduces fall risk. A dishwasher that emits a distinct chime and has an illuminated cycle-complete light accommodates both hearing and sight variations.
Implementation in practice: Integrate multi-sensory cues strategically. Use color contrast deliberately: a noticeable difference in light reflectance value between wall and trim helps define spaces for low-vision users. Install lever handles with distinct shapes for hot (cross) and cold (straight) water. Choose flooring with subtle texture changes at room transitions to signal a change in space underfoot. For doorbells, pair a visual flasher (in living areas) with the audible chime.
Common pitfalls to avoid: Relying solely on color to convey meaning (e.g., red for stop, green for go)—this excludes color-blind users. Instead, combine color with shape or position. Avoid overly loud or startling auditory alerts that could distress sensitive individuals; opt for gentle, adjustable-volume signals. Don’t neglect acoustic design: hard surfaces create echo that hinders speech comprehension for hearing aid users; incorporate soft textiles, acoustic panels, or rugs to absorb sound.
Principle 5: Tolerance for Error – Minimizing Hazards and Unintended Actions
The most thoughtful designs forgive mistakes. This principle focuses on reducing risks and the adverse consequences of accidental or unintended actions. It’s about building safety nets into the environment itself, not just relying on user vigilance. Non-slip flooring supports safety for toddlers learning to walk, adults rushing on a rainy day, and visitors unfamiliar with the space.
Why this matters profoundly: Human error is inevitable. Fatigue, distraction, unfamiliarity, or momentary lapses happen to everyone. Tolerance for error shifts responsibility from the individual (“Be more careful!”) to the environment (“How can we make this safer?”). Rounded countertop corners can help reduce injury severity from bumps. Anti-scald valves in showers help prevent burns regardless of user age or attention. Motion-sensor lights in hallways significantly reduce risks associated with navigating in darkness.
Implementation in practice: Conduct a “hazard hunt” through the lens of common errors. In kitchens: install stove controls at the front (not rear) to prevent reaching over hot burners; consider induction cooktops that activate only with compatible cookware; choose appliances with automatic shutoff features. In bathrooms: specify slip-resistant tiles; ensure adequate clearance around toilets; use lever faucets that default to cooler temperatures.
Common pitfalls to avoid: Overlooking “small” hazards that compound risk. A loose throw rug is a tripping hazard for all. A poorly placed electrical outlet encourages dangerous cord stretching. Avoid sharp edges on furniture or cabinetry—even minor bumps can cause significant injury for those on certain medications. Remember: safety features should feel like thoughtful design, not institutional caution (e.g., elegant textured tiles versus industrial-grade non-slip mats).
Principle 6: Low Physical Effort – Efficient and Comfortable Operation
Design should permit efficient, comfortable use with minimal fatigue. This addresses the cumulative toll of small exertions: turning a stiff doorknob repeatedly, bending to reach a low shelf, struggling with a heavy cabinet door. Reducing physical strain preserves energy for meaningful activities and supports independence longer.
Why this matters profoundly: Physical effort isn’t just about strength; it’s about endurance, joint health, and pain management. For someone with rheumatoid arthritis, a smooth-gliding drawer is the difference between preparing a meal independently or needing help. For an aging adult conserving energy, lever handles reduce hand fatigue throughout the day. For a child, accessible storage fosters autonomy and responsibility.
Implementation in practice: Prioritize hardware and mechanisms requiring minimal force. Soft-close hinges on cabinets and drawers prevent slamming and reduce effort to open/close. Pocket doors eliminate swing space and resistance of traditional doors. In closets, install pull-down rods or lazy Susans for upper shelves. Choose lightweight materials for frequently moved items (like shower chairs). Ensure pathways are wide enough (minimum 36 inches, ideally 42+) to allow comfortable passage without brushing against walls or furniture.
Common pitfalls to avoid: Assuming “low effort” means “low quality.” High-performance hardware (like full-extension drawer slides with smooth action) often costs slightly more upfront but delivers decades of reliable, effortless use. Avoid solutions that trade one effort for another (e.g., a motorized lift that requires complex programming). Test hardware personally: open/close drawers, turn handles—does it feel smooth and intuitive?
Principle 7: Size and Space for Approach and Use – Accommodating Diverse Bodies and Mobility Aids
Adequate space must be provided for approach, reach, manipulation, and use regardless of the user’s body size, posture, or mobility device. This is the most visible principle—clear floor space, doorway widths—but its implications run deep. It’s not merely about fitting a wheelchair through a door; it’s about enabling graceful movement, social inclusion, and functional reach for everyone.
Why this matters profoundly: Insufficient space creates isolation. A narrow hallway forces someone using a walker to wait while others pass. A cramped bathroom prevents a caregiver from assisting safely. But generous space benefits all: it makes rooms feel more open and calm, allows furniture to be arranged flexibly, and accommodates life’s messy realities (like a temporary pile of moving boxes or holiday decorations). Clear floor space under sinks allows knee clearance for seated use while maintaining counter continuity for standing users.
Implementation in practice: Design circulation paths first. Hallways should be at least 42 inches wide. Doorways require a minimum 32-inch clear opening (meaning a 36-inch door), but 34–36 inches is ideal for comfort and future-proofing. In kitchens, maintain a 60-inch diameter turning space within the work triangle. Position toilets with 18 inches of clear space beside them (not just the code-minimum 15 inches) for easier transfers. Ensure countertops have varied heights: a standard 36-inch section, a lowered 32-inch zone, and potentially a raised 42-inch bar area.
Common pitfalls to avoid: Treating space requirements as mere code compliance. Building codes set legal minimums, not optimal standards. A 32-inch doorway technically fits a wheelchair but feels tight and stressful to navigate daily. Prioritize comfort and dignity over bare compliance. Avoid “dead zones”—unused corners that waste space; instead, use curved countertops or strategic furniture placement to maximize usable area.
The Fundamental Principle: Universal design succeeds not when it solves a single problem for one person, but when it creates layered value—where every thoughtful detail serves multiple users across countless moments, transforming obligation into opportunity and exclusion into belonging.
Room-by-Room Implementation: From Vision to Reality
Theory becomes transformative when applied to the spaces where life unfolds. This guide moves beyond abstract ideals to concrete, actionable strategies for every critical area of the home. For each room, we address core functions, integrate the seven principles, offer tiered solutions (ideal, budget-conscious, quick-fix), and spotlight often-overlooked nuances. Remember: perfection isn’t the goal; progress is. Implement one change today that makes your home more welcoming tomorrow.
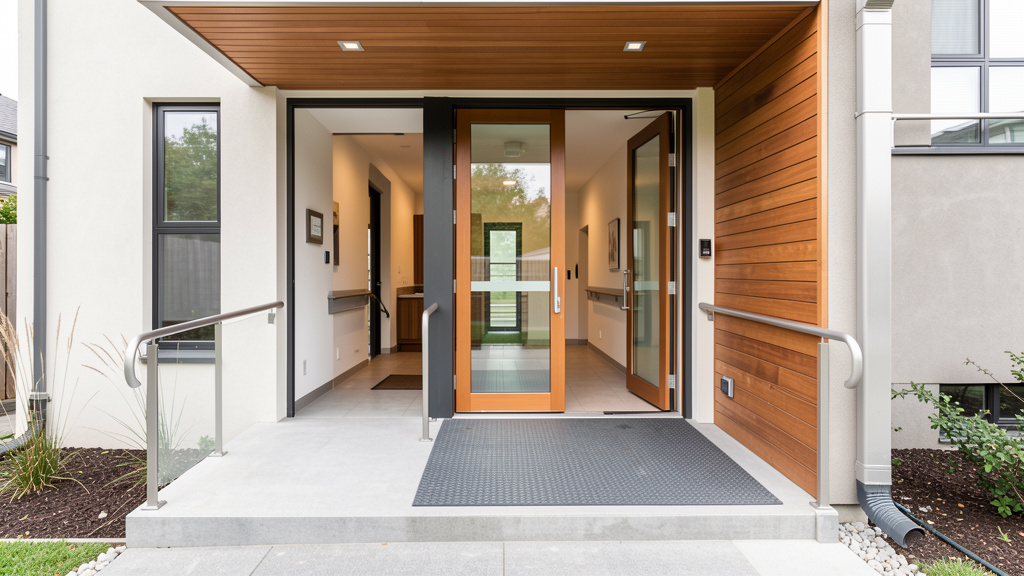
The Entryway & Exterior: First Impressions of Inclusion
The journey home begins long before the front door. The entry sequence sets the emotional and physical tone for the entire dwelling. A welcoming approach signals, “You belong here.”
Exterior Pathways & Approach
Why it matters: Uneven surfaces, steps without handrails, or poor lighting create immediate barriers and safety hazards. For someone with low vision, a subtle change in elevation is a fall risk. For a parent with a stroller, steps are an obstacle. For delivery personnel carrying packages, a smooth path is efficient.
Ideal Implementation: Create a zero-step entrance with a gently sloped path (maximum 1:12 slope ratio—1 inch rise per 12 inches of run). Use non-slip paving materials like textured concrete, brick with tight joints, or composite decking. Install continuous handrails on both sides of any ramp or steps (diameter 1.25–1.5 inches, with 1.5 inches of clearance from the wall). Integrate subtle lighting: low-voltage path lights embedded flush with the surface, motion-sensor lights at the door, and ambient lighting on the porch ceiling. Ensure the path width is at least 42 inches to allow two people to walk comfortably side-by-side.
Budget-Conscious Path: If a full ramp isn’t feasible, focus on the immediate landing area. Install a sturdy, well-anchored handrail on at least one side of existing steps. Apply non-slip tape or grit strips to stair treads. Replace a single worn step. Add solar-powered path lights to improve visibility at night.
Quick Fix Today: Clear all debris, hoses, or obstacles from the main approach path. Place a high-contrast, non-slip mat at the door threshold. Test your doorbell—add a visual flasher if needed. Ensure house numbers are large, high-contrast, and well-lit for emergency responders.
Critical Nuance: Pay attention to transitions between materials. A sudden change from concrete to gravel can be disorienting for cane users. Use consistent materials or clearly defined edges. Consider the “psychological threshold”—a slightly recessed porch area with overhead cover creates a welcoming pause point before entering, beneficial for those who need a moment to adjust. In regions with seasonal weather, select materials that remain slip-resistant when wet or frozen and allow for practical snow removal.
The Front Door & Threshold
Why it matters: The threshold is a notorious trip hazard and barrier. Traditional raised thresholds (often ¾ inch or higher) stop wheelchairs, walkers, and strollers abruptly. Heavy doors require significant strength to open.
Ideal Implementation: Specify a door with a flush or nearly flush threshold (maximum ½ inch beveled edge). Choose an out-swinging door if space permits (creates more interior clearance), but verify local fire codes. Install an automatic door opener triggered by motion, remote, or button—increasingly affordable and discreet. Use a lever handle at a comfortable height (34–48 inches) with a thumb-turn deadbolt (easier than a keyhole for many). Ensure the door handle color contrasts with the door for visibility.
Budget-Conscious Path: Replace a high threshold with a low-profile, beveled transition strip. Add a door closer to prevent slamming and reduce the force needed to open/close. Install a secondary lever handle lower on the door for children or seated users.
Quick Fix Today: Apply non-slip tape to the threshold edge. Ensure the doorbell button is within easy reach (48 inches max height) and has a contrasting color. Keep the immediate interior area clear of shoes, mats, or furniture that block the swing path.
Critical Nuance: Door hardware finish matters beyond aesthetics. Avoid highly polished brass or chrome that creates glare; matte black, brushed nickel, or satin finishes reduce visual confusion for low-vision users. Test the door’s opening force—ideally under 5 pounds of pressure. If it’s stiff, lubricate hinges or adjust the closer.
Living & Dining Areas: Spaces for Connection and Comfort
These rooms thrive on flexibility and sensory comfort. They should facilitate conversation, relaxation, and shared activities without physical or cognitive strain.
Flooring & Circulation
Why it matters: Slippery floors cause falls. Deep-pile rugs trap wheels and trip feet. Narrow pathways isolate users. Good flooring supports movement while defining zones.
Ideal Implementation: Install continuous, firm, slip-resistant flooring throughout main living areas (e.g., luxury vinyl plank with textured finish, sealed concrete with non-slip additive, low-pile commercial-grade carpet with tight weave). Avoid transitions between different flooring types in high-traffic paths; if unavoidable, use flush, beveled transition strips. Maintain clear pathways of at least 36 inches between furniture groupings. Arrange seating to allow multiple approach angles to sofas and chairs.
Budget-Conscious Path: Secure all area rugs with double-sided tape or non-slip pads. Replace high-pile rugs in traffic lanes with low-pile alternatives. Rearrange furniture to widen key pathways—temporarily remove a side table if needed.
Quick Fix Today: Conduct a “trip audit”: run your hand along the floor edges where rugs meet hard surfaces—feel for lifts or wrinkles. Ensure electrical cords are routed along walls, not across walkways. Place a contrasting-color runner in a long hallway to define the path.
Critical Nuance: Acoustic comfort is part of universal design. Hard floors reflect sound, making conversation difficult for those with hearing differences. Layer in area rugs, heavy curtains, upholstered furniture, and wall art to absorb sound. Position seating in a circular arrangement to facilitate lip-reading and non-verbal cues during conversation.
Lighting Strategy
Why it matters: Glare causes disorientation. Shadows hide obstacles. Inconsistent lighting strains eyes. Layered lighting supports diverse visual needs and activities.
Ideal Implementation: Combine three layers: ambient (ceiling fixtures or cove lighting for overall illumination), task (adjustable floor lamps near seating, under-cabinet lights in dining areas), and accent (wall sconces, picture lights). Use dimmers on all circuits. Choose warm-white LEDs (2700K–3000K) with high CRI (90+) for accurate color rendering. Install motion-sensor nightlights along pathways to bathrooms or kitchens. Place switches at consistent heights (42–48 inches) with rocker-style plates and subtle backlighting for nighttime location.
Budget-Conscious Path: Replace cool-white bulbs with warm-white LEDs. Add plug-in dimmer switches to existing lamps. Install adhesive-backed LED strip lights under shelves or cabinets for task lighting. Use smart plugs with timers for automatic pathway lighting at night.
Quick Fix Today: Clean light fixtures and bulbs—dust reduces output significantly. Replace burnt-out bulbs immediately. Add a floor lamp behind your main seating area to reduce screen glare when watching TV.
Critical Nuance: Avoid placing bright light sources directly in line of sight (e.g., unshielded bulbs in table lamps). Use lampshades that diffuse light downward. For art lighting, ensure fixtures don’t create harsh shadows on walls that could be misinterpreted as holes or obstacles by low-vision users.
Furniture Selection & Arrangement
Why it matters: Furniture that’s too low, too deep, or without arms makes sitting and standing difficult. Poor arrangement blocks movement.
Ideal Implementation: Choose seating with firm cushions, seat heights between 18–20 inches (allowing feet to rest flat when seated), and sturdy armrests that extend to the front edge of the seat (providing leverage to stand). Sofas and chairs should have contrasting colors from walls and floors for visibility. Leave clear space under tables (minimum 27 inches high, 30 inches deep) for knee clearance if someone prefers to sit at a table while using a mobility device.
Budget-Conscious Path: Add firm cushions or seat risers to existing low chairs. Install discreet grab bars inside furniture frames (requires carpentry) or use portable transfer handles. Place a contrasting throw pillow on light-colored sofas for visual cueing.
Quick Fix Today: Test your favorite chair: can you stand up without using your hands? If not, it’s too low or too deep. Rearrange one piece of furniture to widen a narrow pathway. Place a small side table within easy reach of every seating position for drinks or remotes.
Critical Nuance: Consider the “social footprint” of furniture. A large sectional might dominate a room, leaving little space for movement. Modular furniture allows reconfiguration as needs change. Ensure coffee tables have rounded corners and are positioned so they don’t obstruct primary paths.
The Kitchen: Heart of the Home, Engine of Independence
Kitchens demand precision in universal design. They involve heat, water, sharp objects, and complex workflows. Thoughtful design here directly impacts nutrition, safety, and daily autonomy.
Work Triangle & Circulation
Why it matters: The classic “work triangle” (sink-refrigerator-stove) must accommodate users of varying heights and mobility. Narrow aisles become dangerous bottlenecks.
Ideal Implementation: Design a minimum 42-inch clearance between countertops and islands or opposing cabinets. For homes anticipating wheelchair use, expand to 60 inches in key work zones. Create multiple work zones: a primary triangle for standing users, and a secondary prep area with lowered counter (32–34 inches) and accessible sink near the main workspace. Ensure the refrigerator door swings away from high-traffic paths. Position the cooktop away from main walkways to prevent accidental bumps.
Budget-Conscious Path: During a remodel, prioritize widening one critical aisle (e.g., between sink and stove). Remove a cabinet door under the sink to create knee space (add insulation to pipes first!). Install pull-out shelves in deep base cabinets to bring contents forward.
Quick Fix Today: Clear countertops of unnecessary items to maximize usable space. Store frequently used items in easy-reach zones (between 15–48 inches high). Place a non-slip mat in front of the sink and stove.
Critical Nuance: The “landing space” principle is crucial. Provide at least 15 inches of clear counter space on both sides of the cooktop and sink for setting down hot pans or wet dishes. This reduces reaching and handling risks for all users.
Countertops & Storage
Why it matters: Standard 36-inch counters exclude seated users and children. Deep cabinets hide essentials. Heavy pots stored overhead become hazards.
Ideal Implementation: Install varied-height countertops: standard 36-inch for most tasks, a lowered 32-inch section with knee space for seated prep, and a raised 42-inch bar area for casual dining or standing tasks requiring less bending. Use continuous countertops without seams where possible (easier to clean, no tripping edges). For storage: full-extension drawers with soft-close slides in base cabinets; pull-down shelves or lazy Susans in upper cabinets; appliance garages with flip-up doors to hide clutter while keeping items accessible.
Budget-Conscious Path: Add a portable, height-adjustable prep table (like a sturdy kitchen cart with locking casters) that can be positioned as needed. Install under-cabinet task lighting with motion sensors. Replace deep upper cabinets with open shelving at accessible heights for frequently used items.
Quick Fix Today: Relocate heavy items (cast iron pans, large appliances) to lower cabinets. Use clear, labeled bins inside cabinets to organize contents and make items visible. Install adhesive hooks inside cabinet doors for hanging measuring cups or oven mitts.
Critical Nuance: Edge profile matters. Avoid sharp 90-degree edges on countertops; specify eased, bullnose, or radius edges to minimize injury from bumps. For lowered sections, ensure adequate toe kick depth (minimum 9 inches) for comfortable knee clearance.
Appliances & Fixtures
Why it matters: Complex controls frustrate users. Heavy oven doors strain shoulders. Slippery faucet handles cause drops.
Ideal Implementation: Choose appliances with front-mounted controls (wall ovens, cooktops with knobs at front edge). Select side-by-side or French-door refrigerators with water/ice dispensers at accessible heights. Install induction cooktops (cools rapidly, activates only with cookware present). Use single-handle, lever-style faucets with temperature limiters. Specify dishwashers with controls on the top edge of the door (visible when open) rather than hidden inside.
Budget-Conscious Path: Add adhesive knob extenders to existing stove controls for easier gripping. Install a faucet extender hose for the kitchen sink. Use a magnetic knife strip mounted at an accessible height instead of a high block.
Quick Fix Today: Test your faucet: can it be turned on with a closed fist or elbow? If not, consider a temporary touchless adapter. Organize the “golden triangle” of your most-used items within the easy-reach zone. Place a fire extinguisher in an accessible, visible location (not under the sink).
Critical Nuance: Safety features should be seamless. Anti-scald valves are essential. For ovens, look for models with cool-touch doors and automatic shutoff. Consider a range hood with effective ventilation and quiet operation—reduces respiratory irritants while preserving conversation.
The Bathroom: Sanctuary of Safety and Dignity
Bathrooms present significant considerations for safety and accessibility. Yet they are also deeply personal spaces where dignity is paramount. Universal design here supports independence and well-being.
Layout & Clearances
Why it matters: Tight spaces prevent safe transfers, caregiver assistance, or independent use of mobility aids. Poor layout forces awkward maneuvers.
Ideal Implementation: Design a minimum 60-inch diameter clear floor space inside the bathroom door for turning. Position the toilet with 18 inches of clear space on at least one side (preferably both). Place the sink away from the door swing path. If space allows, create a wet room design (level-entry shower with linear drain) eliminating thresholds entirely. Ensure the shower area has a minimum 36×36-inch clear space, ideally 42×60 inches for seated use.
Budget-Conscious Path: During a remodel, prioritize widening the doorway first. Remove a vanity cabinet under the sink to create knee space (insulate pipes!). Swap a tub for a curbless shower base. Install blocking in walls before finishing for future grab bars.
Quick Fix Today: Remove bath mats inside the tub/shower—use non-slip strips applied directly to the surface instead. Keep the floor clear of bottles, scales, or laundry baskets. Install a hook on the back of the door for hanging towels or robes within reach.
Critical Nuance: Door swing direction is critical. Bathroom doors should swing outward if possible (prevents blocking someone who has fallen inside). If inward-swinging is unavoidable due to space, ensure the clear floor space allows the door to open fully without obstruction.
Fixtures & Hardware
Why it matters: Slippery surfaces, hard edges, and inaccessible controls turn routine hygiene into a hazard.
Ideal Implementation: Install a wall-hung toilet (easier to clean around, height adjustable during install). Choose a comfort-height toilet (17–19 inches seat height). Specify a sink with an integrated backsplash and no sharp corners. Use lever-handle faucets with temperature limiters. In the shower: install a handheld showerhead on a vertical slide bar (allows height adjustment), a built-in or fold-down seat, and multiple grab bars (positioned based on user needs, not just code minimums). All grab bars must be securely anchored into wall studs or reinforced blocking—never just into drywall.
Budget-Conscious Path: Add a suction-cup or clamp-on shower seat temporarily. Install grab bars now in strategic locations (beside toilet, in shower) using proper anchors. Replace a standard showerhead with a handheld model on a flexible hose.
Quick Fix Today: Apply non-slip adhesive strips to the shower/tub floor. Test water temperature at the tap—adjust the anti-scald valve if water gets too hot too quickly. Ensure toilet paper holder is within easy reach from a seated position (not behind the toilet).
Critical Nuance: Grab bar placement is highly individual. The standard “L-shaped” bar beside the toilet may not suit everyone. Consult an occupational therapist for personalized recommendations. When installing, choose bars with a textured grip surface and a diameter of 1.25–1.5 inches—thinner bars are hard to grip for arthritic hands, thicker bars are difficult to hold securely. Color contrast between bars and walls is essential for visibility.
Lighting & Ventilation
Why it matters: Steam fogs mirrors. Shadows hide wet spots. Poor ventilation encourages mold, triggering allergies and respiratory issues.
Ideal Implementation: Layer lighting: recessed ambient lights (dimmable), vertical sconces flanking the mirror (eliminates facial shadows), and task lighting inside the shower. Use fog-free or heated mirrors. Install a high-CFM exhaust fan on a timer or humidity sensor to run automatically after showers. Ensure all switches are outside the shower enclosure and within easy reach of the entrance.
Budget-Conscious Path: Add LED strip lights under the vanity cabinet for shadow-free task lighting. Replace the exhaust fan with a quieter, higher-CFM model. Install a battery-operated motion-sensor light inside the shower niche.
Quick Fix Today: Clean the exhaust fan cover—dust buildup reduces efficiency. Place a small dehumidifier in the bathroom if ventilation is poor. Keep a squeegee inside the shower to quickly remove water from walls and reduce slip risk.
Critical Nuance: Mirror placement should allow viewing from both standing and seated positions. A full-length mirror on a closet door or wall serves multiple purposes. For vanity lighting, avoid placing lights above the mirror (casts shadows under eyes); vertical placement at eye level is optimal.
Bedrooms & Closets: Rest, Renewal, and Autonomy
Bedrooms should promote restful sleep and support morning/evening routines with minimal strain. Closets are often overlooked accessibility considerations.
Bed Placement & Clearances
Why it matters: Narrow paths around the bed hinder movement. Poor lighting increases fall risk during nighttime trips. Inaccessible outlets frustrate device charging.
Ideal Implementation: Position the bed to allow approach from both sides with minimum 36-inch clearance. Ensure clear floor space on at least one side matches the bed’s length for potential future equipment needs. Install wall-mounted reading lights with adjustable arms and dimmers on both sides. Place electrical outlets (with USB ports) within easy reach of the bed on both sides, positioned higher than standard (18–24 inches from floor) to avoid bending. Use under-bed lighting with motion sensors for safe nighttime navigation.
Budget-Conscious Path: Add plug-in bed rails with integrated lights for temporary support. Install adhesive-backed LED strip lights under the bed frame. Use a bedside caddy to keep essentials (water, glasses, phone) within reach.
Quick Fix Today: Clear a 3-foot path from the bed to the door and bathroom. Test your bedside lamp switch—can it be reached without sitting up fully? Place a non-slip rug beside the bed.
Critical Nuance: Bed height is critical. The top of the mattress should align with the user’s knee cap when standing beside it (typically 20–25 inches total height). Too low makes standing difficult; too high increases fall risk. Consider an adjustable base for customizable positioning.
Closet Design
Why it matters: Deep shelves hide items. High rods require stretching. Heavy sliding doors are hard to operate.
Ideal Implementation: Design reach-in closets with rods no higher than 48 inches. Use double-hang rods (one at 40 inches, one at 60 inches) to maximize accessible space. Install pull-down rods for upper sections. Choose full-height doors with lever handles. For walk-in closets: include seating within the closet, varied-height hanging rods, and open shelving at accessible heights. Use motion-sensor lighting inside the closet.
Budget-Conscious Path: Install a closet organizer system with adjustable components. Add a second rod below the existing one. Replace closet doors with curtains on a smooth-gliding track (eliminates door swing space and operation effort).
Quick Fix Today: Relocate frequently worn items to the middle rod or shelf. Use clear bins with labels for seasonal storage on high shelves. Install adhesive hooks on the closet door for belts, scarves, or robes.
Critical Nuance: Lighting inside closets is essential. Dark corners lead to missed items and frustration. LED puck lights with motion sensors are inexpensive and transformative. Ensure the closet floor is clear of shoes or hampers that block access.
Hallways, Stairs, and Vertical Circulation: The Connective Tissue of Home
These transitional spaces are where safety and flow are most tested. Thoughtful design here prevents accidents and reduces daily fatigue.
Hallways & Corridors
Why it matters: Narrow halls feel claustrophobic and block movement. Poor lighting creates disorientation.
Ideal Implementation: Maintain a minimum width of 42 inches throughout. Install continuous handrails on both sides at a consistent height (34–38 inches). Use consistent, slip-resistant flooring without thresholds. Place wall sconces or recessed lights every 8–10 feet for even illumination. Add subtle visual cues at hallway ends (a piece of art, a contrasting wall color) to aid navigation for low-vision users.
Budget-Conscious Path: Remove protruding objects (wall-mounted phones, shelves) that narrow the path. Add non-slip treads to existing handrails for better grip. Install plug-in motion-sensor nightlights at hallway intervals.
Quick Fix Today: Conduct a “width check”: can two people pass comfortably? Remove any furniture or decor blocking the path. Ensure light switches are at both ends of long hallways.
Critical Nuance: Acoustic treatment matters in long hallways. Hard surfaces create echo that distorts sound. Add a runner rug, fabric wall panels, or artwork to absorb sound and improve speech clarity.
Stair Safety
Why it matters: Stairs are high-risk zones. Inconsistent risers, poor lighting, or missing handrails contribute to falls.
Ideal Implementation: Design stairs with consistent riser heights (maximum 7.75 inches) and tread depths (minimum 10 inches). Install continuous handrails on both sides, extending 12 inches beyond the top and bottom steps. Use high-contrast nosing strips on each tread edge. Ensure lighting is shadow-free—combine overhead lights with step lights or wall sconces. Avoid open risers (toe catch hazard).
Budget-Conscious Path: Add non-slip adhesive strips to existing stair nosings. Install a second handrail if only one exists. Replace burnt-out bulbs in stairwell fixtures immediately. Add glow-in-the-dark tape to the edge of each step as a temporary visual cue.
Quick Fix Today: Test handrail stability—shake firmly; it should not wobble. Clear all clutter from stairs immediately. Ensure the light switch is accessible at both the top and bottom of the stairs.
Critical Nuance: The psychological aspect of stairs is real. For someone with balance concerns, a well-designed stair with secure handrails and clear visual cues reduces anxiety. Avoid patterned carpet on stairs—it can distort depth perception. Solid colors with contrasting nosing are safest.
Future-Proofing for Vertical Movement
Why it matters: Planning ahead preserves options for changing mobility needs.
Ideal Implementation: During new construction or major renovation, frame a “mechanical closet” (minimum 5×5 feet) adjacent to the stairwell on each floor, with structural support for potential future equipment. Run conduit for future electrical needs. Design stairwells with wider landings (minimum 48×48 inches) to accommodate potential platform lifts.
Budget-Conscious Path: If space is limited, identify the most critical vertical transition (e.g., between main living floor and bedroom floor) and prioritize planning there. Consult an accessibility specialist for a feasibility assessment—even if installation is years away.
Quick Fix Today: Document your home’s layout with measurements. Note potential locations for future modifications. Research local incentive programs for accessibility improvements.
Critical Nuance: Platform lifts have specific space and structural requirements. They are not simple “bolt-on” solutions. Early consultation with an accessibility specialist prevents costly mistakes later. Remember: personal mobility devices like stairlifts serve individual users but do not make the home accessible for all visitors.
Outdoor Living Spaces: Extending Inclusion Beyond Four Walls
A truly universal home embraces the outdoors. Gardens, patios, and decks should be places of joy, connection, and sensory engagement.
Patios, Decks & Pathways
Why it matters: Uneven pavers, steep steps, and slippery surfaces isolate users from nature and social connection.
Ideal Implementation: Create level, firm, slip-resistant surfaces (stamped concrete, composite decking, tightly set pavers). Ensure pathways are minimum 42 inches wide with gentle slopes (1:20 ratio preferred for comfort). Install continuous handrails on ramps and steps. Provide shaded seating areas with armrests for easy standing. Position seating to face gathering areas (fire pit, grill) for inclusion in conversation.
Budget-Conscious Path: Fill cracks in concrete pathways with leveling compound. Add non-slip tape to deck steps. Install portable ramps over small level changes. Use container gardens on casters to bring nature to seated users.
Quick Fix Today: Remove tripping hazards (hoses, garden tools, loose stones) from main paths. Test deck railing stability. Place a small side table within reach of every seating position for drinks or gardening tools.
Critical Nuance: Sensory gardens benefit everyone. Incorporate plants with varied textures (lambs ear, ornamental grasses), fragrances (lavender, rosemary), and colors. Wind chimes or a small water feature add auditory interest. Raised garden beds (24–30 inches high) with knee space underneath allow gardening from a seated position. In climates with seasonal variations, select materials and layouts that accommodate weather changes while maintaining year-round usability.
Lighting & Safety
Why it matters: Darkness hides obstacles. Glare from poorly placed lights creates blind spots.
Ideal Implementation: Use low-voltage path lighting embedded flush with the surface. Install motion-sensor lights at all exterior doors and pathway entrances. Choose warm-white (2700K) fixtures with frosted lenses to minimize glare. Place subtle step lights on deck stairs. Ensure lighting illuminates the path ahead, not just the immediate area underfoot.
Budget-Conscious Path: Add solar-powered stake lights along garden paths. Install battery-operated LED puck lights under deck railings. Use smart plugs to automate existing outdoor lights.
Quick Fix Today: Clean existing outdoor light fixtures. Replace cool-white bulbs with warm-white LEDs. Test all exterior lights at dusk—replace any that are dim or flickering.
Critical Nuance: Lighting should enhance, not dominate, the nighttime environment. Avoid uplighting trees directly into seating areas (creates harsh shadows). Position fixtures to graze walls or highlight pathways softly. Consider the impact on neighbors and wildlife—shield fixtures downward.
Navigating Common Frictions: Cost, Aesthetics, and Conversations
Universal design faces real-world considerations. Addressing these thoughtfully builds confidence and accelerates adoption. This section tackles frequent concerns with evidence-based perspective and practical strategies.
“Universal Design Is Too Expensive”
This perception often stems from viewing accessibility as costly retrofits rather than integrated design. Research from the National Association of Home Builders indicates that incorporating universal design features during initial construction typically adds a minimal percentage to total project costs, substantially less than expenses associated with retrofitting later. Installing reinforced blocking in bathroom walls costs pennies per square foot during framing but becomes significantly more expensive after drywall is installed. Choosing lever handles over knobs adds minimal cost upfront but avoids future replacement expenses.
Reframe the investment: Universal design is preventative maintenance for your home and independence. Consider the broader context: medical expenses from falls, emotional toll of lost autonomy, costs of premature relocation, or emergency renovations after an injury. A zero-step entry isn’t just for wheelchair users; it protects delivery personnel, prevents stroller accidents, and eliminates a tripping hazard for everyone.
Phased implementation strategy: You don’t need to do everything at once. Prioritize high-impact, low-cost changes first:
– Phase 1 (Under $200): Replace door knobs with levers, install non-slip strips in showers, add under-cabinet lighting, clear circulation paths.
– Phase 2 ($200–$2,000): Install grab bars with proper blocking, add motion-sensor lights, upgrade to comfort-height toilets, install pull-out shelves.
– Phase 3 ($2,000+): Widen doorways during remodels, create curbless showers, install adjustable-height countertops, add exterior ramps.
Funding resources: Explore options beyond personal savings. In the U.S., the IRS may allow medical expense deductions for accessibility modifications prescribed by a healthcare provider (consult a tax professional). Many states offer property tax exemptions for accessibility improvements. Nonprofits like Rebuilding Together provide volunteer labor for eligible homeowners. Veterans may qualify for VA grants (SAH, SHA). Always get multiple quotes and verify contractor licenses and insurance.
“It Will Look Institutional or Ugly”
Contemporary universal design celebrates aesthetics. The key is selecting features that serve multiple purposes and align with your style. A grab bar in a rich oil-rubbed bronze finish complements farmhouse decor. A sleek, wall-mounted toilet enhances modern minimalism. Textured tiles in earthy tones add visual interest while providing slip resistance. Designers increasingly showcase universal principles in high-end publications—proving inclusivity and beauty are inseparable.
Integrate, don’t isolate: Instead of adding a bright yellow handrail to a staircase, choose a handrail crafted from the same wood as your banister, with a subtly textured grip surface. Rather than a clinical white shower seat, select a teak folding bench that doubles as a shelf for plants. Use color contrast purposefully: a deep navy vanity against a light gray wall defines the space elegantly while aiding low-vision users.
Seek inspiration: Follow designers specializing in inclusive design on social media (search #UniversalDesign, #InclusiveDesign). Visit showrooms of major hardware manufacturers (Kohler, Moen, Delta) to see stylish lever handles, grab bars, and faucets. Remember: good design is good design. Features that enhance usability for some often elevate the experience for all—like the satisfying click of a soft-close drawer or the intuitive flow of a well-planned kitchen.
“How Do I Talk to My Contractor or Designer?”
Clear communication bridges the gap between vision and execution. Many contractors possess the skills to implement universal design with thoughtful guidance. Approach the conversation collaboratively.
Before the meeting:
– Gather inspiration images showing features you like. Note what appeals to you: “I love how this grab bar matches the faucet finish,” or “This shower has a clean look with the seat folded up.”
– Prioritize your needs using the “Must-Have, Nice-to-Have, Future-Proof” framework. Be specific: “Must-Have: Zero-step entry at front door. Nice-to-Have: Adjustable-height kitchen counter. Future-Proof: Blocking in all bathroom walls for grab bars.”
– Research local building codes regarding accessibility (though aim beyond minimums).
During the conversation:
– Frame requests around shared goals: “I want this home to be welcoming for my aging parents and our young nieces and nephews,” or “I’m designing for long-term enjoyment and resale value.”
– Ask open-ended questions: “What’s the most cost-effective way to reinforce these bathroom walls for future grab bars?” or “How can we integrate handrails into the staircase design so they feel like part of the architecture?”
– Request samples: “Can we see lever handle options in different finishes?” or “Can you show me slip-resistant tile samples that aren’t institutional-looking?”
Red flags to watch for:
– Dismissiveness (“You don’t need that yet”)
– Insistence on bare code minimums without discussing options
– Unwillingness to provide references for similar projects
Green flags:
– Asking about your specific needs and lifestyle
– Suggesting alternatives you hadn’t considered
– Providing detailed drawings showing clearances and specifications
– Willingness to consult with an occupational therapist if needed
When reviewing examples from NAHB’s universal design award winners, a consistent pattern emerges: the most successful projects address aesthetics and function in tandem from the earliest sketch phase, resulting in spaces that feel intentionally beautiful, not adaptively modified.
Your Questions, Answered
Q: Is universal design the same as ADA compliance?
A: No. The Americans with Disabilities Act (ADA) sets legal minimum standards for public accommodations and commercial facilities. Universal design is a broader philosophy for all environments—especially private homes—focusing on proactive, inclusive solutions that benefit everyone. ADA guidelines can inform residential choices (e.g., doorway widths), but homes aren’t legally required to meet ADA standards. Universal design often exceeds ADA minimums for comfort and dignity (e.g., recommending 36-inch doorways vs. ADA’s 32-inch minimum).
Q: I’m young and able-bodied. Why should I care about universal design now?
A: Universal design is about designing for your future self and the people you love. Life is unpredictable—a sports injury, pregnancy, caring for an aging parent, or simply growing older. Implementing features during new construction or renovation is exponentially more practical than retrofitting later. Moreover, many universal design elements enhance daily life today: lever handles are easier with arms full of groceries, good lighting reduces eye strain, and intuitive layouts save time and frustration. It’s smart, forward-thinking design.
Q: Do I need to hire a specialist (like a CAPS-certified professional)?
A: For complex renovations (full bathroom remodels, structural changes), consulting a Certified Aging-in-Place Specialist (CAPS) or designer with universal design expertise is highly recommended. They navigate technical details, product selection, and contractor coordination. However, many impactful changes require no specialist: swapping hardware, improving lighting, decluttering pathways. Start with small, confident steps. Resources like the NAHB’s CAPS directory or the American Society of Interior Designers (ASID) can help find qualified professionals when needed.
Q: Will universal design features lower my home’s resale value?
A: Research and market trends indicate the opposite. With demographic shifts toward an aging population and growing multigenerational households, homes with thoughtful accessibility features have broader market appeal. Features like zero-step entries, lever handles, and open floor plans are increasingly sought after by diverse buyers. Frame these features as “smart, modern design” rather than “accessibility modifications” in listings—they represent foresight and quality craftsmanship.
Q: What’s the single most impactful change I can make today?
A: Improve lighting. Poor lighting affects safety, mood, and function for everyone. Start with the path from your bedroom to the bathroom: install motion-sensor nightlights, ensure switches are reachable from bed, and use warm, shadow-free fixtures. This simple upgrade reduces fall risk, supports circadian rhythms, and benefits children, guests, and your future self. It’s affordable, non-invasive, and delivers immediate value.
Q: How do I balance universal design with my personal style?
A: Universal design is a framework, not an aesthetic mandate. The principles guide how you implement features, not what they look like. Choose lever handles in finishes that match your decor (matte black for modern, antique brass for traditional). Select grab bars that double as towel bars or toilet paper holders. Use area rugs with non-slip pads that complement your color scheme. Work with designers who see constraints as creative opportunities—they’ll find solutions that honor your vision while embedding inclusivity.
Q: Are there universal design considerations for neurodiversity or sensory processing differences?
A: Absolutely. Universal design extends beyond physical mobility to cognitive and sensory needs. Strategies include: creating quiet retreat spaces with sound-absorbing materials; using consistent, predictable layouts to reduce anxiety; minimizing visual clutter; providing options for lighting intensity (dimmers, multiple light sources); choosing flooring with subtle patterns to avoid visual overstimulation; and incorporating natural elements (plants, water features) for calming effect. Resources from organizations like the Autism Housing Network offer deeper guidance.
Q: What if I rent and can’t make permanent changes?
A: Many impactful adaptations are renter-friendly:
– Hardware: Use adhesive-backed lever handle covers over existing knobs (check with landlord first; often removable).
– Lighting: Add plug-in dimmer switches, smart bulbs, or battery-operated motion-sensor lights.
– Safety: Apply removable non-slip strips in showers, use non-slip rug pads, install portable grab bars with suction cups (test stability daily).
– Organization: Use over-the-door organizers, under-bed storage bins, and clear labeled containers to reduce clutter and improve wayfinding.
Always discuss modifications with your landlord—many appreciate proactive safety measures. Document the space before moving in and agree on restoration terms.
Q: How do cultural differences influence universal design?
A: Universal design principles are globally applicable, but implementation must respect cultural context. In cultures where floor seating is common (e.g., parts of Asia, Middle East), lowered countertops, accessible storage at floor level, and seamless transitions between rooms become priorities. In multigenerational households common worldwide, private accessible suites with independent entries may be valued. Successful universal design listens deeply to the specific users’ lifestyles, rituals, and values—it’s not a one-size-fits-all template but a responsive process.
Q: Where can I see universal design in action before committing?
A: Seek out model homes! Many builders participate in NAHB’s “Seniors Housing” or “Green Building” programs featuring universal design elements. Visit local home shows and ask specifically about accessibility features. Tour homes modified through programs like Habitat for Humanity’s accessible builds. Some occupational therapy schools maintain demonstration kitchens or bathrooms open to the public. Online, virtual tours from organizations like the Center for Universal Design provide detailed walkthroughs.
Conclusion and Next Step
Universal design is more than a set of techniques—it’s a mindset shift from designing for an imagined “average” to designing for the rich tapestry of human experience. It recognizes that inclusion isn’t a niche concern but a fundamental aspect of good design. The strategies outlined here—from the foundational seven principles to room-specific implementations—empower you to create spaces where dignity, safety, and joy coexist. You’ve learned that equitable use prevents stigma, flexibility future-proofs your investment, simplicity reduces cognitive load, perceptible information serves all senses, tolerance for error builds compassion, low physical effort preserves energy, and generous space fosters connection. These principles compound: a lever handle aids arthritic hands, a child, and someone carrying groceries. A well-lit path prevents falls for elders, guides visitors at night, and creates ambiance. Every thoughtful detail ripples outward, strengthening the fabric of home for everyone who enters.
Recap: The Three Pillars of Action
- Start Small, Think Big: You don’t need a full remodel to begin. Swap one door knob for a lever handle. Add a motion-sensor light in a hallway. Clear a pathway. These micro-actions build momentum and prove that inclusion is achievable.
- Design for the Spectrum: Move beyond “disabled vs. able-bodied” thinking. Consider temporary states (injury, pregnancy), situational needs (carrying packages), and lifelong variations (aging, neurodiversity). When design serves the edges, it elevates the center.
- Collaborate with Compassion: Engage family members, contractors, and designers in open dialogue. Share this guide. Ask, “How might this space feel for someone with different needs?” Center the human experience in every decision.
The 24-Hour Rule
Within the next day, complete one tangible action that moves your home toward greater inclusion. Choose one:
– If you own your home: Measure the width of your main entry doorway. If it’s under 32 inches clear opening, research lever-handle replacements or threshold modifications.
– If you rent: Place a non-slip mat in your shower or bathtub. Test all light switches on your path to the bathroom at night—add a plug-in nightlight if needed.
– For everyone: Walk through your home slowly, imagining navigating it with a temporary limitation (carrying a heavy box, using a walker, low vision). Note one obstacle you can remove or modify.
This tiny step breaks inertia. It transforms knowledge into agency. It whispers: This matters. I can do this.
The Big Picture
Homes shape how we live, connect, and see ourselves. When we design spaces that welcome all bodies, minds, and life stages, we do more than prevent falls or ease daily tasks—we affirm inherent worth. We say to a child learning independence, “You belong here.” To an elder aging in place, “Your comfort matters.” To a visitor with a hidden disability, “You are seen.” Universal design is an act of quiet intentionality against exclusion. It’s a commitment to building a world where the places we call home reflect our highest values: empathy, foresight, and unwavering respect for human diversity. Begin where you are. Use what you have. Do what you can. Your inclusive habitat starts today.
Explore Our Complete System:
The Ultimate Guide to Aging-in-Place Home Modifications | Budget-Friendly Accessibility Upgrades Under $500 | How to Talk to Your Contractor About Universal Design | Universal Design vs. ADA Compliance: What Homeowners Need to Know | Creating a Sensory-Friendly Home for Neurodiverse Family Members | The Psychology of Space: How Design Impacts Mental Wellbeing | Sustainable Universal Design: Eco-Friendly Materials That Enhance Accessibility