Design, Install, and Maintain a Cohesive Water Management Ecosystem That Protects Your Property, Conserves Resources, and Adapts Through Every Season
Imagine stepping into your backyard after a summer rain. Your garden remains vibrant while neighboring plots show signs of stress. Water flows purposefully through discreet channels, vanishing into the earth without pooling near your foundation. You twist the frost-proof hose bib near the patio—smooth operation, no drip—and fill a watering can for container herbs. This isn’t magic; it’s intentional outdoor plumbing. Far beyond simple hoses and drains, a thoughtfully integrated system forms the circulatory network of your property—delivering water where life needs it, providing access where humans need it, and removing excess before damage occurs. When designed with foresight and installed with care, outdoor plumbing transforms frustration into function, waste into wisdom, and vulnerability into resilience.
Introduction: The Silent Guardian of Your Property’s Health
Outdoor plumbing operates largely unseen, yet its influence permeates every aspect of your home’s exterior experience. Unlike indoor plumbing confined within walls, outdoor systems interface directly with dynamic environmental forces: freezing temperatures, shifting soils, intense UV exposure, root activity, and seasonal precipitation extremes. A single overlooked detail—a missing vacuum breaker on a hose bib, an improperly sloped drain line, an irrigation head spraying directly onto siding—can trigger cascading consequences: foundation stress from hydrostatic pressure, moisture-related deterioration in wall cavities, unnecessary water consumption, or potential cross-connection risks.
This reality underscores why modern building standards treat outdoor plumbing as a critical subsystem requiring deliberate planning. The International Plumbing Code (IPC), adopted in whole or part across many North American jurisdictions, includes specific provisions for outdoor water management—addressing backflow prevention, burial depths relative to local frost considerations, pressure considerations for irrigation zones, and material suitability for direct burial. These guidelines reflect accumulated field experience documented by water authorities, engineers, and landscape professionals. When a hose bib is installed without a required atmospheric vacuum breaker (AVB), it may create a pathway for non-potable water to enter the household supply during pressure fluctuations—a documented concern in plumbing safety literature. Similarly, drainage systems installed without appropriate filtration fabric can rapidly accumulate silt in fine-textured soils, reducing effectiveness over time.
Understanding outdoor plumbing as an interconnected ecosystem—where irrigation decisions influence drainage needs, hose bib placement affects irrigation efficiency, and soil composition informs material choices—shifts the paradigm from reactive fixes to proactive stewardship. This guide synthesizes established engineering principles, material considerations, climatic adaptation strategies, and practical installation approaches into a unified framework. Whether you’re planning a new installation, renovating an existing system, or troubleshooting persistent issues, you’ll gain clarity to make informed decisions. We move beyond fragmented tips to explore how water moves, rests, and transforms across your property—and how to guide it with intelligence.
The Integrated Outdoor Plumbing Framework: Deliver, Access, Remove
At its core, every outdoor plumbing challenge resolves into three fundamental actions: Deliver water thoughtfully where life needs it (irrigation), Access water conveniently where humans need it (hose bibs/faucets), and Remove water purposefully where it may cause concern (drainage). These pillars do not operate in isolation. Over-irrigating a slope without adequate drainage may accelerate erosion. Placing a hose bib where runoff accumulates invites seasonal wear. Ignoring soil percolation characteristics when designing drainage may lead to persistent saturation. True effectiveness emerges when these elements are designed as interdependent components of a single water cycle.
This framework moves beyond treating outdoor plumbing as three separate projects. Instead, it positions you as the thoughtful steward of your property’s water journey—orchestrating flow, access points, timing, and exit strategies across seasons. Below, we explore each pillar with contextual detail, embedding the why behind every how, anticipating common friction points, and offering adaptable pathways for varying site conditions, skill levels, and resource considerations.
Pillar 1: Precision Irrigation Systems (The “Deliver” Principle)
Irrigation is not merely “watering plants.” It is the practice of aligning hydraulic delivery with plant needs while respecting environmental context. Inefficient irrigation can contribute significantly to outdoor water use. Precision irrigation reduces uncertainty through thoughtful zoning, pressure awareness, and adaptive scheduling.
Understanding Water Sources and Pressure Dynamics
Before selecting components or laying tubing, assess your water source. Attach a pressure gauge (available at hardware stores) to an existing outdoor faucet during typical household water use (e.g., morning routines). Record static pressure (no flow) and dynamic pressure (with shower or dishwasher running). Most residential systems operate between 40–80 PSI. General guidance:
– Below 30 PSI: Drip systems typically function well; sprinklers may require low-pressure models.
– 30–60 PSI: Suitable range for many systems. Pressure regulation is still recommended for component longevity.
– Above 60 PSI: Pressure regulation is strongly advised. Unregulated higher pressure may cause premature wear in drip components, increase misting (leading to wind drift and evaporation loss), and accelerate fitting fatigue.
Why this matters: Systems operating significantly above recommended pressure without regulation may experience reduced component lifespan. Water hammer—a pressure surge from sudden valve closure—can be more pronounced at elevated pressures. Installing an inline pressure regulator at the system’s origin is a widely recommended practice for durability.
Zoning: The Biological Logic of Grouping Plants
Zoning groups plants with similar water needs, sun exposure, and soil conditions into dedicated irrigation circuits. This prevents the common issue of watering drought-tolerant and moisture-loving plants on the same schedule.
- Hydrozone Mapping Exercise: Sketch your property. Color-code areas:
- Red: Higher-water needs (vegetable beds, new plantings, dense flower borders)
- Blue: Moderate needs (established lawns, shrub beds)
- Green: Lower-water needs (native plantings, rock gardens, succulents)
- Slope Consideration: Group uphill and downhill areas separately. Water moves downhill; uphill zones may need longer application times, downhill zones may benefit from shorter cycles with rest periods to minimize runoff.
- Sun Exposure: South/west-facing zones typically lose moisture faster than north/east-facing zones in summer months.
Practical insight: A single-zone system watering a mixed planting area for “average” needs may overwater shade-adapted plants while under-watering sun-exposed specimens. Thoughtful zoning supports plant health and promotes efficient water use.
Emitter Selection: Matching Technology to Purpose
| Emitter Type | Best For | Flow Characteristics | Key Considerations | Important Notes |
|---|---|---|---|---|
| Drip Line | Dense plantings, rows, hedges | Low, targeted flow | Uniform coverage under mulch, minimal evaporation | Benefits from filtration in hard water areas |
| Bubblers | Trees, shrubs, container plants | Adjustable flow | Directs water to root zone | Visible; requires periodic flow checks |
| Micro-Sprayers | Ground covers, irregular beds | Gentle coverage | Suitable for delicate foliage | More affected by wind; higher evaporation potential |
| Rotary Nozzles | Lawns, large open areas | Low precipitation rate | Reduces runoff potential, wind-resistant pattern | Requires precise spacing; higher initial investment |
| Impact Sprinklers | Large fields, temporary setups | Higher flow, long throw | Durable for rugged use | Higher evaporation; audible operation; pattern consistency varies |
Analogy: Choosing emitters resembles selecting garden tools. A trowel (drip emitter) works precisely for seedlings; a rake (rotary nozzle) efficiently covers broad areas. Using a rake for delicate seedling work is inefficient. Similarly, applying high-volume spray to a moisture-sensitive alpine garden may stress plants and waste water.
Backflow Prevention: A Critical Safety Practice
Irrigation systems connect to your household water supply. Without appropriate protection, non-potable water (potentially containing soil, fertilizers, or other substances) could enter the potable system during pressure fluctuations. IPC Section 608 addresses backflow prevention for irrigation systems. Device selection depends on local code requirements and system design:
– Atmospheric Vacuum Breaker (AVB): Often used for lower-hazard applications without chemical injection. Must be installed vertically with adequate clearance above downstream piping. Note: AVBs may not function correctly if installed below grade or horizontally.
– Pressure Vacuum Breaker (PVB): Suitable for many residential sprinkler systems. Requires vertical installation with specified clearance.
– Reduced Pressure Zone (RPZ): Typically required for higher-hazard applications (e.g., systems with chemical injection ports). Contains redundant check valves and a monitored relief zone.
Critical consideration: AVBs are sometimes installed incorrectly within valve boxes below grade. During a siphon event, a submerged AVB cannot admit air and may fail to protect the system. Always verify device type, installation orientation, and clearance requirements with your local building department. When uncertain, consulting a qualified professional is prudent.
Installation Example: Drip System for a Vegetable Bed
Scenario: South-facing raised bed with tomatoes, peppers, lettuce. Soil: loamy mix. Water source: hose bib with measured pressure in the typical residential range.
Step 1: Filtration and Pressure Management
– Attach a fine-mesh filter and pressure regulator rated for drip systems directly to the hose bib. Why: Even municipally treated water may contain particulates that clog small emitter orifices. Unregulated pressure may stress connections.
– Common oversight: Skipping filtration to reduce initial cost. Result: Emitters may clog prematurely, requiring system flushing or component replacement.
Step 2: Mainline Layout
– Run UV-resistant polyethylene tubing along the bed’s edge. Secure with landscape staples at regular intervals.
– Pro tip: Include a small service loop of coiled tubing near the start point. Future repairs or adjustments become simpler without replacing the entire run.
Step 3: Emitter Placement Logic
– For tomatoes/peppers (deeper roots): Position two low-flow emitters per plant, placed equidistant from the stem.
– For lettuce (shallower roots): Use inline drip tape with emitters spaced to match row layout.
– Why spacing matters: Emitters create moist zones in the soil profile. Placement too close may cause overlapping saturation; too far may leave dry zones. In loamy soil, a standard low-flow emitter typically moistens a zone approximately 12 inches in diameter at shallow depth after a standard runtime.
Step 4: Flushing and Verification
– Leave the line end open initially. Activate the system briefly to flush debris. Cap the end.
– Run the system. Verify consistent flow at each emitter, check connections for leaks, and adjust flow controls if present.
– Troubleshooting: An emitter spraying instead of dripping may indicate debris—remove and rinse. Weak flow in a section may signal a kink or clogged filter.
Step 5: Protection and Integration
– Cover tubing with 2 inches of organic mulch. Why: UV exposure degrades poly tubing over time. Mulch also conserves soil moisture and suppresses weeds.
– Budget consideration: Soaker hoses offer a lower-cost option for temporary setups. Limitation: Flow consistency may diminish beyond 25 feet; lifespan is typically shorter; precise emitter control isn’t possible.
– Field repair: For a damaged section, cut out the compromised segment and reconnect using a barbed coupling secured with hose clamps.
Smart Control: Adapting to Conditions
A timer alone doesn’t constitute “smart” irrigation. True adaptability responds to environmental conditions.
– Basic Timer: Fixed schedules. May apply water during rain or withhold during heatwaves.
– Weather-Based Controller (EPA WaterSense Certified): Uses local evapotranspiration (ET) data via Wi-Fi to adjust runtimes daily. Many users report water savings that offset the device cost within a couple of seasons, depending on local water rates and usage patterns.
– Soil Moisture Sensor: Buried in the root zone, it can pause irrigation when soil moisture is sufficient. Particularly helpful in clay soils that retain water longer.
– Integration tip: Place sensors in the zone with the highest water demand (e.g., a south-facing slope). The system waters only when that zone requires it, helping protect all zones from overwatering.
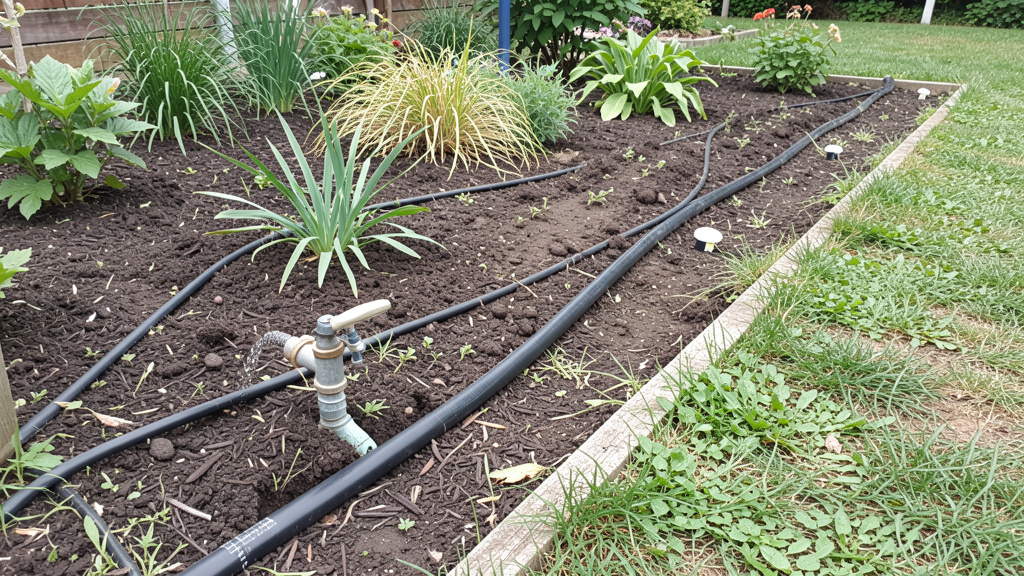
Pillar 2: Strategic Hose Bib Placement and Installation (The “Access” Principle)
Hose bibs (hose faucets, sillcocks) serve as human interface points for your outdoor water system. Thoughtful placement reduces daily friction: minimizing hose dragging across pathways, ensuring reach to garden areas, and avoiding locations prone to seasonal damage. Strategic placement transforms routine tasks into convenient actions while supporting structural protection.
Thoughtful Placement Locations (and Rationale)
- Primary Service Point (Near Garage or Utility Area):
- Purpose: Vehicle washing, bucket filling, pressure washer connection.
- Placement: Within a few feet of garage door or utility entrance. Mount 12–18 inches above anticipated grade to avoid snow or debris accumulation.
-
Critical spec: In climates with freezing temperatures, a frost-proof hose bib is strongly recommended. Include a vacuum breaker installed per local code.
-
Garden Support Location (Adjacent to Vegetable Beds):
- Purpose: Filling watering cans, connecting drip kits, rinsing harvest.
- Placement: At the garden edge, optionally sheltered by a small overhang (protects connections from direct rainfall).
-
Enhancement: A small mounted shelf below the bib holds gardening tools or supplies.
-
Living Area Access (Near Patio or Outdoor Kitchen):
- Purpose: Filling pet bowls, cleaning surfaces, connecting misting systems.
- Placement: On a post or wall within easy reach of seating areas. Height: approximately 36 inches for comfortable use.
-
Aesthetic note: Select finishes (bronze, ceramic handle) that complement your outdoor design.
-
Perimeter Access Point (Opposite Side of House):
- Purpose: Reaching distant beds, compost areas, or side yards without routing hoses around corners.
-
Placement: Midway along the longest exterior wall with a clear access path.
-
Drainage Zone Support (Near Downspouts or Low Areas):
- Purpose: Clearing debris from drains, connecting temporary discharge hoses during heavy rain.
- Placement: 5–10 feet from drainage concern areas. Crucially: Install on slightly higher ground to avoid submersion during pooling events.
Why this configuration? Fewer bibs may create hose-dragging inconvenience; more increases installation complexity and potential leak points. This layout aims to ensure no area on a typical residential lot requires excessive hose length—a practical consideration for maneuverability and pressure retention.
Frost-Proof vs. Standard Hose Bibs: Understanding Freeze Protection
Standard Hose Bib:
– The valve mechanism (where water shuts off) is located near the faucet body, just behind the handle.
– Consideration: Water trapped in the spout may freeze, expand, and potentially damage the bib or interior pipe stub. Repair often requires interior wall access.
– Typical use: Climates with minimal to no freezing risk.
Frost-Proof Hose Bib (Freeze-Proof Sillcock):
– The valve mechanism is positioned inside the conditioned building envelope, typically 6–12 inches behind the wall surface.
– The spout is designed to slope downward (approximately ¼ inch per foot) so residual water drains out when the handle is closed.
– Critical installation detail: The bib must be installed with a slight downward pitch away from the house. If installed level or pitched inward, water may remain trapped in the spout.
– Verification: After installation and closing the handle, no water should drip from the spout after a brief wait. Persistent dripping suggests improper pitch or internal issue.
Material considerations:
– Brass: Resists corrosion, withstands UV exposure, durable threads. A longer-term investment.
– Plastic/Zinc Alloy: Lower initial cost. May be more susceptible to cracking in cold temperatures or thread wear. Often suitable for secondary locations with lower usage.
Installation Guidance: Frost-Proof Hose Bib Through Siding
Tools: Stud finder, level, appropriate hole saw, pipe wrench, thread sealant, exterior-grade sealant, shims.
Step 1: Locate and Verify
– Use a stud finder to identify wall framing. Critical: Confirm no electrical wiring or plumbing exists behind the intended location using a voltage detector. Safety first.
– Mark hole location. Standard height: 12–18 inches above final grade. Rationale: Reduces tripping hazard with hoses; positions bib below typical snow accumulation in winter climates.
Step 2: Cut and Prepare
– Drill pilot hole. Use hole saw to cut siding carefully.
– Important: Install a corrosion-resistant sleeve through the sheathing. This creates a smooth pathway for the bib stem and accommodates minor movement from temperature shifts without binding.
Step 3: Pitch and Secure
– Insert bib through sleeve. Use a level on the bib body. Shim behind the mounting flange until the spout slopes downward away from the house.
– Common error: Forcing the bib to appear level with siding lines. Proper pitch is essential for drainage.
– Secure the flange to sheathing with corrosion-resistant screws.
Step 4: Interior Connection
– Inside the wall cavity, connect the bib tailpiece to the supply line. Use two wrenches: one to stabilize the bib body, one to tighten the connection. Why: Prevents twisting the bib out of alignment.
– Apply thread sealant appropriately per manufacturer instructions.
Step 5: Seal and Verify
– Apply exterior-grade silicone sealant around the flange perimeter. Note: Avoid acrylic latex caulk—it may crack with temperature cycling.
– Turn on water supply. Open bib fully. Check for leaks at interior connection and spout. Close bib. Verify no drip after 60 seconds.
– Final check: Attach a hose with a shut-off nozzle. Turn bib on, then close nozzle. Briefly open bib handle—water should not spray backward. If it does, the vacuum breaker may be faulty or missing.
Vacuum Breakers: Essential Protection
An Atmospheric Vacuum Breaker (AVB) is a valve designed to admit air into the line if pressure drops, breaking a potential siphon that could draw non-potable water backward. Many plumbing codes require AVBs on hose bibs used for irrigation, chemical application, or submerged uses.
- Installation: Screw directly onto bib outlet before attaching hose. Mount vertically with outlet facing down.
- Clearance: Maintain adequate air gap above potential flood levels (e.g., avoid installing inside a bucket).
- Verification: Periodically press the test lever. You should hear air enter. If water sprays out, the device may need replacement.
- Clarification: Not all bibs include built-in vacuum breakers. Verify by checking for a small vent cap on top. If absent and required by code or use case, add an external AVB.
Pillar 3: Comprehensive Drainage Solutions (The “Remove” Principle)
Water sustains life until accumulation creates concern. Persistent standing water near foundations may contribute to structural stress over time. Soggy lawns can weaken turf health. Erosion paths may develop on slopes. Effective drainage isn’t about eliminating water—it’s about guiding its journey from sky to soil with intention.
Diagnosing Drainage Patterns: Read the Land
Before digging, observe your property:
– After Rain Observation: Walk your property 60–90 minutes after moderate rain stops. Note:
– Pooling: Water lingering several hours may indicate slow percolation (common in clay soils) or low spots.
– Flow Paths: Darker soil streaks reveal where water concentrates. Target solutions here.
– Foundation Proximity: Is water flowing toward your house? Downspouts should discharge several feet from the foundation.
– Soil Percolation Test: Dig a 12″x12″ hole 12 inches deep. Fill with water. Time drainage:
– < 30 minutes: Sandy soil (fast drainage; may need less intervention)
– 30–120 minutes: Loam (balanced drainage; moderate solutions often sufficient)
– > 120 minutes: Clay (slow drainage; may require more robust solutions)
Surface Drainage: Managing Visible Flow
- Downspout Extensions: Flexible or rigid extensions direct water 6–10 feet from the foundation. Critical: Slope extensions away from the house.
- Splash Blocks: Concrete or plastic wedges under downspouts dissipate water energy, reducing soil erosion. Place on a stable gravel base.
- Swales: Shallow, vegetated ditches (6–12 inches deep, 2–3 feet wide) contour along slopes to slow and redirect sheet flow. Line with river rock in higher-flow areas. Pro tip: Plant deep-rooted native grasses (e.g., switchgrass) in swales—their roots stabilize soil while utilizing moisture.
- Dry Creek Beds: Aesthetic surface channels using layered gravel to move water visibly across landscapes. Ideal for redirecting flow away from patios or walkways.
Subsurface Drainage: Addressing Hidden Flow
When surface solutions are insufficient, water may be moving underground. Subsurface systems intercept it before reaching concern areas.
French Drains: A Common Subsurface Solution
A French drain is a system: perforated pipe surrounded by gravel and wrapped in geotextile fabric, buried in a trench. Water enters the gravel envelope, flows through the pipe, and discharges safely away.
Installation Considerations for a Foundation-Adjacent Drain:
1. Layout and Slope: Mark trench path. Target slope: approximately 1 inch drop per 8 feet of run. Verify with string level. Why slope matters: Insufficient slope may cause water to stagnate; reverse slope directs water toward the foundation.
2. Trench Dimensions: Excavate to appropriate depth and width per soil conditions and local practice. Trench bottom must maintain consistent slope—verify with a straight board and level.
3. Fabric First: Line the entire trench with permeable geotextile fabric (not landscape weed barrier). Overlap edges generously. Purpose: Fabric allows water entry while restricting soil particles that could clog gravel.
4. Gravel Base: Add several inches of washed gravel. Lightly compact.
5. Pipe Placement: Lay perforated pipe with holes oriented downward. Rationale: Water enters from the bottom of the gravel envelope, keeping the pipe’s upper portion clear for air exchange.
6. Gravel Fill and Fabric Closure: Cover pipe with gravel. Fold fabric over the top.
7. Final Cover: Finish with topsoil and sod, or decorative stone for a dry creek appearance.
8. Outlet Strategy: Discharge pipe into:
– Dry well: A gravel-filled pit wrapped in fabric, buried where water can percolate safely (verify soil suitability first).
– Approved discharge point: Such as a street curb (with municipal permission) or a low swale where water can sheet-flow harmlessly.
– Never discharge onto neighboring properties without agreement.
Common Considerations:
– Omitting geotextile fabric may lead to silt accumulation in the gravel over time, reducing effectiveness.
– Using landscape fabric (designed for weed control) instead of drainage-specific geotextile may clog quickly.
– Insufficient slope may allow water to pool within the trench.
Dry Wells: Temporary Storage Solutions
Ideal for properties with limited discharge options (e.g., flat lots). A dry well is a buried chamber (plastic infiltration units or gravel pit) that temporarily stores runoff, allowing gradual percolation.
- Sizing Consideration: For roof area draining to one downspout, calculate potential volume. Example: 500 sq. ft. roof area x 1 inch rain ≈ 310 gallons. A standard 3’x3’x3′ gravel dry well holds approximately 160 gallons. Multiple chambers may be needed.
- Installation: Excavate hole. Line with geotextile. Stack infiltration chambers or fill with washed gravel. Wrap fabric over top. Backfill carefully.
- Limitation: Less effective in very slow-percolating soils (e.g., heavy clay). Confirm with a percolation test first.
Grading: The Foundational Element
No drain system compensates for improper grading. The ground should slope away from your foundation continuously for the first 10 feet.
– Target Slope: Approximately 6 inches of drop over 10 feet (roughly 5% grade).
– Verification: Place a 10-foot straight board against the foundation. Use a level. Lift the outer end until level. Measure the gap between board end and ground. Should be at least 6 inches.
– Correction: Add clean fill against the foundation in thin, tamped layers. Re-grade surface soil. Important: Maintain clearance between soil and wood siding (typically 4+ inches) to prevent moisture contact.
The Fundamental Principle: “Outdoor plumbing achieves resilience not through isolated components, but through cyclical harmony: water delivered with thoughtful precision supports plant life without waste; accessed at intuitive points empowers daily stewardship; and removed with strategic foresight protects structural integrity. This triad transforms water from a potential concern into a managed asset—honoring both the landscape’s needs and the home’s longevity.”
Planning Your System: Site Assessment and Design Fundamentals
A successful installation begins long before tools touch soil. Dedicated site assessment prevents costly rework and ensures solutions match your property’s unique conditions. Allocate 2–3 hours for methodical observation. This investment pays dividends in reduced labor, material efficiency, and long-term satisfaction.
The Property Walk-Through Protocol
Gather a clipboard, property sketch (if available), and smartphone. Conduct this assessment after rainfall when drainage patterns are visible.
- Water Source Audit:
- Locate the main water shutoff valve. Note accessibility.
- Measure distances from shutoff to proposed irrigation valve box and primary hose bib locations.
-
Test water pressure and flow rate: Place a 5-gallon bucket under an existing outdoor faucet. Time fill duration. Calculate GPM:
(5 gallons / seconds) x 60. This helps determine how many irrigation zones can operate simultaneously. -
Sun and Shade Mapping:
- Sketch property outline. At 9 AM, 12 PM, and 3 PM, mark areas in full sun (>6 hrs), partial sun (3–6 hrs), and full shade (<3 hrs).
-
Why: Sun exposure correlates with moisture loss. A south-facing zone may require more frequent irrigation than a north-facing zone with identical plants.
-
Soil Composition Survey:
- Dig 6-inch test holes in 4–5 key areas (lawn, garden beds, near foundation). Examine soil:
- Sandy: Gritty, falls apart when squeezed. Drains rapidly. Benefits from frequent, light watering.
- Clay: Sticky, forms a firm ball. Drains slowly. Benefits from infrequent, deep watering.
- Loam: Crumbly, holds shape briefly. Balanced drainage.
-
Insight: Soil type informs emitter choice. Clay soils often work well with bubblers (slow application reduces runoff); sandy soils may benefit from closely spaced drip emitters (water moves vertically faster).
-
Existing Infrastructure Inventory:
-
Note locations of:
- Underground utilities (call 811 before digging—free service locates public lines; private lines may require separate detection)
- Tree roots (avoid trenching within the drip line of mature trees when possible)
- Septic system components (maintain recommended separation distances per local code)
- Property lines (ensure drainage discharge complies with local ordinances)
-
Human Use Patterns:
- Observe natural pathways, play areas, and gardening zones. Place hose bibs where hoses won’t cross high-traffic paths. Route irrigation lines away from planned hardscape expansions.
- Empathy exercise: Walk the property carrying a full watering can. Where would a water source be most helpful? Where does the hose snag?
Creating Your Master Plan Sketch
Transfer observations to graph paper (1 square = 1 ft) or free landscape design software. Your sketch should include:
– Property boundaries and house footprint
– North arrow (critical for sun/shade analysis)
– Existing trees, structures, hardscapes
– Proposed irrigation zones (color-coded by hydrozone)
– Hose bib locations (labeled with type)
– Drainage solutions (French drain paths, swale locations, dry well sites)
– Valve box locations (positioned for accessible maintenance)
– Slope arrows indicating water flow direction
Why sketch? A visual plan prevents placement errors (e.g., “I didn’t realize the hose bib would be behind the AC unit”). It serves as a communication tool for contractors or family members. Keep copies in accessible locations.
Material Selection Guidance: Beyond Initial Cost
Choosing materials solely on upfront price may lead to premature replacement. Consider total lifecycle value:
| Component | Budget-Oriented Choice | Longer-Term Investment | Rationale |
|---|---|---|---|
| Irrigation Tubing | Thin-wall poly | Thick-wall poly or rigid PVC | Thin-wall may crack under foot traffic or UV exposure sooner. Thicker walls offer greater durability. |
| Hose Bib | Zinc alloy | Solid brass frost-proof | Brass generally withstands freeze-thaw cycles and corrosion better. Repairing a failed bib inside a wall is disruptive. |
| Drain Pipe | Corrugated black flex | Perforated PVC with sock | Flex pipe may collapse under soil load over time; rigid PVC maintains shape. Sock provides integrated filtration. |
| Valve Box | Thin plastic | Heavy-duty polypropylene | Thin boxes may crack under foot traffic or equipment; heavy-duty boxes withstand routine use. |
| Backflow Device | AVB | PVB | AVBs have specific installation constraints; PVBs are often more tolerant of installation variables and handle broader applications. |
Guideline: Prioritize investment in components that are buried underground or embedded in walls—they are significantly harder to access and replace later. Save on visible, easily replaceable items (e.g., hose nozzles).
Essential Tools and Materials: Building Your Outdoor Plumbing Toolkit
Precision outdoor plumbing benefits from purpose-built tools. This curated list supports efficient, confident execution. Organize tools in a dedicated project tote—saving time hunting for tools compounds into reclaimed project hours.
Core Tool Kit (Recommended)
- Pipe Wrench (14″): For securing hose bib connections without damaging fittings.
- Tubing Cutter (for poly pipe): Creates clean, square cuts without crushing tubing—essential for leak-resistant barbed fittings. Avoid scissors or hacksaws for this task.
- Deburring Tool: Removes sharp ridges inside cut pipes that could disrupt flow or catch debris.
- Stainless Steel Hose Clamps (assorted sizes): For securing drip tubing to barbed fittings. Worm-drive style provides even pressure.
- Thread Sealant Tape: Apply appropriately to male threads for leak-resistant connections.
- Silicone Lubricant Spray: Eases insertion of tubing onto barbed fittings; protects rubber gaskets.
- Post Hole Digger: Efficient for narrow trenches in compacted soil.
- Laser Level or String Level: Verifies consistent slope for drainage pipes and hose bib pitch. A modest investment prevents significant drainage issues.
- Voltage Detector: Scans walls before cutting for hose bibs to avoid electrical wiring. Safety is paramount.
- Heavy-Duty Gloves: Protects hands during trenching, handling gravel, and pipe work.
Material Checklist by Project Phase
Before visiting the hardware store, photocopy this list and check items off:
Planning Phase
– [ ] Property sketch pad
– [ ] Measuring tape (25-ft)
– [ ] Camera (for documentation)
– [ ] Soil test kit (optional but helpful)
Irrigation Installation
– [ ] Pressure regulator (rated for drip systems)
– [ ] Filter (mesh size per water quality)
– [ ] Backflow prevention device (per local code)
– [ ] Valve box (heavy-duty)
– [ ] Mainline tubing
– [ ] Zone valves
– [ ] Emitter tubing/drip line per zone plan
– [ ] Barbed fittings (tees, elbows, end caps)
– [ ] Landscape staples
– [ ] Wire and connectors (for valve solenoids)
– [ ] Controller (weather-based recommended)
Hose Bib Installation
– [ ] Frost-proof hose bib (brass, correct length for wall depth)
– [ ] Vacuum breaker (if required)
– [ ] Sillcock sleeve
– [ ] Corrosion-resistant mounting screws
– [ ] Exterior-grade sealant
– [ ] Pipe thread sealant
– [ ] Shims (for pitch adjustment)
Drainage Installation
– [ ] Geotextile fabric (drainage-grade)
– [ ] Perforated pipe (with sock if specified)
– [ ] Washed gravel (“drainage gravel”)
– [ ] Catch basin (for downspout connections)
– [ ] Downspout extension
– [ ] Landscape fabric pins
Practical Tool Tips
- Winterizing Hose Bibs: Before freezing temperatures:
- Shut off interior supply valve.
- Open hose bib handle fully.
- Disconnect and store hoses indoors.
- Place a small container under bib to catch residual drip.
- Leave handle open throughout winter. This allows any residual water to expand outward without stressing the bib.
- Unclogging a Drip Emitter: Remove emitter. Soak in white vinegar for 30 minutes to dissolve mineral deposits. Rinse thoroughly.
- Locating a Leak in Buried Line: Activate system. Walk barefoot along tubing path. Cool, damp soil spots may indicate leaks.
- Cutting PVC Pipe Cleanly: Wrap masking tape around the cut line first. Saw through the tape—it helps prevent splintering.
Troubleshooting Common Outdoor Plumbing Challenges
Even well-installed systems encounter issues. A systematic approach to troubleshooting saves time and resources. Observe symptoms, eliminate variables, and test hypotheses methodically.
Irrigation System Challenges
Symptom: Reduced Flow at Emitters
– Possible Causes:
1. Clogged filter (most frequent)
2. Kinked or pinched tubing
3. Undersized mainline for zone demand
4. Partially closed valve
– Diagnostic Steps:
1. Inspect and clean the filter first.
2. Trace mainline from source to first emitter. Feel for kinks or sharp bends.
3. Verify all valves are fully open.
4. If flow improves after cleaning filter, consider a finer-mesh filter if water contains sediment.
– Prevention: Use a filter with a clear bowl for easy visual inspection. Clean regularly during peak season.
Symptom: Sprinkler Heads Not Activating
– Possible Causes:
1. Debris in head mechanism
2. Low zone pressure
3. Damaged riser pipe
– Diagnostic Steps:
1. Remove head. Rinse internal components under faucet. Check for obstructions.
2. Test pressure at a nearby head. If low, check valve operation and mainline integrity.
3. If adjacent heads function, carefully excavate around the faulty head to inspect the riser.
– Pro Tip: Apply plumber’s grease to O-rings before reinserting the head.
Symptom: Water Accumulating Around Valve Box
– Possible Causes:
1. Leaking valve solenoid connection
2. Cracked valve body
3. Poor drainage under box
– Diagnostic Steps:
1. Dry the box interior. Activate the system. Watch for spray near solenoid wires.
2. Gently tighten the solenoid connection (¼ turn max—overtightening may crack plastic).
3. If leak persists, the valve cartridge may need replacement.
– Critical: Drill small weep holes in the bottom of the valve box before final burial. Prevents water accumulation that may corrode components.
Hose Bib Challenges
Symptom: Dripping from Spout When Closed
– Cause: Worn washer or damaged valve seat.
– Fix:
1. Shut off interior supply valve.
2. Open bib handle to relieve pressure.
3. Remove handle screw.
4. Unscrew packing nut. Extract stem assembly.
5. Replace washer. Lightly smooth the valve seat with fine emery cloth if pitted.
6. Reassemble carefully. Test.
– Prevention: Close bibs gently—forceful closure may damage the washer seating.
Symptom: Leaking Around Handle When Open
– Cause: Worn packing washer around the stem.
– Fix: Tighten the packing nut slightly (¼ turn). If leaking continues, replace the packing washer (graphite-impregnated types are durable).
– Caution: Overtightening makes the handle stiff and accelerates stem wear.
Symptom: No Water Flow
– Possible Causes:
1. Interior supply valve closed
2. Frozen pipe (in cold climates)
3. Debris blocking inlet
– Diagnostic Steps:
1. Verify interior valve is open.
2. In winter: Feel the pipe near the bib inside the wall. If frozen, apply heat indoors only using approved methods (heat tape, hairdryer on low). Never use open flame.
3. If accessible, remove bib and flush the inlet.
– Emergency: If frozen and urgent need exists, apply gentle heat only to the bib body—never to buried sections.
Drainage System Challenges
Symptom: Persistent Standing Water After Rain
– Possible Causes:
1. French drain clogged with silt
2. Insufficient slope
3. Outlet blocked
– Diagnostic Steps:
1. Locate drain outlet. Run a hose into the upstream end. If water backs up, a clog is likely.
2. Dig a small inspection hole at the midpoint. Check gravel for silt buildup.
3. Verify the outlet discharges freely (clear leaves/debris).
– Restoration: For clogged drains, a sewer jetter attachment on a pressure washer (rental option) may help clear blockages. Insert from the outlet and flush backward.
Symptom: Erosion Gully Forms Despite Swale
– Cause: Water velocity exceeds swale capacity.
– Fix:
1. Add rock check dams: Place flat stones vertically across the swale every few feet.
2. Line swale bottom with 2 inches of river rock.
3. Install erosion-control matting (coir fiber) on slopes above the swale.
– Prevention: Size swales based on the contributing watershed area. Larger drainage areas may require deeper or wider swales.
Seasonal Maintenance: A Year-Round Care Calendar
Outdoor plumbing systems face continuous environmental exposure. Proactive maintenance prevents most failures. Integrate these tasks into existing seasonal routines—pairing them with familiar chores builds consistency.
Spring (March–April): System Activation
- Irrigation:
- Remove winterizing caps from backflow devices per manufacturer instructions.
- Slowly open the main shutoff valve (¼ turn every 10 seconds to minimize water hammer risk).
- Activate the controller. Run each zone manually for a brief period.
- Inspect every emitter/sprinkler head: clean obstructions, adjust spray patterns away from hardscapes, replace damaged components.
- Check and clean the filter.
- Hose Bibs:
- Open all bibs fully. Flush for 60 seconds to clear winter debris.
- Test vacuum breakers: Press test lever—should admit air. Replace if leaking or malfunctioning.
- Lubricate stiff handles with silicone spray.
- Drainage:
- Clear leaves/debris from catch basins and dry well grates.
- Inspect French drain outlets—remove blockages.
- Check swales for sediment buildup; re-grade if eroded.
- Pro Tip: While the system runs, walk the property with a notepad. Note zones needing adjustment (e.g., “Zone 3: spray contacting fence”).
Summer (May–August): Monitoring and Efficiency
- Irrigation:
- Weekly: Check for leaks (unusually wet spots, vibrant grass patches).
- Bi-weekly: Clean filter. Adjust controller runtimes based on weather—reduce after rainfall, increase during heatwaves.
- Monthly: Verify backflow device isn’t leaking.
- Water Wisdom: Water during early morning hours (e.g., 4–10 AM). Reduces evaporation loss and minimizes conditions favorable to fungal growth.
- Hose Bibs:
- After each use: Disconnect hoses. Coiling hoses on the bib stresses connections over time.
- Inspect hoses for cracks—replace brittle sections.
- Drainage:
- After heavy storms: Check for new erosion paths. Address promptly with mulch or rock.
- Trim vegetation growing over drainage paths—roots may obstruct flow.
- Critical Check: Place shallow containers (like tuna cans) in the lawn during sprinkler operation. Measure water depth after a cycle. Adjust runtimes to apply approximately ½ inch of water—suitable for many lawns.
Fall (September–November): Winterization Preparation
This phase is critical in climates with freezing temperatures. Skipping it risks significant damage.
– Irrigation Winterization (Blow-Out Method – Recommended):
1. Shut off main water supply to the irrigation system.
2. Open manual drain valves at lowest points (if installed).
3. Connect an air compressor (regulated to manufacturer-specified PSI, often ≤50 PSI) to the blow-out port.
4. Activate zones one by one. Blow air until mist ceases and only air flows (typically 60–90 seconds per zone).
5. Important: Do not rely on system water pressure alone to clear lines—trapped water may remain.
6. Leave valves and solenoids in the open position for winter.
– Alternative (Manual Drain Method – Less Reliable):
– Only suitable for systems specifically designed with drain valves at all low points. Open all valves. Set controller to “rain delay” or off. Risk: Water trapped in high spots may still freeze.
– Hose Bibs:
1. Shut off interior supply valve.
2. Open bib handle fully.
3. Disconnect and store hoses indoors.
4. Place a small container under bib to catch residual drip.
5. Leave handle open throughout winter.
– Drainage:
– Clear all debris from catch basins, swales, and dry well grates.
– Rake leaves away from drainage paths—wet leaves can mat and block flow.
– Pro Insight: Scheduling professional winterization in early fall may be worthwhile. The cost is minor compared to potential repair expenses from freeze damage.
Winter (December–February): Observation and Preparation
- During Thaws:
- Briefly open bibs to flush sediment. Close immediately after.
- Check drainage paths after snowmelt—address new pooling areas.
- Before Spring:
- Inspect stored hoses for cracks.
- Order replacement parts (washers, emitters) during off-season sales.
- Review summer notes—plan system upgrades.
- Safety Note: If a bib freezes shut, apply gentle heat only to the bib body from the interior side. Never use torches on pipes.
Navigating Real-World Scenarios: Code, Soil, Budget, and Constraints
Theory meets practice in the field. This section addresses common friction points with actionable, adaptable pathways.
Scenario 1: “My Building Department Requires an RPZ Backflow Device—It’s Costly!”
Context: RPZ assemblies involve higher initial cost and often require annual testing by certified professionals. They are typically mandated where irrigation systems include chemical injection or in specific high-risk zones.
Adaptive Pathways:
– Path A (Full Compliance): Install the RPZ assembly. Schedule annual testing with a certified professional. Rationale: Supports community water safety. Non-compliance may carry penalties and liability concerns.
– Path B (System Modification): Eliminate chemical injection capability from your irrigation design. Use manual fertilizing methods (e.g., hose-end sprayers disconnected after use). Submit revised plans requesting evaluation for a PVB. Success factor: Many jurisdictions permit PVBs for standard irrigation without injection ports.
– Path C (Clarify Requirements): Request specifics from the building official: “What specific aspect of my proposed system triggers the RPZ requirement?” Document the response. Often, clarifying design details resolves the requirement.
– Professional Tip: Frame the conversation collaboratively: “I want to ensure my system is safe and compliant. Can you help me understand the requirement for my specific property?”
Scenario 2: “I Have Heavy Clay Soil—Drainage Solutions Clog Quickly!”
Context: Clay particles are fine and plate-like, packing tightly and migrating into gravel envelopes over time.
Adapted Solutions:
– French Drains:
– Increase gravel envelope thickness.
– Use geotextile fabric specifically rated for fine soils (higher density weave).
– Ensure adequate slope to maintain flow velocity.
– Irrigation:
– Prefer bubblers over drip emitters—slower application reduces surface runoff.
– Install soil moisture sensors to prevent irrigation when soil is saturated.
– Aerate lawns annually to improve soil structure.
– Drainage Swales:
– Line with geotextile before adding gravel.
– Plant deep-rooted native species (e.g., Joe-Pye weed) whose roots create micro-channels.
– Soil Amendment Insight: Incorporating compost into the top layer of clay beds (e.g., 25% by volume) can gradually improve soil structure over successive seasons.
Scenario 3: “I’m on a Tight Budget—Where Can I Prioritize Wisely?”
Guiding Principle: Some compromises risk system integrity; others are smart phasing.
| Compromise to AVOID (High Risk) | Compromise to ACCEPT (Lower Risk) |
|---|---|
| Omitting required backflow prevention | Using soaker hoses for temporary garden beds instead of permanent drip |
| Installing standard bib in freeze-prone area | Choosing plastic valve box instead of metal (if not in high-traffic zone) |
| Skipping geotextile fabric on subsurface drains | Hand-digging trenches for short runs (<50 ft) instead of renting equipment |
| Using undersized or thin-wall tubing for mainlines | Installing fewer hose bibs initially (add later via T-fitting) |
| Ignoring slope requirements for drainage | Using a weather-based controller app with existing timer (if compatible) |
Budget Phasing Strategy:
– Year 1: Install backbone elements—frost-proof bibs at key locations, main water line to future valve box location, primary surface drainage (swales, downspout extensions).
– Year 2: Add irrigation zones incrementally (start with high-value areas like vegetable gardens).
– Year 3: Expand subsurface drainage based on observed problem areas.
– Why it works: Prevents overwhelming expense. Each phase delivers immediate value while building toward the complete vision.
Scenario 4: “I Rent My Home—What Non-Permanent Solutions Exist?”
Constraints: No trenching, no wall modifications, landlord approval required.
Renter-Friendly Toolkit:
– Irrigation:
– Use hose-end timers with rain sensors.
– Deploy modular drip kits that connect directly to the existing bib. Store components indoors off-season.
– Place soaker hoses under mulch in garden beds—remove before moving.
– Hose Bibs:
– Add an external vacuum breaker (screws on/off easily).
– Use a portable hose reel mounted on patio furniture (no drilling).
– Drainage:
– Place portable splash blocks under downspouts.
– Create temporary swales with flexible landscape edging (staked into soil).
– Use permeable pavers on patios to reduce runoff.
– Landlord Communication: “These improvements conserve water, protect the property from erosion, and require no permanent modification. I’ll remove everything upon moving.” Document pre/post conditions with photos.
Your Questions, Answered
Q: How deep should I bury irrigation lines to avoid freezing or accidental damage?
A: Burial depth involves balancing multiple factors. For freeze protection in cold climates, burying below the local frost line is ideal (depths vary significantly by region—consult local resources). However, deeper burial increases installation effort and future repair complexity. A practical approach: bury mainlines 8–10 inches deep (below typical shovel depth) and rely on proper winterization (blow-out) for freeze protection. Lateral drip lines under mulch can be shallower (2–4 inches) as they drain during blow-out. Critical: Always call 811 before digging to locate public underground utilities. They mark lines for free. Private lines (like existing irrigation) may require a separate locator service.
Q: Can I connect my irrigation system directly to a rain barrel?
A: Direct connection presents challenges. Rain barrels rely on gravity feed, providing very low pressure (approximately 0.43 PSI per foot of elevation). A barrel 3 feet high yields about 1.3 PSI—insufficient for most sprinklers or drip systems requiring 15–30 PSI. Options:
– Use the rain barrel solely for hand-watering with a watering can.
– Install a small pump with pressure switch to feed a dedicated drip zone. Must include appropriate backflow prevention if any connection to household plumbing exists.
– Design a gravity-fed soaker hose system where the barrel is elevated higher than the garden bed.
Important: Never connect a rain barrel directly to household plumbing without an air gap and approved backflow prevention—this could risk contaminating the drinking water supply.
Q: My hose bib leaks where the pipe enters the wall. Can I fix this without opening the wall?
A: A permanent fix usually requires interior access. This leak often indicates a failed connection or pipe stub inside the wall cavity. Temporary measures (epoxy putty, tape) rarely provide lasting results under pressure. Recommended path:
1. Shut off the interior supply valve.
2. Remove the bib from outside.
3. Inspect the pipe stub. If the leak is at the threads and accessible, reseal and reinstall the bib.
4. If the leak persists inside the wall, consult a plumber to access the connection from the interior (often through a closet or basement).
Prevention Tip: During initial installation, use two wrenches—one to hold the pipe stub steady while tightening the bib—to prevent stressing the internal connection.
Q: How do I know if my property has a high water table affecting drainage?
A: Indicators include persistent dampness in basements/crawlspaces, water pooling more than 24 hours after rain in flat areas, or difficulty digging below 18 inches without encountering water. Confirm with a percolation test (dig a 24-inch hole, fill with water—if it doesn’t drain within 24 hours, the water table may be high). Solutions:
– Install French drains above the water table level, discharging to a sump pump system.
– Use raised garden beds with drainage holes for planting areas.
– Consult a drainage professional for subsurface evaluation—they use probes to map conditions.
Critical Note: Avoid installing dry wells in high water table areas—they may retain water and exacerbate saturation.
Q: Are “smart” irrigation controllers worth the investment?
A: For many homeowners, especially in regions with variable rainfall, they offer significant value. EPA WaterSense-certified weather-based controllers adjust runtimes using local evapotranspiration (ET) data, often reducing outdoor water use by 15–30% annually. Payback period varies:
– With water costing $0.005/gallon and a system using 10,000 gallons monthly, savings could be approximately $7.50/month.
– A $150 controller may pay for itself in under two years, depending on usage and local rates.
– Additional benefits: Remote control prevents overwatering during travel; freeze alerts protect the system.
Exception: If you consistently adjust a basic timer based on weather observations, the incremental savings may be smaller. However, smart controllers provide reliable “set-and-forget” efficiency for most users.
Q: What’s the difference between a French drain and a curtain drain?
A: Both use perforated pipe in gravel, but their purpose and placement differ:
– French Drain: Typically installed along a foundation footer or at the base of a slope to intercept subsurface water before it reaches a structure. Pipe holes usually face downward.
– Curtain Drain: Installed across a slope (like a curtain) to intercept surface and shallow subsurface flow mid-slope, diverting it sideways before it gains erosive velocity. Often shallower than French drains.
Guideline: Use French drains for foundation protection; curtain drains for hillside erosion control.
Q: Can tree roots damage my irrigation or drainage lines?
A: Yes—particularly aggressive species like willow, poplar, or silver maple. Roots seek moisture and may penetrate cracks or loose fittings. Prevention strategies:
– Maintain distance (10+ feet) between lines and tree drip lines where possible.
– Install root barriers (plastic sheets buried vertically) between trees and pipes.
– Choose more root-resistant pipe materials (e.g., rigid PVC over corrugated flex pipe).
– For existing lines near trees, consult a professional about root management options.
Sign of root intrusion: Gradual loss of water pressure, frequent clogs requiring cleaning.
Q: How often should I test my backflow prevention device?
A: Testing frequency depends on device type and local requirements:
– RPZ assemblies typically require annual testing by a certified professional—often mandated by law.
– For PVBs and AVBs on residential systems:
– Test AVBs monthly (press lever—should admit air).
– Visually inspect PVBs each spring for leaks or corrosion.
– Consider professional testing every few years for PVBs, or if contamination risk is suspected (e.g., after flooding).
Documentation: Keep test records. They may be required during property transactions in some areas.
Q: Is it safe to use reclaimed water (graywater) for irrigation?
A: Graywater systems (from sinks, showers) are highly regulated and generally not recommended for DIY installation. Graywater contains soap, oils, and potential pathogens. Risks include:
– Clogging drip emitters with soap residue.
– Soil salinity buildup from detergents.
– Health concerns if used on edible plants.
Legal Note: Most municipalities prohibit graywater systems without engineered plans, permits, and professional installation. If interested, consult a certified graywater specialist—they design systems with filtration, subsurface drip only, and strict plant restrictions. For safer water reuse, focus on rainwater harvesting (with appropriate filtration) instead.
Q: My yard floods during heavy rain despite having gutters. What’s missing?
A: Gutters manage roof water but don’t address ground saturation. Likely gaps:
1. Downspouts discharge too close to the foundation (<6 feet).
2. Missing extensions or splash blocks to direct flow away.
3. Soil grading slopes toward the house.
4. Absence of subsurface drainage for groundwater.
Action Plan:
– Extend downspouts 8–10 feet from the foundation.
– Verify grading: Aim for 6 inches of drop over 10 feet away from the house.
– Install a French drain along the foundation footer if groundwater is the primary issue.
– Add a dry well to capture downspout discharge if no safe outlet exists (verify soil suitability first).
Professional Help: If flooding persists, a drainage specialist can use cameras to inspect underground flow paths.
Q: How do I winterize a hose bib without an interior shut-off valve?
A: This situation carries risk. A safer long-term solution is installing an interior shut-off valve (consult a plumber). For temporary measures in mild freezes:
1. Disconnect all hoses.
2. Open bib handle fully.
3. Use a hairdryer on low setting to gently warm the bib body for a few minutes.
4. Use a small vacuum to extract residual water from the spout.
5. Insert rags soaked in non-toxic RV antifreeze (propylene glycol) into the spout.
6. Cover with an insulated faucet cover.
Strong Recommendation: Prioritize installing an interior shut-off valve. It’s the most reliable solution and adds value to your home.
Q: Can I install outdoor plumbing myself, or do I need a licensed plumber?
A: Scope determines necessity:
– DIY-Friendly (with research): Hose bib replacement (if accessible), modular drip irrigation kits, surface drainage swales, downspout extensions.
– Licensed Professional Recommended:
– Tapping into the main water line
– Installing backflow prevention devices (often requires permits and certified testing)
– French drains near foundations
– Any work requiring trenching near utilities
Critical Step: Check local codes and permit requirements before starting. Many jurisdictions require permits for irrigation systems (due to backflow rules) and drainage modifications. Unpermitted work may affect insurance coverage. When uncertain, contact your building department—they often provide free pre-application guidance.
Conclusion: Building Confidence Through Informed Action
Mastery of outdoor plumbing unfolds through accumulated understanding applied with care. You now hold a framework that transcends isolated tasks: the integrated perspective that delivering water thoughtfully, accessing it strategically, and removing it purposefully forms a resilient cycle protecting your home’s structure, nurturing your landscape, and honoring shared water resources. This knowledge transforms uncertainty into agency—the confidence to assess a pooling area not as a crisis, but as a solvable puzzle of slope and soil; to install a hose bib understanding the physics of drainage; to design irrigation that works with natural conditions rather than against them.
Three Guiding Principles to Carry Forward
- Water Follows Physical Laws—Design Accordingly: Whether moving through soil, pipes, or air, water responds to slope, pressure, and permeability. Observe your property’s unique patterns first; let those observations inform your actions.
- Preventive Care Saves Significant Effort Later: The modest investment in a vacuum breaker supports water safety. Verifying slope before backfilling prevents drainage rework. Honoring small details compounds into years of reliable performance.
- Your Property is Unique—Adapt Principles to Context: Soil composition, sun patterns, rainfall, and usage needs vary significantly. Trust your observations. What works on a neighbor’s sandy lot may require adjustment for your clay soil.
The 24-Hour Rule: Your First Step Toward Clarity
Within the next 24 hours, complete this single, specific action:
Walk your property at dusk with a flashlight. Shine the beam low across the ground near your foundation, downspouts, and garden areas. Note every spot where water pools after rain, flows toward the house, or where you wish a hose bib existed. Sketch these observations simply on paper.
This act bridges knowledge and action. It transforms concepts into your personal reality—the foundational step of your customized plan. No tools required. No expense incurred. Just clarity.
The Broader Perspective: Stewardship Beyond Property Lines
Every drop of water conserved through efficient irrigation, every safeguard preventing potential contamination, every ounce of erosion halted by thoughtful drainage contributes to a healthier local environment. Your backyard is part of a larger watershed. By managing water wisely on your parcel, you support municipal storm systems, protect local waterways from sediment runoff, and model responsible stewardship. This work holds meaning far beyond property boundaries—it’s a quiet commitment to resilience.
You are now equipped not just to address a specific task, but to think holistically about water on your property. Return to this guide as your landscape evolves. Revisit the framework when adding a patio, planting a new garden, or preparing for seasonal shifts. Share insights with neighbors. Ask questions. Adapt. Grow.
The most enduring landscapes are shaped not by single grand gestures, but by consistent, intelligent care applied season after season. Your journey toward a harmonious outdoor water system begins now—with that flashlight in hand, and clarity in your next step.
Explore Our Complete System:
Designing Water-Wise Landscapes: Xeriscaping Principles for Every Climate | Foundation Protection 101: Grading, Gutters, and Drainage Strategies | The Homeowner’s Guide to Understanding Building Codes | Tool Mastery: Choosing, Using, and Maintaining Your DIY Arsenal | Seasonal Property Maintenance Calendar: Month-by-Month Tasks for Long-Term Value | Rainwater Harvesting Simplified: From Barrel to Irrigation | Solving Common Soil Challenges: Amendments, Testing, and Plant Selection Guides