Transform your landscape into a living calendar of color with strategic bulb layering, seasonal sequencing, and nature’s most reliable floral performers
Imagine stepping into your garden on a crisp March morning to discover cheerful crocus pushing through melting snow. By May, tulips and daffodils create a vibrant tapestry beneath budding trees. As summer heat arrives, gladiolus and lilies take center stage while alliums provide architectural interest. Finally, in September’s golden light, colchicum and autumn crocus offer a surprising encore before frost. This is an achievable goal for home gardeners with thoughtful planning and the right techniques. This comprehensive guide reveals a practical methodology for creating this living timeline of blooms, combining horticultural principles with artistic design to transform your outdoor space into a dynamic source of seasonal wonder.
Introduction
For centuries, bulbs have captivated gardeners with their remarkable ability to store energy, survive dormancy, and reliably produce spectacular blooms with minimal intervention. Unlike annuals requiring constant replanting or perennials needing years to establish, bulbs operate on nature’s efficient timing mechanism—a self-contained life cycle engineered for resilience. Yet many gardeners experience frustration when their bulb displays fade after a single spring season, leaving bare patches for months. This outcome typically stems not from bulb failure but from incomplete planning. True bulb mastery requires understanding the distinct categories of bulbs (true bulbs, corms, rhizomes, and tubers), their unique growth cycles, chilling requirements, and how they interact within a seasonal ecosystem. Based on established horticultural research and observed patterns across diverse growing regions, the most enduring bulb gardens follow a deliberate succession strategy rather than random planting. This guide synthesizes widely documented gardening knowledge into an actionable framework that respects both botanical requirements and aesthetic aspirations. Whether you cultivate a modest suburban border, a rural acreage, or container gardens on an urban balcony, the principles within these pages will empower you to create a dynamic, evolving display that celebrates each season’s unique character while maintaining visual continuity. The journey begins not with digging a hole, but with understanding the living calendar hidden within each unassuming bulb.
The Three-Layer Succession Framework: Engineering Year-Round Bloom
At the heart of every successful continuous-bloom bulb garden lies a deliberate architectural approach we call the Three-Layer Succession Framework. This methodology moves beyond the common misconception that “bulbs = spring flowers” by strategically positioning distinct bulb categories to create overlapping waves of color. Think of your garden bed as a theatrical stage where performers enter and exit according to a carefully choreographed schedule. The Spring Foundation Layer establishes the initial visual impact. The Summer Bridge Layer ensures seamless transition without awkward gaps. The Autumn Finale Layer provides a graceful conclusion while setting the stage for next year’s performance. This framework acknowledges that bulbs don’t exist in isolation—they interact with surrounding perennials, shrubs, and seasonal light conditions. By designing with succession in mind, you create living mulch where fading foliage of early bloomers is naturally concealed by emerging summer plants, eliminating the “brown period” that discourages many gardeners. The framework also incorporates soil health considerations, recognizing that different bulb types have varying nutrient demands and root structures that benefit the garden ecosystem when properly sequenced. Implementing this system requires understanding not just what to plant, but when each component performs its role in the seasonal symphony. Below, we explore each layer in meticulous detail, including specific varieties, planting depths, spacing considerations, and companion planting strategies that maximize visual impact while supporting plant health.
Layer 1: The Spring Foundation – Early Awakening Through Late Spring
The Spring Foundation Layer forms the emotional and visual anchor of your bulb garden. These are the flowers that signal winter’s end and rekindle gardening enthusiasm after dormant months. This layer requires the most strategic planning because its performers must be planted the previous autumn to undergo necessary chilling. Understanding the precise bloom sequence within this layer prevents color clashes and ensures continuous interest from late winter through late spring.
Late Winter Emergers (February–March):
These botanical pioneers possess remarkable cold tolerance, often blooming while snow still dusts the ground. Crocus chrysanthus (snow crocus) varieties like ‘Blue Bird’ or ‘Cream Beauty’ push through frozen soil with cup-shaped flowers in violet, gold, or white. Plant 3–4 inches deep and 3 inches apart in clusters of 15–25 bulbs for maximum visual impact. Galanthus nivalis (snowdrops) form delicate pendulous bells on slender stems—plant ‘Flore Pleno’ for double-flowered elegance. Eranthis hyemalis (winter aconite) creates cheerful yellow goblets surrounded by ruffled collars of green; its rapid spread makes it ideal for naturalizing under deciduous trees where it receives winter sun before canopy closure. Critical planting insight: These earliest bloomers require exceptional drainage. Amend heavy clay soils with coarse sand and compost at a 1:1 ratio in the top 6 inches. Avoid planting beneath evergreen trees where soil remains frozen longer. A common mistake is planting too sparsely—these small flowers disappear when isolated. Create “drifts” following natural contours of your landscape for an organic appearance.
Early Spring Stars (March–April):
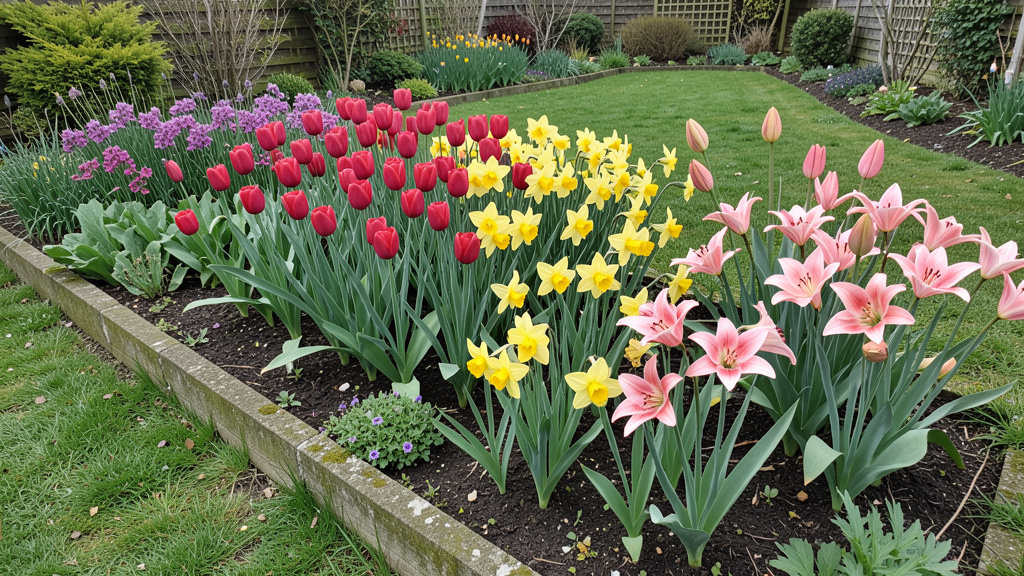
As soil temperatures reach 50°F (10°C), the main spring chorus begins. Narcissus (daffodils) offer unparalleled reliability and deer resistance. For extended bloom time within this category, select varieties across early, mid, and late season: ‘February Gold’ (early miniature), ‘Ice Follies’ (midseason large-cupped), and ‘Cheerfulness’ (late double). Plant daffodils 6–8 inches deep (deeper in sandy soils) with pointed end up. Hyacinthus orientalis (hyacinths) provide intense fragrance and dense flower spikes in cobalt, pink, or white. Plant 6 inches deep and 5 inches apart—closer spacing creates fuller visual blocks. Muscari armeniacum (grape hyacinth) forms deep blue cascades perfect for edging or weaving among taller bulbs. Its grass-like foliage emerges early, so position where it won’t be disturbed by later planting. Scilla siberica (Siberian squill) creates electric blue carpets beneath flowering cherries; plant generously (50+ bulbs) for dramatic effect. Design principle: Create color echoes by repeating a signature hue across different bloom times. If using ‘Tête-à-Tête’ daffodils (golden yellow), follow with yellow-tipped tulips and later, yellow alliums for visual continuity.
Mid-to-Late Spring Spectacle (April–May):
This is the tulip and allium showcase. Tulipa varieties require careful selection for perennial performance. Darwin Hybrids (‘Apeldoorn’, ‘Golden Apeldoorn’) reliably return for multiple years with large, vibrant flowers. Species tulips like Tulipa clusiana ‘Cynthia’ (pink with yellow center) naturalize beautifully in rock gardens. Plant tulips 8 inches deep in well-drained soil—deeper planting encourages perennialization. Allium giganteum creates stunning 4–6 inch purple globes on 3–4 foot stems, blooming as tulips fade. Pair with Allium christophii (star of Persia) for silvery-lavender fireworks. Fritillaria meleagris (checkered lily) offers unique checkered maroon or white bells in moist areas. Camassia leichtlinii (great camas) produces spires of blue in late spring, thriving in meadow settings. Critical cultural note: Tulip foliage must remain intact for 6–8 weeks post-bloom to recharge bulbs. Interplant with fast-growing perennials like Hosta ‘Francee’ or Heuchera whose emerging foliage conceals yellowing tulip leaves. Avoid the temptation to braid or tie daffodil leaves, as this restricts the leaf surface available for photosynthesis and weakens bulbs for the following season.
The Fundamental Principle: Continuous bloom isn’t achieved by planting more bulbs—it’s engineered through precise temporal sequencing where each variety’s decline is masked by the next performer’s emergence, creating an unbroken visual narrative across seasons.
Layer 2: The Summer Bridge – Sustaining Momentum Through Heat
Many gardeners mistakenly believe bulbs disappear after spring. The Summer Bridge Layer shatters this myth with heat-loving corms, tubers, and rhizomes that thrive when spring bulbs retreat. These performers require planting after last frost date when soil reaches 60°F (15°C), making them perfect projects for late spring gardening sessions. Unlike spring bulbs that store energy during winter dormancy, summer bulbs often need winter storage in cold climates—a crucial distinction affecting your planning.
Early Summer Transition (May–June):
As alliums fade, summer bulbs step forward. Iris germanica (bearded iris) rhizomes planted the previous summer produce sword-like foliage and intricate flowers in May–June. Select reblooming varieties like ‘Immortality’ for potential fall encore. Plant rhizomes shallowly with tops exposed, in full sun and excellent drainage. Gladiolus (glads) provide vertical drama with flower spikes in every color except true blue. Plant corms 4–6 inches deep every two weeks from late spring through early July for continuous bloom. Stagger planting depths: deeper corms bloom later. Acidanthera (peacock orchid) offers fragrant white flowers with maroon centers on 3-foot stems—plant 4 inches deep in groups of 7–10. Lilium asiatic hybrids (Asiatic lilies) burst forth with upward-facing, spotted blooms in vibrant reds, oranges, and yellows. Plant bulbs 6–8 inches deep (deeper for taller varieties) where roots stay cool but tops receive sun—a technique called “head in the sun, feet in the shade.” Companion strategy: Position lilies behind summer perennials like Salvia nemorosa ‘Caradonna’ whose purple spikes complement orange lilies while hiding fading lower foliage.
Midsummer Powerhouses (June–August):
When temperatures peak, these bulbs thrive. Dahlia tubers deliver remarkable color intensity and form diversity—from dinner-plate ‘Café au Lait’ to pompon ‘Karma Choc’. Plant after soil warms to 60°F, 6 inches deep with eyes facing up. Install stakes at planting time to avoid root damage later. Lilium orientalis (Oriental lilies) like ‘Stargazer’ release intoxicating evening fragrance with recurved pink petals. Plant 8 inches deep in acidic soil amended with peat moss. Eucomis (pineapple lily) creates architectural interest with tufted flower spikes resembling tropical fruit—perfect for container gardens. Zantedeschia aethiopica (calla lily) thrives in moist areas with elegant white spathes; ‘Pink Mist’ offers soft rose hues. Critical moisture management: Summer bulbs demand consistent moisture but despise soggy roots. Create a “moisture sandwich” when planting: layer compost at bottom of hole, position bulb, then backfill with native soil mixed with perlite. Apply 2 inches of shredded bark mulch to conserve moisture and regulate soil temperature. In containers, use moisture-control potting mix and elevate pots on feet for drainage. Common pitfall: Over-fertilizing dahlias encourages lush foliage but fewer blooms. Use balanced fertilizer (10-10-10) at planting, then switch to low-nitrogen bloom booster (5-10-10) when buds form.
Late Summer Continuity (August–September):
These performers extend the season gracefully. Lycoris radiata (spider lily) produces striking red umbrellas on leafless stems in late summer—a magical surprise after foliage disappears in spring. Plant bulbs 4 inches deep in protected locations. Hymenocallis (spider lily relatives) offer fragrant white flowers with dramatic stamens. Colchicum autumnale (autumn crocus) actually blooms in September despite its name, with rosy-purple flowers emerging before leaves. Plant corms 3 inches deep in grassy areas for naturalized effect. Sternbergia lutea (winter daffodil) pushes golden cups through dry soil in September. Design insight: Position late-summer bulbs near seating areas or pathways where their unexpected blooms create moments of discovery. Pair Lycoris with ornamental grasses like Miscanthus sinensis ‘Adagio’ whose fine texture contrasts with bold flower forms. For moon gardens, combine white Zephyranthes candida (rain lily) with silver-foliaged Artemisia—rain lilies magically appear after summer showers, providing spontaneous delight.
Layer 3: The Autumn Finale – Graceful Closure and Future Promise
The Autumn Finale Layer serves dual purposes: delivering unexpected late-season color while simultaneously planting the seeds of next spring’s display. This layer requires nuanced understanding of bulb physiology, as it includes both fall-blooming varieties and the critical autumn planting of spring bulbs. Many gardeners overlook fall bloomers, missing opportunities for seasonal extension, while others delay spring bulb planting until it’s too late for proper root development.
Fall-Blooming Specialists (September–November):
These botanical treasures defy expectations. Crocus sativus (saffron crocus) produces delicate purple flowers with vivid red stigmas in October—each stigma is precious saffron spice. Plant corms 3 inches deep in full sun; harvest stigmas mid-morning on bloom day. Colchicum varieties like ‘Waterlily’ offer double pink flowers resembling water lilies. Sternbergia species provide golden cups when most gardens fade. Cyclamen hederifolium forms heart-shaped leaves with upswept pink or white flowers in shaded woodlands. Critical planting note: Fall bloomers must be planted in late summer (August) to establish before flowering—waiting until September misses their narrow planting window. They prefer dry summer dormancy, so avoid irrigating planting areas during July–August. In regions with heavy autumn rains, plant on slight mounds to prevent rot. Companion strategy: Interplant with late-blooming asters or Sedum ‘Autumn Joy’ whose fading flowers provide structural contrast to delicate crocus blooms. Position near evergreen groundcovers like Vinca minor to highlight their emergence against dark foliage.
The Essential Autumn Ritual: Planting Next Spring’s Display
This is among the most consequential gardening tasks of the year. Spring-blooming bulbs require 12–16 weeks of soil temperatures below 40°F (4°C) to initiate flower development. Planting too early (when soil is still warm) causes premature growth vulnerable to frost; planting too late risks inadequate root establishment. Optimal timing varies by hardiness zone:
– Zones 3–5: Late September to mid-October
– Zones 6–7: Mid-October to early November
– Zones 8–9: Late October to late November (pre-chill tulips/daffodils 8–10 weeks at 40°F before planting)
– Zone 10+: Pre-chill bulbs; plant December–January
Soil preparation is essential. Dig planting areas 12 inches deep. Remove rocks and roots. Amend with equal parts compost and your native soil. For clay soils, add coarse sand. For sandy soils, add composted leaf mold. Incorporate bulb fertilizer (low-nitrogen, high-phosphorus like 5-10-10) at recommended rates—never let bulbs contact fertilizer directly. Planting depth guideline: Approximately three times the bulb’s height. A 2-inch tulip bulb goes 6 inches deep; a 1-inch crocus goes 3 inches deep. Adjustments: In sandy soils, plant slightly deeper; in heavy clay, plant slightly shallower. Spacing guidelines:
– Large bulbs (tulips, daffodils): 4–6 inches apart
– Medium bulbs (hyacinths, alliums): 3–5 inches apart
– Small bulbs (crocus, snowdrops): 2–3 inches apart
Advanced technique: Lasagna layering (also called bulb lasagna or pocket planting). In a single planting hole 12 inches deep:
1. Place largest bulbs (tulips) at bottom (8 inches deep)
2. Cover with 2 inches of soil
3. Add medium bulbs (hyacinths) at 6 inches deep
4. Cover with 2 inches of soil
5. Add small bulbs (crocus) at 3 inches deep
6. Finish with soil and mulch
This creates a vertical bloom sequence where flowers emerge at different heights and times from one concentrated area—ideal for containers or small garden spaces. For naturalized areas beneath trees, toss bulbs gently across the area and plant where they land for organic drifts. Always plant bulbs with roots down, shoots up. If orientation is unclear (like with dahlias), place eyes or growth points facing upward. After planting, water thoroughly to settle soil and initiate root growth. Apply 2–3 inches of shredded leaf mulch to regulate soil temperature and suppress weeds. In regions with severe winters (zones 3–5), add extra mulch after ground freezes to prevent frost heaving.
Designing Your Bulb Garden for Continuous Color and Form
Technical planting knowledge alone won’t create a breathtaking garden. Artistic design transforms individual bulbs into cohesive living art. This section moves beyond “how to plant” into “how to compose,” addressing spatial relationships, color theory, and seasonal evolution that elevate your bulb garden from collection to masterpiece.
Mapping Your Garden’s Microclimates and Light Patterns
Bulbs respond distinctly to environmental conditions. A tulip thriving in full sun may struggle in shade; a snowdrop naturalizing happily under maples may scorch in open fields. Begin design by creating a detailed sun map of your planting areas. Over one week, sketch your garden at 9 AM, 1 PM, and 5 PM, noting where full sun (6+ hours direct light), partial sun (4–6 hours), partial shade (2–4 hours), and full shade (<2 hours) occur. Simultaneously, assess soil drainage: dig a 12-inch hole, fill with water, and time drainage. Less than 4 hours = poor drainage (requires significant amendment); 4–12 hours = moderate (needs improvement); over 12 hours = excellent. Document existing vegetation—deciduous trees create shifting light patterns crucial for spring bulb success. Note wind exposure: tall gladiolus need sheltered locations; low-growing crocus tolerate open areas. Record slope direction: south-facing slopes warm earlier (ideal for early bloomers); north-facing slopes stay cooler longer (better for late spring bulbs). This microclimate analysis prevents costly mistakes. Example: Planting moisture-loving Leucojum aestivum (summer snowflake) in a dry, south-facing slope typically leads to poor performance, while positioning it in a north-facing depression with amended soil supports reliable growth. Similarly, placing deer-prone tulips near your home’s frequently used path leverages human activity as a deterrent, while situating deer-resistant daffodils along remote property edges creates natural barriers.
Creating an Evolving Color Palette Across Seasons
Color theory for bulb gardens differs fundamentally from static painting. Your palette must transition gracefully through time while maintaining coherence. Begin by selecting a dominant anchor color that appears across multiple seasons—this creates visual continuity. For instance, choosing violet/purple as your anchor:
– Spring: Muscari (grape hyacinth), Hyacinthoides hispanica (Spanish bluebells)
– Summer: Allium ‘Purple Sensation’, Gladiolus ‘Black Star’
– Fall: Crocus sativus (saffron crocus has purple petals)
Complement this anchor with seasonal accent colors that shift with the year:
– Early Spring: Soft yellows (Crocus chrysanthus ‘Cream Beauty’) and whites (Galanthus) for hope and renewal
– Late Spring: Vibrant oranges (Tulipa ‘Ballade’) and pinks (Tulipa ‘Pink Impression’) for celebration
– Summer: Deep reds (Dahlia ‘Thomas Edison’) and blues (Agapanthus) for intensity
– Autumn: Burnt oranges (Colchicum ‘Autumn Queen’) and golds (Sternbergia lutea) for warmth
Avoid color chaos by limiting your palette to 3–4 core colors plus neutrals (white, silver, green). Use white strategically as a “visual rest” between intense colors—planting white Narcissus ‘Thalia’ between purple alliums and red tulips prevents clashing. Consider bloom time overlaps: When Allium giganteum (purple) fades in June, ensure Gladiolus ‘Black Star’ (deep maroon) emerges nearby to maintain color presence. For monochromatic elegance, create a “white garden” evolving through textures: snowdrops (pendulous bells), Leucojum vernum (nodding bells), Narcissus ‘Thalia’ (graceful trumpets), Lilium candidum (stately trumpets), Zephyranthes candida (star-shaped). Document your color plan seasonally with simple sketches—this prevents impulse purchases that disrupt your scheme. Remember that foliage contributes significantly to palette: blue-green Muscari leaves, silver-variegated Hosta companions, and burgundy Heuchera create background harmony even when flowers rest.
Layering by Height, Form, and Bloom Duration
Successful bulb gardens operate in three dimensions. The “thriller, filler, spiller” container principle applies equally to in-ground plantings. Establish vertical layers:
– Back layer (24+ inches): Structural elements like Allium giganteum (48″), Gladiolus (36–60″), Dahlia ‘Bishop of Llandaff’ (36″)
– Middle layer (12–24 inches): Tulipa Darwin Hybrids (20″), Lilium asiatic (24–36″), Iris germanica (24–36″)
– Front layer (under 12 inches): Crocus (4″), Galanthus (6″), Muscari (8″), Scilla (6″)
Critical nuance: Account for bloom duration within layers. Allium flowers last several weeks but leave distinctive seed heads that provide winter interest—position where these skeletal forms enhance autumn structure. Tulipa blooms last 1–2 weeks but foliage persists 6–8 weeks; place behind perennials that emerge as tulip leaves yellow. Dahlia blooms continuously from July until frost but require staking; integrate supports during planting to avoid root damage later. Form diversity prevents visual monotony: Combine spires (Gladiolus), globes (Allium), cups (Tulipa), bells (Leucojum), and stars (Zephyranthes). Create rhythm by repeating form-color combinations at intervals: A cluster of purple Allium followed by white Narcissus ‘Thalia’, repeated three times across a border, guides the eye naturally. For naturalistic plantings, abandon rigid rows. Toss handfuls of small bulbs across the area and plant where they fall. For formal gardens, use geometric patterns: concentric circles of decreasing height (tulips outer ring, hyacinths middle, crocus center) create living mandalas. Always photograph your garden monthly for two years—this reveals unexpected gaps or clashes invisible during initial planning.
Soil Preparation and Planting Techniques for Long-Term Success
Soil is the silent partner in bulb success. Even the most meticulously designed garden struggles with poor soil preparation. This section details site-specific soil amendment strategies, advanced planting methods for challenging conditions, and container techniques that expand bulb possibilities beyond traditional garden beds.
Creating the Ideal Bulb Bed: Soil Science Made Practical
Bulbs share one essential requirement: good drainage. Sitting in waterlogged soil for extended periods invites rot. Yet they also need consistent moisture during active growth. Achieving this balance requires understanding your native soil’s composition and modifying it strategically. Begin with a simple soil assessment: Squeeze a handful of moist soil. If it forms a tight ball that doesn’t crumble = clay (poor drainage). If it feels gritty and won’t hold shape = sand (drains too fast). If it forms a loose ball that crumbles easily = loam (ideal). For clay soils: Excavate planting area 12–18 inches deep. Remove half the native soil. Mix remaining soil with equal parts compost and coarse horticultural sand. Add gypsum per package instructions to improve structure. For sandy soils: Excavate 12 inches deep. Mix native soil with equal parts compost and coconut coir (retains moisture without compaction). Add bone meal per package instructions for slow-release phosphorus. For existing beds with unknown history: Perform a percolation test. Dig 12-inch hole, fill with water twice (first to saturate soil), time drainage of second filling. Under 4 hours = needs drainage improvement; over 24 hours = needs moisture retention. Universal amendment approach for new bulb beds:
– 50% native soil
– 30% compost (well-rotted mushroom or leaf mold)
– 15% coarse sand or perlite
– 5% aged pine bark fines
Incorporate amendments thoroughly to 12 inches depth—bulbs won’t grow roots into unamended soil below. Avoid fresh manure (burns roots) or high-nitrogen fertilizers (promotes foliage over flowers). Instead, use bulb-specific fertilizer (3-5-3 or 5-10-10) mixed into the lower third of the planting hole. For naturalizing areas beneath trees: Work amendments into top 6 inches only to avoid damaging tree roots. Focus on adding organic matter annually via leaf mulch rather than deep digging. Critical reminder: Soil pH matters. Most bulbs prefer slightly acidic to neutral soil (pH 6.0–7.0). Lilium and Dahlia thrive at pH 6.0–6.5; Narcissus tolerates pH 6.0–7.5. Test soil pH with an inexpensive kit. To lower pH (make more acidic): Add elemental sulfur (follow package rates). To raise pH (make more alkaline): Add garden lime. Adjust gradually over two years. After planting, apply 2–3 inches of shredded hardwood mulch. This regulates soil temperature, suppresses weeds, and decomposes to enrich soil. Replenish mulch annually in fall. Avoid rock mulch—it heats soil excessively in summer and provides no organic benefit.
Lasagna Layering: Maximizing Impact in Minimal Space
Lasagna layering (also called pocket planting or bulb lasagna) revolutionizes small-space gardening by creating vertical bloom sequences in containers or compact beds. This technique stacks bulbs at different depths in a single planting hole, producing multiple waves of flowers from one concentrated area. Ideal for patios, entryways, or filling small gaps in established gardens. Container requirements: Minimum 12 inches deep, with drainage holes. Use high-quality potting mix (not garden soil) amended with 20% perlite for drainage. Step-by-step process:
1. Place broken pottery shards or mesh over drainage holes
2. Add 2 inches of potting mix
3. Position largest bulbs (tulips, daffodils) on soil, spaced closely but not touching (pointed ends up)
4. Cover with 2–3 inches of soil
5. Add medium bulbs (hyacinths, small alliums) in gaps between lower bulbs
6. Cover with 2 inches of soil
7. Add smallest bulbs (crocus, snowdrops, muscari) scattered across surface
8. Finish with 1–2 inches of soil, leaving 1 inch below container rim
9. Water thoroughly until water runs from drainage holes
10. Place container in location matching bulb light requirements
For in-ground lasagna beds: Dig hole 12–14 inches deep. Follow same layering sequence. Space planting pockets 8–10 inches apart across the bed. Bloom sequence example in one container:
– March: Crocus and snowdrops emerge
– April: Hyacinths and early tulips bloom beneath fading crocus
– May: Late tulips and alliums rise as hyacinths fade
– June: Foliage of all layers conceals itself as perennials planted around container take over
Advanced variation: “Color cascade” layering. Plant white crocus at top layer, pink hyacinths middle layer, purple tulips bottom layer—creating a downward color gradient as each layer blooms. For fall interest: Add colchicum corms at 3-inch depth in August for September blooms before spring bulbs emerge. Critical success factors:
– Ensure bulb layers don’t touch each other or container sides (reduces disease risk)
– Use only firm, disease-free bulbs
– In cold climates (zones 3–6), protect containers from freeze-thaw cycles by burying pots in ground, moving to unheated garage after first frost, or wrapping with bubble wrap
– Water containers deeply when top inch of soil feels dry; reduce watering after foliage yellows
Document your layering designs with photos and notes—successful combinations deserve repetition. Lasagna planting transforms limited spaces into dynamic seasonal displays, proving that garden size doesn’t limit floral abundance.
Container Gardening with Bulbs: Expanding Possibilities
Containers liberate bulb gardening from soil constraints and spatial limitations. Apartment dwellers, gardeners with poor native soil, or those seeking movable floral displays find immense value in container techniques. Beyond standard lasagna layering, specialized approaches unlock unique opportunities. Forced bulb containers bring spring indoors during winter. Select pre-chilled bulbs or chill yourself: After planting in pots, place containers in dark location at 35–45°F (2–7°C) for 12–16 weeks (unheated garage, refrigerator—away from fruit gases). Check weekly for root emergence through drainage holes. When shoots appear (2–3 inches tall), move to cool room (60°F/15°C) with indirect light for one week, then to brighter location. Hyacinthus, Narcissus ‘Paperwhite’, and Crocus force reliably. Tender bulb containers solve climate challenges. Plant Dahlia, Gladiolus, or Canna in large pots (16+ inches diameter). When frost threatens, simply move containers to protected location or store bulbs indoors. This eliminates digging and storage uncertainties. Seasonal container rotation maintains year-round interest:
– Fall: Plant spring bulbs in decorative pots; display among mums
– Winter: Move pots to protected area; add winter pansies on surface
– Spring: Enjoy blooms; after foliage yellows, replace with summer annuals
– Summer: Plant summer bulbs directly into same pots
– Autumn: Repeat cycle
Critical container considerations:
– Pot material matters: Terracotta breathes well but dries fast; plastic retains moisture but requires excellent drainage; fiberglass offers durability and moisture balance
– Drainage is essential: Drill additional holes if needed; avoid saucers that trap water
– Potting mix must be fresh each season: Old mix compacts, loses nutrients, and may harbor pathogens
– Fertilize containers differently: Use liquid fertilizer at half-strength every two weeks during active growth (spring bulbs after sprouting; summer bulbs after 6 inches growth)
– Overwintering containers: In zones 7+, leave pots outside with mulch protection. In zones 3–6, bury pots to rim in garden bed, wrap with burlap, or store in unheated garage with occasional watering to prevent complete drying
Create themed containers for special impact: “Moon Garden” pot with white Narcissus ‘Thalia’, Hyacinth ‘Carnegie’, and Muscari ‘Album’; “Pollinator Pot” with purple Allium, blue Muscari, and yellow Narcissus ‘Tête-à-Tête’. Containers also enable bulb experimentation—you can test new varieties without committing garden space. Photograph successful combinations for future reference. With thoughtful execution, containers become versatile stages for bulb artistry across all seasons.
Seasonal Care and Maintenance: Nurturing Your Living Calendar
Planting is just the beginning. Strategic seasonal care transforms temporary displays into enduring garden legacies. This section details precise maintenance protocols for each season, emphasizing proactive practices that prevent problems while respecting bulbs’ natural growth cycles.
Spring Care: Supporting Growth and Preparing for Future Seasons
Spring care begins before blooms appear. As soon as soil is workable (not muddy), remove winter mulch from bulb areas to allow soil warming. Inspect for frost-heaved bulbs—gently press back into soil and cover with fresh compost. When shoots emerge 2–3 inches tall, apply balanced organic fertilizer (5-5-5) at half recommended strength to support root and foliage development without promoting excessive soft growth. Water deeply if spring rainfall is less than 1 inch per week—bulbs need consistent moisture during active growth. Critical post-bloom protocol: Never remove foliage until it yellows naturally. This 6–8 week period after flowering is when bulbs photosynthesize energy for next year’s blooms. For daffodils and tulips, this means resisting the urge to tidy yellowing leaves. Instead:
– Gently fold leaves downward (do not tie or braid)
– Interplant with fast-growing annuals like Lobularia maritima (sweet alyssum) or perennials like Geranium ‘Rozanne’ whose foliage conceals fading bulb leaves
– Apply light mulch (1 inch) of shredded leaves to suppress weeds competing with bulb foliage
Deadhead spent flowers immediately after petals drop—this prevents seed production that diverts energy from bulb development. Exception: Allow Allium and Fritillaria seed heads to remain for architectural interest and potential self-sowing. For naturalized areas beneath trees, avoid raking or disturbing soil where bulbs multiply. Monitor for pests: Aphids cluster on tulip buds—spray with strong water jet or insecticidal soap. Slugs target emerging shoots—place copper tape around beds or use iron phosphate bait. Disease watch: Botrytis (gray mold) appears as fuzzy gray spots on wet petals—remove affected flowers immediately and improve air circulation. After foliage yellows completely (usually late June), cut stems to soil level. For perennializing bulbs (daffodils, species tulips, alliums), leave bulbs in ground. For non-perennializing tulips or crowded clumps, mark locations with plant tags before foliage disappears, then dig and divide in July–August. Spring is also ideal time to photograph your garden and update planting maps—note which combinations worked beautifully and where gaps appeared for next year’s adjustments.
Summer Management: Supporting Growth and Preparing for Dormancy
Summer care varies between spring-planted summer bulbs and dormant spring bulbs. For active summer performers (Dahlia, Gladiolus, Lilium): Water deeply 1–2 times weekly during dry spells, directing moisture to soil base to avoid wetting foliage (reduces disease risk). Apply low-nitrogen fertilizer (5-10-10) when buds form to support flowering. Stake tall varieties before they need support—inserting stakes later risks bulb damage. For dahlias, pinch back center growth when plants reach 12 inches to encourage bushier growth and more blooms. Deadhead spent flowers daily to prolong blooming. Monitor for pests: Japanese beetles skeletonize lily leaves—hand-pick early morning when sluggish. Thrips distort dahlia buds—spray with neem oil at first sign. For dormant spring bulbs: This is their rest period. Avoid cultivating soil where bulbs sleep—roots remain active even when foliage disappears. Do not fertilize dormant bulbs. If summer rainfall exceeds 2 inches weekly in poorly drained areas, temporarily divert water from bulb beds to prevent rot. For naturalized areas, allow fallen leaves to remain as protective mulch. Critical July–August task: Divide overcrowded spring bulb clumps. When foliage has completely yellowed and dried:
1. Carefully dig around clump with garden fork (minimizes bulb damage)
2. Lift entire clump and gently separate bulbs by hand
3. Discard soft, damaged, or diseased bulbs
4. Replant healthy bulbs immediately at proper depth and spacing
5. Water thoroughly after replanting
For bulbs requiring winter storage (Dahlia, Gladiolus, Canna in zones below hardiness):
– Wait until after first light frost blackens foliage
– Cut stems to 4 inches
– Carefully dig bulbs with fork, keeping soil clump intact
– Gently remove excess soil (do not wash)
– Cure in dry, ventilated area at 60–70°F (15–21°C) for 2–3 weeks
– Remove dried stems and loose soil
– Store in mesh bags or cardboard boxes filled with peat moss, vermiculite, or wood shavings
– Keep in dark location at 40–50°F (4–10°C) with moderate humidity
– Check monthly for rot or shriveling; remove affected bulbs immediately
Summer is also prime time for garden journaling. Document bloom times, heights, color interactions, and maintenance challenges. Note which varieties performed well in your specific conditions. This personalized data becomes invaluable for future planning. Additionally, July–August is ideal for ordering next season’s bulbs—reputable suppliers release new varieties and allow pre-orders before autumn rush. Place orders early for best selection, especially for rare or heirloom varieties.
Fall Rituals: Planting, Dividing, and Protecting for Future Seasons
Autumn is the most consequential season for bulb gardeners. Actions taken now significantly influence next year’s success. Begin by clearing summer debris from bulb beds while preserving beneficial habitat—leave some leaf litter in naturalized areas for overwintering insects. Conduct final soil assessment to guide amendments. For existing bulb beds showing reduced bloom: Top-dress with 1 inch of compost and gently work into top 2 inches of soil. Apply bulb fertilizer (low-nitrogen) around established clumps following package rates. The cornerstone autumn task: planting spring-blooming bulbs. Follow the precise timing guidelines outlined in the Three-Layer Framework section. After planting:
– Water thoroughly to settle soil and initiate root growth
– Apply 2–3 inches of shredded leaf mulch (not whole leaves which mat)
– In zones 3–5, add extra mulch layer after ground freezes to prevent frost heaving
– Install wire mesh or hardware cloth over newly planted areas if rodents are problematic
For summer bulbs requiring storage: Complete curing and storage process before first hard freeze. Label containers clearly with variety names and dates. For bulbs remaining in ground (Lilium, Narcissus in appropriate zones): After foliage yellows completely, cut stems to soil level. Apply fresh mulch layer to protect from temperature fluctuations. Critical autumn design task: Evaluate your garden’s seasonal flow. Walk through your space weekly from September through November, noting:
– Where color gaps occurred after summer bloom
– Which fall-blooming bulbs provided welcome surprise
– Areas needing additional spring bulbs for better coverage
– Companion plantings that successfully concealed fading foliage
Take photographs in afternoon light to assess structural elements. Update your garden map with observations. This reflective practice transforms each season’s lessons into next year’s improvements. Additionally, autumn is ideal for soil improvement projects. Plant cover crops like crimson clover in vacant beds to fix nitrogen and improve soil structure over winter. Order soil amendments in bulk for spring preparation. Clean and sharpen garden tools before winter storage—well-maintained tools make spring planting more efficient. Finally, practice mindful observation: Sit quietly in your garden during autumn’s golden light. Notice the subtle beauty of seed heads, changing leaf colors, and late-season pollinators. This connection reinforces why we garden—not just for floral displays, but for relationship with living cycles.
Troubleshooting Common Challenges: Solutions Rooted in Understanding
Even meticulous planning encounters obstacles. This section addresses frequent bulb garden challenges with diagnostic precision and actionable solutions, emphasizing prevention while respecting ecological balance.
Pest and Disease Management: Integrated Strategies for Healthy Gardens
Bulbs face distinct threats at different life stages. Understanding pest life cycles enables targeted intervention without broad-spectrum pesticides that harm beneficial insects. Rodent protection (voles, mice, squirrels) requires multi-layered defense:
– Physical barriers: Line planting holes with 1/2-inch hardware cloth; cover newly planted areas with wire mesh until shoots emerge
– Bulb selection: Prioritize rodent-resistant varieties—Narcissus (daffodils), Allium, Fritillaria imperialis (crown imperial—its scent deters rodents)
– Natural repellents: Interplant with Euphorbia (spurge); sprinkle blood meal around planting areas (reapply after rain)
– Strategic planting: Avoid planting tulips and crocus near rodent habitat (woodpiles, dense shrubbery); position near high-traffic areas
Insect pests require identification before treatment:
– Aphids on tulip buds: Spray with strong water jet early morning; introduce ladybugs; avoid over-fertilizing with nitrogen
– Lily leaf beetles (scarlet red): Hand-pick adults and larvae daily; spray neem oil on undersides of leaves at first sign
– Thrips on dahlias: Use yellow sticky traps; spray insecticidal soap at dusk when bees are inactive
– Narcissus bulb fly: Plant daffodils deeper (8 inches); cover soil with fine mesh after planting; remove and destroy infested bulbs showing softness
Disease prevention centers on cultural practices:
– Botrytis (gray mold): Appears as gray fuzzy spots on wet petals/stems. Prevent by ensuring good air circulation (proper spacing), avoiding overhead watering, and removing affected plant parts immediately. Never compost diseased material.
– Basal rot (Fusarium): Causes yellowing leaves and bulb decay. Prevent by planting only firm, disease-free bulbs; rotating planting locations every 3 years; avoiding high-nitrogen fertilizers.
– Tulip fire (Botrytis tulipae): Distorts leaves with twisted, brown-spotted growth. Remove and destroy affected plants immediately; avoid replanting tulips in same location for 3 years.
Critical principle: Healthy soil supports healthy plants. Bulbs in well-drained, organically rich soil with proper spacing resist pests and diseases more effectively than stressed plants. Always prioritize prevention: Select disease-resistant varieties, practice crop rotation where applicable, and maintain garden sanitation by removing spent foliage. When intervention is necessary, start with least-toxic options: hand-picking, water sprays, insecticidal soaps, or neem oil. Reserve chemical controls for severe infestations, applying precisely according to label instructions while protecting pollinators. Remember that some “pests” are beneficial: Ground beetles consume slug eggs; parasitic wasps control aphids. Tolerate minor damage—resilient ecosystems, not perfect plants, are the goal.
Climate Adaptations: Success Across Diverse Growing Regions
Bulb gardening principles adapt across climates when core requirements are understood. The primary climate challenges involve winter chilling requirements and summer moisture management. Cold climate strategies (Zones 3–5):
– Winter protection: After ground freezes, apply 4–6 inches of shredded leaf mulch over bulb beds to prevent frost heaving. Remove gradually in spring as soil thaws.
– Bulb selection: Prioritize hardy varieties—Narcissus ‘Carlton’, Allium ‘Purple Sensation’, Crocus species. Choose Darwin Hybrids or species tulips over marginally hardy types.
– Planting timing: Complete spring bulb planting by mid-October to allow root establishment before deep freeze.
– Container protection: Bury pots to rim in garden bed; wrap with bubble wrap and burlap; or store in unheated garage with occasional watering.
Warm climate challenges (Zones 8–10):
– Chilling requirement solution: Purchase pre-chilled bulbs or refrigerate tulips, hyacinths, and crocus for 12–16 weeks before planting (store in paper bag away from ripening fruit).
– Alternative bulb selection: Focus on heat-loving varieties that don’t require chilling—Zephyranthes (rain lily), Habranthus, Crinum, Amaryllis belladonna (naked lady), Lycoris.
– Planting timing: Delay spring bulb planting until soil cools in December–January.
– Summer dormancy management: For bulbs requiring dry summer rest (Crocus sativus, Sternbergia), plant in raised beds with sharp drainage; avoid summer irrigation in their location.
Variable climate regions (Zones 6–7):
– Microclimate utilization: Plant early bloomers on south-facing slopes for earlier display; position late bloomers in north-facing areas for extended season.
– Soil moisture management: Amend heavy clay soils extensively for drainage; add moisture-retaining compost to sandy soils.
– Seasonal adjustment: Monitor soil temperatures with an inexpensive thermometer—plant spring bulbs when soil reaches 55°F (13°C) at 6-inch depth.
Universal adaptation principle: Observe local botanical gardens and successful neighborhood gardens. Note which bulbs thrive naturally in your area—these varieties have proven adaptation to your specific microclimate, soil, and pest pressures. Join local gardening clubs for region-specific advice. Remember that climate zones are guidelines—your property’s unique features (slope, wind exposure, tree cover) create microclimates that may differ from regional averages. Keep detailed records of what succeeds in your specific conditions; this personalized knowledge becomes your most valuable gardening asset.
Reviving a Tired Bulb Garden: Diagnostic and Renewal Protocols
When bulb displays diminish over time, systematic diagnosis identifies the cause before implementing solutions. Common symptoms and remedies:
– Fewer blooms, lush foliage: Excess nitrogen fertilizer. Solution: Stop nitrogen applications; apply phosphorus-rich fertilizer (bone meal) in fall; divide overcrowded clumps.
– Bulbs failing to emerge: Poor drainage causing rot; rodent damage; planting too shallow. Solution: Dig test hole to check soil moisture; install drainage; use physical barriers; replant at proper depth.
– Shortened bloom time: Insufficient chilling (warm climates); premature foliage removal. Solution: Pre-chill bulbs; allow foliage to yellow naturally; select varieties suited to your zone.
– Weak, spindly growth: Insufficient sunlight; depleted soil. Solution: Transplant to sunnier location; amend soil with compost and balanced fertilizer.
– Bulbs multiplying but not blooming: Overcrowding. Solution: Dig and divide clumps when dormant (July–August for spring bulbs); replant with proper spacing.
Renewal protocol for established beds:
1. Assessment phase (late summer): Map existing bulbs while foliage marks locations. Note bloom performance, spacing issues, and design gaps.
2. Soil rejuvenation (early fall): Top-dress entire bed with 2 inches of compost; gently work into top 3 inches of soil without disturbing bulbs.
3. Strategic division (August–September): Dig overcrowded clumps; separate healthy bulbs; discard damaged ones; replant at recommended spacing.
4. Gap filling (September–October): Plant new bulbs in identified gaps following lasagna layering principles for immediate and future impact.
5. Companion integration: Add perennials that support bulb lifecycle—Hosta to conceal fading foliage, Nepeta (catmint) for summer coverage, Helleborus for early spring interest before bulbs emerge.
For severely depleted beds: Consider complete renovation. In July, after foliage yellows:
– Carefully dig all bulbs
– Screen soil for rocks, roots, and debris
– Amend soil deeply with compost and drainage materials
– Replant healthy bulbs with improved spacing
– Introduce new varieties to refresh color scheme
Patience is essential—renewed bulbs may take one season to reestablish full bloom. Document the renewal process with photos and notes. Most importantly, celebrate small victories: A single cluster of revived snowdrops signals ecosystem recovery. Bulb gardens possess remarkable resilience when given proper conditions—they’ve persisted for generations in wild habitats through adaptive strategies we can honor in our cultivated spaces.
Your Questions, Answered
Q: How do I know if my stored bulbs are still viable before planting?
A: Perform a simple viability check. Healthy bulbs feel firm with dry, papery tunics (outer skin). Gently squeeze—soft, mushy bulbs indicate rot and should be discarded. Check for mold (white, blue, or green fuzz); lightly brush off surface mold and dip in fungicide solution if minor, but discard heavily affected bulbs. For tubers like dahlias, look for plump “eyes” (growth points). If bulbs feel lightweight or hollow, they’ve desiccated and won’t perform well. When uncertain, plant questionable bulbs in a nursery bed rather than prime garden locations—they may surprise you, but won’t compromise your main display.
Q: Can I plant bulbs in lawns for naturalized displays?
A: Absolutely—this creates magical “surprise” blooms. Best candidates: Crocus chrysanthus, Galanthus, Narcissus ‘February Gold’, Scilla siberica. Plant after lawn cools in fall (soil under 60°F/15°C). Use bulb planter or sharp trowel to remove soil plug. Place bulb at proper depth, replace soil plug, and tamp gently. Critical: Delay mowing until bulb foliage yellows completely (usually 6–8 weeks after bloom). Mark planting areas with temporary flags to avoid accidental disturbance. For larger areas, scatter bulbs randomly and plant where they fall for natural drifts. Avoid high-traffic lawn areas where bulbs would suffer compaction damage.
Q: Why do my tulips only bloom well the first year?
A: Most hybrid tulips (Darwin Hybrids excepted) are bred for single-season impact. Their energy goes into spectacular blooms rather than perennialization. Solutions: 1) Treat as annuals—plant fresh bulbs each fall for reliable display. 2) Select perennializing varieties: Darwin Hybrids, Greigii tulips, Kaufmanniana tulips, or species tulips like Tulipa clusiana. 3) Plant deeper (8–10 inches) in well-drained soil. 4) Allow foliage to remain until completely yellow. 5) Fertilize lightly in fall with low-nitrogen formula. For reliable multi-year performance, daffodils and alliums often provide better value with similar visual impact.
Q: How do I protect bulbs from deer and rabbits?
A: Prevention combines repellents, barriers, and plant selection. Primary strategy: Plant deer-resistant bulbs—Narcissus (daffodils), Allium, Fritillaria, Hyacinthoides, Muscari. Interplant vulnerable bulbs (tulips, crocus) with resistant varieties to confuse browsers. Physical barriers: Wire mesh cages buried around planting holes; hardware cloth covers over newly planted areas until shoots emerge. Repellents: Spray emerging shoots with commercial deer repellent containing putrescent egg solids; reapply after rain. Natural deterrents: Plant Allium or Fritillaria imperialis (crown imperial) near vulnerable bulbs—their strong scents mask appealing odors. For severe pressure, consider motion-activated sprinklers or fencing. Remember: Hungry deer will eat almost anything in deep winter—focus protection on high-value areas near your home.
Q: Can I grow bulbs successfully in containers on a balcony?
A: Containers excel for bulb gardening with proper protocols. Critical factors: Pot depth (minimum 12 inches), drainage holes (drill additional if needed), quality potting mix (not garden soil), and winter protection. For spring bulbs: Plant in fall; after first frost, move pots to unheated garage or bury in garden bed for chilling period; return to balcony when shoots emerge. For summer bulbs: Plant after last frost; place in location matching light needs; water consistently; bring tender bulbs indoors before first frost. Lasagna layering maximizes impact in limited space. Choose compact varieties: Narcissus ‘Tête-à-Tête’, Tulipa ‘Little Beauty’, Muscari. Group containers for greater visual impact. Elevate pots on feet to prevent waterlogging. In windy locations, secure tall varieties with discreet stakes.
Q: What should I do with bulb foliage after flowering?
A: This is the most critical post-bloom practice. Never cut, tie, or braid foliage until it has completely yellowed and withered (typically 6–8 weeks after bloom). During this period, leaves photosynthesize energy stored in bulbs for next year’s flowers. Premature removal significantly reduces bloom size and quantity in subsequent seasons. Instead: Gently fold leaves downward if they obstruct pathways. Interplant with fast-growing companions like Hosta, Heuchera, or annuals whose foliage conceals yellowing leaves. Apply light mulch to suppress weeds competing with bulb foliage. For naturalized areas under trees, simply let foliage decompose naturally—this returns nutrients to soil. Patience during this “resting phase” rewards you with stronger bulbs and more abundant future blooms.
Q: How do I handle bulbs that sprout too early during a winter warm spell?
A: Early sprouting rarely kills bulbs but may affect bloom quality. For shoots under 2 inches tall: Cover lightly with shredded leaves or straw to insulate from freezing temperatures. For taller shoots: Create a protective tent with burlap or frost cloth supported by stakes—avoid direct contact with foliage. Do not cut emerging shoots. Most bulbs have multiple flower buds; even if early shoots suffer frost damage, later buds often develop normally. Prevent future early sprouting by applying mulch after ground freezes (not before), which moderates soil temperature fluctuations. In consistently warm climates, select later-blooming varieties less prone to premature growth.
Q: Can I divide and transplant bulbs while they’re in bloom?
A: Generally not recommended. Blooming requires significant energy; transplanting causes root disturbance that stresses plants and reduces future performance. Exception: Emergency situations like construction requiring immediate relocation. If absolutely necessary: Water thoroughly 24 hours before moving. Dig wide and deep to preserve root ball. Replant immediately at same depth in prepared soil. Provide shade cloth protection for one week. Expect reduced blooms next season. Best practice: Mark bulb locations with plant tags while in bloom, then transplant during dormancy (July–August for spring bulbs; after frost for summer bulbs). This timing minimizes stress and maximizes recovery potential.
Q: Why are my bulbs producing leaves but no flowers (“blind” bulbs)?
A: Several factors cause blind bulbs: 1) Insufficient chilling (common in warm climates for tulips/hyacinths)—solution: pre-chill bulbs 12–16 weeks before planting. 2) Premature foliage removal previous season—always allow leaves to yellow naturally. 3) Overcrowding—divide clumps every 3–5 years. 4) Excess nitrogen fertilizer—use low-nitrogen bulb fertilizer. 5) Poor drainage causing bulb issues—improve soil structure. 6) Age—some bulbs (like certain tulips) naturally decline after 2–3 years. Diagnosis: Dig a sample bulb. If firm with healthy roots, address cultural factors. If soft or damaged, replace with fresh bulbs in amended soil. Patience—bulbs stressed by division or transplanting may skip a year of blooming before recovering.
Q: How do I create a bulb garden that supports pollinators?
A: Strategic bulb selection creates vital early-season nectar sources when few other flowers bloom. Prioritize single-flowered varieties (double flowers often lack accessible nectar/pollen). Top pollinator bulbs: Crocus (early bees), Galanthus (snowdrops), Scilla siberica, Muscari, Allium (bumblebees love globes), Fritillaria meleagris, Camassia. Plant in clusters of 10+ bulbs for efficient foraging. Extend bloom sequence: Early crocus feeds emerging queens; mid-spring alliums support established colonies; summer lilies attract butterflies. Avoid pesticides entirely in pollinator areas. Include native bulbs where appropriate (Erythronium in woodlands, Camassia in meadows). Provide water source: Shallow dish with stones for landing. Leave some bare soil patches for ground-nesting bees. Remember: Even small bulb plantings contribute meaningfully to pollinator survival during critical early-season periods.
Conclusion and Next Step
Creating a continuous-bloom bulb garden represents one of gardening’s most rewarding journeys—a deliberate collaboration with nature’s rhythms that yields increasing beauty with each passing season. The Three-Layer Succession Framework transforms fragmented planting into a cohesive living calendar where each bulb plays its part in an unbroken floral narrative. By understanding the distinct requirements of spring foundation bulbs, summer bridge performers, and autumn finale varieties, you engineer resilience and visual continuity that withstands seasonal transitions. This approach honors bulbs not as disposable decorations but as perennial partners in your landscape’s evolution. The true magic emerges not in any single bloom, but in the cumulative wisdom gained through seasons of observation—the way Muscari foliage perfectly conceals fading tulip leaves, how Allium seed heads provide winter architecture, or the quiet satisfaction of discovering autumn crocus where you planted them months earlier. Your bulb garden becomes a living journal of patience, foresight, and seasonal awareness.
The Three Foundational Principles to Carry Forward
- Temporal sequencing trumps quantity: Ten thoughtfully sequenced bulbs create more impact than fifty randomly planted ones. Design for the space between blooms as carefully as for the blooms themselves.
- Soil is the silent architect: Invest preparation time underground where bulbs live. Perfect drainage and organic richness are foundational to preventing the majority of bulb failures.
- Foliage is future flowers: Honor the post-bloom period with patience. Those yellowing leaves are not garden clutter—they are the engine of next year’s display.
The 24-Hour Action Step
Within the next day, take one concrete step toward your continuous-bloom vision: Sketch a simple map of one garden area (even a 3×3 foot space). Note sun exposure patterns throughout the day. Circle one spot where early spring color would bring you joy—a pathway edge, visible window view, or bare patch under a deciduous tree. This single intentional act transforms aspiration into momentum. Tomorrow, you’ll know exactly where to plant your first cluster of snowdrops or crocus.
The Bigger Picture: Your Garden as Legacy
A well-designed bulb garden transcends seasonal decoration. It becomes a teaching tool for children discovering nature’s cycles, a sanctuary for stressed minds observing gradual change, and a contribution to local ecology supporting early pollinators. Each bulb you plant carries genetic memory of centuries of adaptation—a tiny time capsule connecting you to gardeners across generations who also found hope in pushing life into cold soil. As your bulb garden matures, it develops character impossible to purchase: the surprise of self-sown seedlings appearing in unexpected places, the deepening color echoes across seasons, the knowledge that you’ve created something that will outlast trends and bring joy long after planting day. Start small, observe deeply, adjust thoughtfully. Your continuous-bloom journey begins not with perfection, but with that first intentional bulb placed in prepared soil—a promise of color waiting beneath the surface.
Explore Our Complete Bulb Gardening System:
The Ultimate Guide to Naturalizing Bulbs in Lawns and Meadows | Mastering Bulb Storage: A Season-by-Season Protocol | Companion Planting for Bulbs: Perennials That Conceal and Complement | Climate-Specific Bulb Guides: Zone 3–10 Success Strategies | Container Bulb Gardens: From Windowsill to Rooftop | Heirloom Bulbs: Preserving Garden History One Bloom at a Time