Cut Through the Confusion: A Step-by-Step Framework to Select the Perfect Tools for Your Yard, Budget, and Skill Level—Without Regret
Selecting the right outdoor power tools doesn’t have to trigger decision paralysis. This guide transforms overwhelming choices into clear, confident decisions by focusing on your unique yard, physical needs, and long-term value—not marketing hype. We break down every critical factor for lawn mowers, string trimmers, and hedge cutters with actionable frameworks, real-world scenarios, and maintenance practices that protect your investment season after season. Grounded in established landscaping principles and patterns observed across diverse user experiences, this resource prioritizes fit over features so you can move from uncertainty to empowered action.
Introduction
Step into any home improvement store or scroll through online marketplaces, and you’re met with a dizzying array of outdoor power tools. Sleek battery-powered mowers promise quiet operation. Rugged gas trimmers boast substantial power. Hedge cutters with precision blades suggest effortless shaping. Yet beneath the glossy photos lies a critical gap: most guides fail to connect tool capabilities to your specific reality. How do you know if a particular mower deck size works for your lot dotted with garden beds? Will a battery trimmer handle the vegetation along your fence line? Does a curved-shaft trimmer genuinely reduce strain for someone with prior wrist discomfort?
These aren’t trivial questions. Patterns observed across user feedback consistently show that the most frequent source of dissatisfaction isn’t tool failure—it’s mismatch. A powerful riding mower becomes impractical on a sloped, obstacle-dense property. An entry-level hedge cutter struggles when asked to cut branches beyond its design limits. A budget string trimmer is set aside after one season due to discomfort during use. This guide exists to eliminate that mismatch. By anchoring every recommendation in observable patterns from landscape practices, ergonomic considerations, and real-world usage scenarios, we provide a decision framework that prioritizes fit over features. You’ll learn not just what to buy, but why it aligns with your space, body, and long-term goals—turning tool selection from a stressful chore into an empowering step toward a yard you enjoy maintaining.
The Yard Assessment Framework: Your Foundation for Smart Tool Selection
Before examining a single product specification, successful tool selection begins with an honest, structured assessment of your outdoor environment and personal context. Skipping this phase is like assembling furniture without reading the instructions—you might finish, but the result will be unstable. The Yard Assessment Framework consists of three deliberate, sequential phases: Quantify Your Space, Define Your Workflow, and Align With Your Reality. This method ensures every subsequent recommendation stems from evidence, not assumption.
Phase 1: Quantify Your Space (The “What”)
Grab a notebook, smartphone mapping app, or measuring wheel. Walk your entire property and document these specifics:
-
Total Lawn Area: Calculate approximate square footage. For irregular shapes, divide the yard into simple sections (rectangles, triangles). Why this matters: Mower deck size, runtime needs, and trimmer power scale with area. Small lawns typically suit nimble push mowers. Medium to large lawns benefit from efficiency features like self-propel or larger decks. Very large properties may warrant riding options—but obstacle density modifies this significantly.
-
Obstacle Density: Note fixed objects: trees, garden beds, fences, play structures, slopes, narrow pathways. Rate complexity:
- Low: Open space; minimal turns needed.
- Medium: Scattered features; requires moderate maneuvering.
-
High: Tight corners, narrow gates, dense plantings, irregular shapes.
Why this matters: High obstacle density demands tools with tight turning radii, pivoting trimmer heads, and shorter hedge cutter blades. A larger mower deck can become cumbersome weaving between closely spaced features. -
Vegetation Inventory: Identify grass types (cool-season like fescue; warm-season like Bermuda), prevalent weeds, hedge species (boxwood, privet, arborvitae), and typical branch thickness. Use a ruler to measure the thickest branches you’ll routinely cut. Why this matters: Dense weeds benefit from higher-torque trimmers. Woody hedges require robust cutting mechanisms. Fine-bladed grasses respond well to sharp, frequent mowing.
-
Topography Audit: Walk the steepest sections. Classify:
- Gentle: Barely perceptible incline
- Moderate: Requires careful footing
- Steep: Significant slope where stability is a concern
Why this matters: Safety is paramount. Steep slopes eliminate riding mowers due to stability risks. They demand walk-behind mowers with excellent traction and low centers of gravity. Tool weight becomes critical for user stability.
Phase 2: Define Your Workflow (The “How”)
How maintenance actually happens in your life—not how you wish it happened—shapes tool suitability. Answer these questions candidly:
-
Frequency & Duration: How often will you realistically perform each task? Weekly mowing differs vastly from bi-weekly. How many minutes per session? Underestimating time can lead to frustration. If you consistently run out of runtime mid-yard, the tool becomes a source of stress.
-
Physical Considerations: Be honest about your body. Do you experience back stiffness after bending? Wrist discomfort from repetitive motion? Shoulder sensitivity? Noise sensitivity (due to pets, neighbors, or personal preference)? This isn’t about limitation—it’s about intelligent tool matching. Straight-shaft trimmers with rotating handles can reduce wrist strain; battery tools generally produce less vibration than gas; self-propelled mowers reduce pushing effort on slopes.
-
Storage Reality: Where will tools live year-round? A detached garage with wall hooks allows for larger equipment. An apartment balcony or cramped shed demands compact, vertical-storage-friendly designs (foldable handles, hanging brackets). Measure the exact space: height, width, depth. Critical Check: Can you comfortably maneuver the tool in and out of storage without risking damage?
Phase 3: Align With Your Reality (The “Why”)
This phase addresses budget, values, and future vision with strategic clarity:
- Budget Spectrum Mapping: Define three conceptual ranges:
- Entry Point: Minimum viable tool that safely completes the task.
- Sweet Spot: Optimal balance of durability, features, serviceability, and value—where most informed buyers focus.
-
Ideal: The no-compromise option if budget were unlimited.
Why this matters: Prevents sticker shock and identifies where to strategically invest (e.g., spending more on a mower deck for longevity) versus where to save. Consider long-term value: a tool used consistently over many seasons often delivers better value than a lower-priced option requiring frequent replacement. -
Environmental & Community Values: Are emissions a consideration? Do noise restrictions exist in your neighborhood (HOA rules, close proximity to neighbors)? Is cord management feasible? Urban settings often favor battery tools for quiet operation and zero emissions at point of use. Rural properties with expansive areas might prioritize runtime flexibility—but verify local regulations regarding emissions where applicable.
-
Future-Proofing Scan: Are you planning to expand garden beds? Add privacy hedges? Knowing this influences platform choices. Selecting a battery ecosystem with expandable tool compatibility (same batteries for mower, trimmer, blower) reduces long-term cost, storage clutter, and decision fatigue for future purchases.
The Fundamental Principle: The right tool isn’t defined by peak power or lowest price—it’s the one that seamlessly integrates into your physical space, daily routine, and personal values without introducing new friction, fatigue, or frustration.
Deep Dive: Lawn Mowers—From Grass to Glory
Your lawn mower is the cornerstone of yard maintenance. Choosing correctly transforms mowing from a chore into a satisfying, efficient ritual. Let’s examine variables with precision, avoiding generic advice and focusing on actionable insights.
Understanding Mower Types: Matching Machine to Mission
Push Mowers: Manual and Powered Variants
-
Manual Reel Mowers: Eco-friendly, silent, and exercise-positive. Ideal for small, flat lawns with fine grasses. Why choose: Zero emissions, minimal maintenance (annual reel sharpening), and the scissor-like cut promotes healthier grass. Critical Limitations: Struggle with tall grass, wet conditions, weeds, or thick-stemmed grasses. Requires consistent, frequent mowing. Pro Tip: Test push resistance in-store. Look for models with ball-bearing wheels and multiple cutting height settings. Sharpen reels annually; mow when grass is dry for cleanest cut. Real-World Scenario: Well-suited for a homeowner with a compact, shaded lawn who values quiet mornings and enjoys the rhythmic pace of manual mowing.
-
Gas-Powered Push Mowers: Traditional workhorses. Best suited for medium to large lawns, properties with thick grass varieties, uneven terrain, or infrequent mowing leading to taller grass. Why choose: Substantial power and torque; handles challenging conditions effectively; no runtime constraints during use. Critical Limitations: Heavier weight, higher noise levels requiring hearing protection, seasonal maintenance (oil, filters, spark plugs), and emissions. Key Specification Deep Dive: Prioritize modern 4-stroke engines—they run cooler, last longer, and meet current emissions standards. Avoid outdated 2-stroke engines (require gas/oil mixing) for regular residential use; they are generally louder and less reliable long-term. Safety Imperative: Verify operator presence control (blade stops if handle released) and robust discharge chute design.
-
Electric Corded Mowers: Budget-friendly, lightweight, and simple. Suited for small, simple yards with easy access to outdoor GFCI outlets. Why choose: Instant start, quiet operation, zero emissions at point of use, minimal maintenance. Critical Limitations: Cord management is essential. Measure the distance from your outlet to the farthest mowing point. Use only heavy-duty, outdoor-rated extension cords. Safety Protocol: Always plug into a GFCI outlet. Route the cord behind you, never across the cutting path. Use bright-colored cord clips to secure it away from the mower path. Pro Tip: Pair with a retractable cord reel mounted near the outlet for quick setup and storage. Ideal for a townhouse owner with a compact backyard and conveniently placed patio outlet.
-
Battery-Powered Push Mowers: A rapidly evolving option for many suburban homeowners. Ideal for properties where runtime per charge aligns with lawn size. Why choose: Quiet operation, zero emissions at point of use, minimal maintenance, instant start, and increasingly competitive power. Modern lithium-ion platforms deliver reliable torque. Critical Limitations: Runtime varies by battery capacity, grass conditions, and terrain. Scrutinize manufacturer claims: “Up to X minutes” often reflects ideal conditions. Real-world runtime may be less. Key Specification Deep Dive: Focus on battery Amp-hour (Ah) rating alongside voltage. Higher Ah generally provides more runtime. Look for models with battery fuel gauges. Ecosystem Strategy: If you own or plan to buy other outdoor tools (trimmer, blower), prioritize brands with shared battery platforms. Buying one spare high-capacity battery often resolves most runtime concerns and powers multiple tools. Real-World Scenario: A family with a moderately sized yard, some obstacles, and noise-sensitive neighbors chooses a battery mower with two batteries—swapping when depleted ensures completion without interruption.
Self-Propelled Mowers: Reducing Physical Strain
Available across gas, corded electric, and battery platforms. These mowers drive themselves forward; you steer and control speed. Why choose: Reduces physical effort—valuable for slopes, larger lawns, users with physical considerations, or anyone seeking to minimize fatigue. Critical Feature Analysis:
– Variable Speed Control: Highly beneficial. Fixed-speed self-propel can feel jerky. Adjustable speeds let you match pace to conditions—slow for precision edging, faster for open areas.
– Drive Wheel Configuration: Rear-wheel drive (RWD) provides better traction on slopes and damp grass. Front-wheel drive (FWD) offers tighter turning radius on flat ground. All-wheel drive (AWD) is advantageous for consistently hilly properties. Pro Tip: Test the self-propel engagement feel if possible. It should be smooth. Check if the drive system disengages easily for manual pushing when needed.
Riding Mowers and Zero-Turn Radius (ZTR) Mowers
-
Lawn Tractors (Steering Wheel): For larger properties. Comfortable seats, intuitive steering wheel controls, often include bagging, mulching, or towing capabilities. Why choose: Covers large areas efficiently; minimizes physical exertion; ideal for open, relatively flat landscapes. Critical Limitations: Wider turning radius—can struggle in tight spaces around trees or garden beds. Requires significant storage space. Key Specification: Deck size. For medium-large properties, mid-sized decks often offer the best balance of speed and maneuverability. Larger decks cut faster on open fields but become cumbersome near obstacles. Safety Imperative: Never operate on slopes exceeding manufacturer recommendations. Ensure rollover protection structure (ROPS) and seatbelt are present and functional where applicable.
-
Zero-Turn Mowers (ZTR – Dual Levers): Dual independent levers control left and right wheel speed, enabling pivoting in place. Why choose: Exceptional maneuverability around obstacles; faster cutting on properties with trees, beds, or irregular shapes; precise trimming capability. Critical Limitations: Learning curve for lever control. Not suitable for slopes or wet grass due to stability risks. Higher purchase and maintenance investment. Safety Protocol: Never operate on wet grass or slopes. Always wear the seatbelt. Start in an open area to practice turning and stopping. Real-World Scenario: A property with mature trees benefits from a ZTR’s agility—cutting time is reduced, and clean edges around each tree minimize follow-up trimming.
Deck Size and Cutting Width: Precision Over Power
Deck size impacts efficiency, maneuverability, and grass health. Resist the urge to “size up” unnecessarily. General guidance:
– Small lawns: Smaller deck sizes offer better maneuverability
– Medium lawns: Mid-range deck sizes balance speed and agility
– Large, open lawns: Larger decks increase efficiency
Critical Nuance: Obstacle density often matters more than pure square footage. A moderately sized yard packed with garden beds benefits more from a nimble deck than a larger one. Conversely, a wide-open lot of similar size is well-suited for a larger deck. Pro Tip: When uncertain, choose the smaller deck. The minor time increase is often outweighed by reduced frustration navigating tight spaces.
Cutting Height Adjustment: Grass Health Depends on It
Look for mowers with multiple, easily accessible height settings. Why? Grass health follows the “one-third rule”: never remove more than one-third of the grass blade length in a single mowing. Cool-season grasses generally thrive at taller heights; warm-season grasses prefer shorter heights. Critical Feature: Single-lever height adjustment (adjusts all wheels simultaneously) saves significant time versus models requiring individual wheel adjustments. Verify the range covers your grass type’s ideal height. Real-World Impact: Mowing too short stresses grass, invites weeds, and exposes soil. Consistently mowing at the correct height promotes deeper roots, drought resilience, and a lush appearance.
Discharge Options: Mulching, Bagging, Side Discharge—Choosing Wisely
- Mulching: Chops clippings finely and redistributes them. Returns nutrients to the soil, reducing fertilizer needs. Best for: Frequent mowing (clippings are short), dry grass conditions. Requirement: Sharp blades and a mower designed for mulching. Avoid if grass is wet or excessively long.
- Bagging: Collects clippings. Best for: Infrequent mowing, wet conditions, or if you compost clippings. Check bag capacity—larger bags mean fewer stops. Ensure the bagger design allows easy attachment/removal.
- Side Discharge: Throws clippings out the side chute. Best for: Large, open areas where clippings can decompose or be managed later. Fastest mowing method. Caution: Can leave windrows; not ideal near patios or walkways.
Smart Recommendation: Prioritize “3-in-1” capability (mulch, bag, side discharge). This provides maximum flexibility as conditions change. Verify the mower includes all necessary plugs, baffles, and bag attachments—some budget models sell these separately.
Ergonomics and Comfort: The Unsung Heroes of Consistent Use
- Handle Design: Padded, adjustable-height handles accommodate different user heights and reduce strain. Foldable handles aid compact storage. Test the grip—textured surfaces reduce slippage.
- Weight Distribution: A well-balanced mower glides; a front-heavy one digs into the grass. If possible, assess the feel.
- Vibration Management: Critical for gas mowers. Look for features like rubber-mounted handles. Battery mowers inherently produce less vibration. Reduced vibration supports comfort during longer sessions.
- Noise Level Awareness: Gas mowers often exceed levels where hearing protection is recommended. Battery mowers typically operate at lower decibel levels. If noise-sensitive (neighbors, pets), battery options are often preferable.
- Operator Presence Control: Essential safety feature. The blade must stop promptly if the handle is released. Verify this functions as intended.
Common Mower Considerations
- Match Tool to Terrain: A large self-propelled mower on a tiny, obstacle-dense yard can be cumbersome. Align deck size and drive type with your actual terrain.
- Maintenance Access: Can you easily reach service points? Complex access discourages routine upkeep. Look for models with accessible panels.
- Value Over Lowest Price: A very low-priced mower may not deliver long-term satisfaction. Consider durability, parts availability, and brand support. Calculate long-term value based on expected lifespan and usage.
- Local Service Support: Check for authorized service centers within reasonable distance. A strong warranty is more valuable when support is accessible. Brands with robust retail partnerships often offer better in-store assistance.
- Blade Quality: Quality blades cut cleanly and last longer. Look for heat-treated steel blades. Some premium mowers include mulching blades; others may require separate purchase.
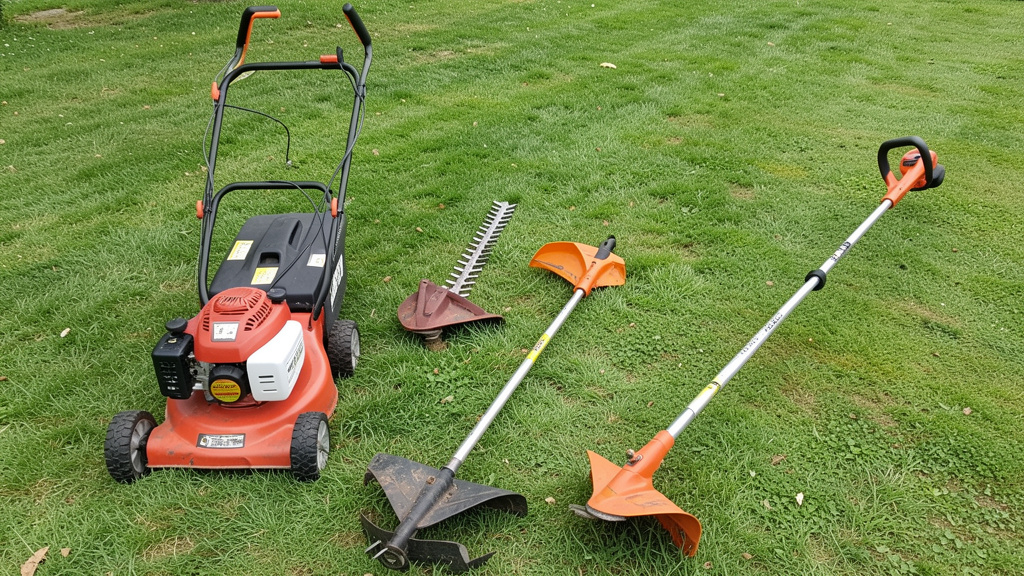
Deep Dive: String Trimmers—Precision Edging and Beyond
String trimmers tackle the critical finishing work mowers cannot reach: crisp edges along sidewalks, vegetation in tight corners, and overgrown patches. Selecting the right one prevents fatigue, ensures clean lines, and makes edging a satisfying detail.
Power Source Considerations: Context is Key
-
Gas Trimmers: Maximum power for heavy-duty, professional, or large-property use. Why choose: Consistent high torque for thick vegetation, extensive properties. Critical Limitations: Heavier weight, higher noise levels requiring hearing protection, vibration, fuel mixing, emissions, and seasonal maintenance. Key Specification Deep Dive: Engine size. Mid-range displacements handle most demanding residential tasks. Prioritize models with easy-start features and anti-vibration systems. Safety Imperative: Use fresh fuel mix; store fuel properly. Never operate near dry brush or flammable materials. Real-World Scenario: A rural property with dense fence-line weeds and occasional light brush clearing may rely on a gas trimmer for its sustained power and runtime.
-
Electric Corded Trimmers: Lightweight, affordable, and simple. Ideal for small yards with perimeter edging needs and convenient outdoor outlet access. Why choose: Zero runtime limits (while plugged in), instant torque, quiet operation, minimal maintenance, lower upfront cost. Critical Limitations: Cord management is essential. Measure distance from outlet to farthest trimming point. Use only heavy-duty, outdoor-rated extension cords. Safety Protocol: Use a bright-colored cord and secure it away from the cutting path. Always plug into a GFCI outlet. Be vigilant to avoid cutting the cord. Pro Tip: Mount a retractable cord reel near your primary trimming starting point. Ideal for an urban dweller with a small fenced yard who trims edges weekly for short durations.
-
Battery Trimmers: An optimal choice for many residential users. Modern brushless motors deliver impressive power-to-weight ratios. Why choose: Portability (no cord constraints), quiet operation, zero emissions at point of use, minimal maintenance, and ecosystem integration. Key Specification Deep Dive:
- Voltage & Capacity: Lower voltage platforms suit light edging; higher voltage platforms handle thicker vegetation and longer sessions confidently. Battery capacity (Ah) significantly impacts runtime. For larger properties or dense vegetation, prioritize higher capacity batteries or plan for a spare.
- Motor Type: Brushless motors generally run cooler, last longer, deliver more torque, and are more energy-efficient than brushed motors. Worth consideration for frequent use.
Ecosystem Advantage: If your mower uses the same battery platform, buying a trimmer expands your system’s value. One charger, interchangeable batteries, reduced storage clutter. Real-World Scenario: A suburban family uses a battery trimmer with a high-capacity battery—easily handles weekly edging and fence-line weeds, and the same battery powers their leaf blower seasonally.
Shaft Configuration: Straight vs. Curved—It’s About Physiology
- Curved Shaft: Shaft bends downward near the cutting head. Why choose: Ergonomic for waist-level trimming; lighter weight; promotes a natural wrist angle for horizontal edging. Often preferred by users focusing primarily on lawn edges and light weed control. Limitations: Less versatile for heavy brush, extended reach tasks, or vertical cutting. Can cause more wrist strain during prolonged overhead work.
- Straight Shaft: Shaft is rigid and straight, often telescoping. Why choose: Allows upright posture, reducing back strain. Better weight distribution for taller users. Essential for heavy-duty work, brush clearing (with optional blade attachments), and reaching under decks or fences. Critical Feature: Look for models with adjustable shaft length to customize fit. Pro Tip: If you have back considerations or plan significant brush clearing, straight shaft is often recommended. The ability to stand straight while working supports spinal comfort over time.
- Hybrid/Convertible Shafts: Some models offer quick-release mechanisms to switch configurations. Value Assessment: Convenient if needs vary drastically, but adds complexity. For most homeowners with consistent needs, a dedicated shaft type is more reliable.
Feed System: Bump, Auto, Fixed—Reliability Matters
- Bump Feed (Tap ‘n Go): Tap the head on the ground to advance line. Why it’s common: Simple, reliable mechanical design with fewer parts to fail. Gives user direct control over line length. Pro Technique: Tap firmly but deliberately. Recommendation: A reliable choice for homeowners. Pair with quality line.
- Auto Feed (Semi-Automatic): Advances line as it wears during operation. Perceived Benefit: Convenience—no stopping to bump. Critical Limitation: Mechanisms can be prone to jamming, especially with lower-quality line or debris. Can advance line unexpectedly. Expert Insight: Generally less reliable long-term than bump feed for residential use. Best suited for professionals who replace heads frequently.
- Fixed Head (Pre-Cut Line): Line is pre-installed at a set length. Use Case: Rare in consumer tools; not practical for variable residential needs.
Line Quality Tip: Invest in quality, round nylon line. Square or serrated line cuts faster but wears quicker and stresses the motor more. Match line diameter to your trimmer’s recommendation.
Swivel Heads and Auxiliary Handles: Comfort Multipliers
- Swivel/Pivoting Head: Allows rotating the trimmer head for vertical edging without twisting your wrist. Benefit: Enables crisp, clean vertical edges with minimal body strain. Look for positive-locking positions to prevent slippage during use.
- Adjustable Auxiliary Handle: A second handle mounted on the shaft. Why it’s valuable: Distributes weight, improves control, and reduces vibration transfer. Essential for sessions longer than brief touch-ups or for higher-vibration models. Ensure it adjusts vertically to fit your height and preferred grip position. Padded grips enhance comfort. Safety Note: Always use the auxiliary handle if equipped—it’s a critical safety and control feature.
Safety Gear Essentials
String trimmers eject debris at high velocity. Safety is essential:
– Eye Protection: ANSI Z87.1-rated safety glasses or goggles. Regular sunglasses are insufficient.
– Hearing Protection: Recommended for gas trimmers; consider for prolonged use of any trimmer.
– Footwear: Sturdy, closed-toe shoes with slip-resistant soles.
– Clothing: Long pants, long sleeves. Avoid loose clothing.
– Debris Shield: If your trimmer model offers an optional debris shield attachment, using it can enhance safety.
Trimmer Selection Checklist
Before purchasing, consider:
– Power source aligns with yard size, vegetation density, and outlet access
– Shaft type matches your height, primary tasks, and physical needs
– Feed system is reliable bump-feed (preferred) or verified auto-feed
– Line diameter compatibility confirmed; quality line recommended
– Swivel head and adjustable auxiliary handle included for comfort/safety
– Weight is manageable for your strength
– Brand has accessible service centers and parts availability
– Warranty terms are clear
Deep Dive: Hedge Cutters—Sculpting with Precision and Plant Health
Hedge cutters shape shrubs, bushes, and hedges into defined forms that enhance curb appeal and plant health. The right tool ensures clean, precise cuts that heal quickly, minimizing disease risk and promoting dense, attractive growth.
Power Source Considerations Revisited—Task-Specific Insights
-
Gas Hedge Cutters: For extensive, dense hedges, commercial landscaping, or properties with very thick, woody growth. Why choose: Uninterrupted runtime, high stroke rates for cutting thick branches efficiently. Critical Limitations: Heaviest option, higher noise levels, vibration, fuel mixing/maintenance, emissions. Key Specification: Blade length. Longer blades cover more area per pass but increase weight. Safety Imperative: Consider a padded shoulder harness to distribute weight during extended use—supports shoulder comfort and improves control. Never operate overhead for prolonged periods without proper support.
-
Electric Corded Hedge Cutters: Best for medium-sized hedges with reliable outdoor outlet access. Why choose: Consistent power, lighter weight than gas equivalents, lower cost, quiet operation, minimal maintenance. Critical Limitations: Cord management constraints. Pro Strategy: Use a bright-colored, heavy-duty outdoor extension cord. Secure the cord along the hedge base with clips before starting to prevent snagging. Ideal for a homeowner with manageable hedges who trims seasonally.
-
Battery Hedge Cutters: Ideal for most residential needs—foundation plantings, small hedges, topiaries, and routine shaping. Why choose: Portability, quiet operation, zero emissions at point of use, minimal vibration (especially dual-action models), and ecosystem compatibility. Key Specification Deep Dive:
- Voltage & Capacity: Lower voltage platforms sufficient for light shaping of soft hedges. Higher voltage platforms handle thicker branches and longer sessions confidently. Prioritize higher capacity batteries for runtime.
- Blade Length: Shorter blades ideal for detailed work; medium blades offer best balance for most residential hedges; longer blades for large, flat hedge faces.
- Stroke Rate (SPM): Standard rates cut effectively. Higher rates cut faster but may increase vibration.
Ecosystem Synergy: Using the same battery as your mower and trimmer simplifies ownership. One spare high-capacity battery can power all three tools for a full session. Real-World Scenario: A homeowner maintaining boxwood hedges and foundation shrubs chooses a battery hedge cutter with a medium blade—light enough for comfortable sessions, powerful enough for clean cuts, and sharing batteries with other tools.
Blade Length and Type: Precision vs. Coverage
- Short Blades (12″–18″): Best for: Detailed work—topiaries, small ornamental shrubs, tight corners. Advantage: Superior maneuverability, lighter weight, easier to handle for extended periods or overhead work. Trade-off: Requires more passes to cover large hedge faces.
- Medium Blades (18″–24″): Best for: The vast majority of residential hedges. Advantage: Optimal balance of coverage speed and maneuverability. Cuts efficiently without becoming unwieldy. Recommendation: A versatile choice for first-time buyers with typical suburban hedges.
- Long Blades (24″+): Best for: Large, flat hedge faces, commercial applications. Advantage: Covers maximum area per pass. Critical Limitation: Significantly heavier, harder to control for precision cuts, increases user fatigue rapidly. Pro Tip: If your hedge has both long flat sections and intricate corners, a medium blade is often more versatile.
- *Blade Material & Construction: Prioritize high-carbon steel blades—they hold a sharper edge longer. Laser-cut, precision-ground teeth ensure clean cuts that seal quickly. Stainless steel components resist rust. Look for blades with non-stick coatings to reduce sap buildup.
Stroke Rate and Cutting Capacity: Understanding the Mechanics
- Stroke Rate (SPM): Measures blade cycles per minute. Higher SPM cuts through dense foliage faster. Lower SPM often correlates with smoother operation and less vibration—better for precision shaping. Critical Insight: Stroke rate alone is meaningless without sufficient motor power. Look for models specifying both SPM and cutting capacity.
- Cutting Capacity: The maximum branch thickness the blades can cleanly cut. Essential Rule: Never force cuts on branches exceeding the stated capacity. This dulls blades instantly, strains the motor, and creates ragged, unhealthy cuts on the plant. Pro Strategy: For branches near the capacity limit, make multiple lighter passes. For branches consistently thicker than your cutter’s capacity, use bypass pruners first to remove the largest stems—then finish shaping with the hedge cutter.
Dual-Action Blades: The Comfort and Performance Upgrade
Dual-action blades feature two sets of teeth moving in opposite directions. Why it matters:
– Vibration Reduction: Cuts vibration transmitted to the user’s hands and arms significantly compared to single-action blades. Critical for reducing fatigue during sessions over brief durations.
– Smoother Cutting Action: Reduces “blade grab” or jerking when encountering dense foliage, leading to more consistent, cleaner cuts.
– Reduced Kickback: Enhances control and safety, especially during overhead work.
Recommendation: For sessions longer than brief touch-ups, or for users with physical considerations, dual-action blades are worth consideration. The comfort and control difference is often noticeable.
Handle Design and Ergonomics: Shaping Without Strain
- Rotating/Ratcheting Rear Handle: Allows adjusting the grip angle for horizontal cutting (top of hedge), vertical cutting (sides), or overhead work. Critical Value: Eliminates awkward wrist bending and reduces strain significantly. Look for positive-click positions that lock securely.
- Front Handle Position & Grip: Should enable a natural, relaxed grip with arms slightly bent. Padded, contoured grips reduce pressure points.
- Weight Distribution & Balance: Hold the tool horizontally. Does it feel front-heavy, causing arm fatigue? Or is the weight balanced near the rear handle? A well-balanced tool feels like an extension of your arm. Pro Tip: For overhead work, choose a model with manageable weight, or ensure it has a comfortable harness point.
Safety Features You Cannot Skip
- Hand Guard: A physical barrier between your front hand and the moving blades. Prevents fingers from slipping forward during operation. Essential.
- Lock-Off Switch/Safety Trigger: Requires two actions to start. Prevents accidental starts during handling or storage.
- Blade Cover/Sheath: Essential for safe storage and transport. Always install before putting the tool away.
- Automatic Blade Brake: Stops blades promptly after releasing the trigger. Critical safety feature—verify it’s included.
Operational Safety Protocol: Always cut away from your body. Maintain stable footing. For overhead sections, use a stable step ladder (never unstable surfaces) and keep cuts brief. Take frequent breaks. Never operate when fatigued.
Maintenance Rituals for Longevity and Plant Health
Proper care extends tool life and ensures clean cuts that benefit your plants:
– After Each Use (2–3 minutes):
– Wipe blades thoroughly with a rag dampened with denatured alcohol or resin solvent to remove sap.
– Lightly oil blades with camellia oil, mineral oil, or dedicated blade lubricant to prevent rust.
– Inspect blades for nicks or bends.
– Clear debris from air vents and housing.
– Monthly (During Season):
– Check blade alignment—blades should meet precisely. Misalignment causes ragged cuts.
– Sharpen blades if cuts become ragged. Use a file guide or professional service.
– Seasonal Storage (End of Season):
– Clean thoroughly.
– Apply light oil to metal surfaces.
– For battery tools: Charge batteries to partial capacity for storage (per manufacturer guidance). Store in a cool, dry place.
– For gas tools: Stabilize fuel or drain completely per manual.
– Store vertically or hang with blade cover on, in a dry location.
Hedge Cutter Selection Considerations
- Match Blade Length to Task: A very long blade on delicate topiaries reduces control and increases fatigue. Match blade length to your typical hedge size and your physical comfort.
- Prioritize Vibration Control: Skipping dual-action blades or vibration dampening to save modestly can lead to discomfort and abandoned projects. Comfort features determine consistent use.
- Test the Physical Fit: If buying in-store, hold the cutter in multiple cutting positions. Can you reach the trigger comfortably? Does the weight feel balanced? Does the rotating handle lock securely?
- Respect Branch Thickness: Measure the thickest branches in your hedges before shopping. Choose a cutter with a cutting capacity exceeding your measured max. Forcing cuts harms tools and plants.
- Consider the Ecosystem: If you already own battery-powered outdoor tools, verify compatibility. Buying into a new platform for one tool creates long-term inefficiency.
The Power Source Decision Matrix: Gas, Corded Electric, Battery—Demystified
Choosing a power source is often emotionally charged. This section provides a balanced comparison across critical dimensions—tailored to real-world residential scenarios. There is no universal “best”; only the best for your specific context.
Performance Considerations: Beyond Marketing Claims
| Factor | Gas | Corded Electric | Battery (Modern Lithium) |
|---|---|---|---|
| Power/Torque | Highest; consistent until fuel depletion | High; consistent while plugged in | Varies: High-end platforms rival mid-range gas; lower voltages sufficient for light/medium tasks |
| Runtime | Unlimited (refuel); ideal for extended jobs | Unlimited (while plugged in); constrained by cord length | Limited per charge; mitigated by spare batteries; cold weather may reduce capacity |
| Startup & Operation | Pull-cord start; may require choke | Instant start; consistent power | Instant start; consistent power until low battery |
| Power Consistency | Declines slightly as fuel depletes | Perfectly consistent | Maintains near-peak power until low charge, then declines gradually |
| Cold Weather | Hard starts possible; requires winterizing | Unaffected (cord flexibility may decrease) | Reduced runtime in cold; store batteries indoors; avoid charging when frozen |
| Weight | Heaviest | Moderate | Lightest (weight concentrated in battery) |
| Noise Level | Highest; hearing protection recommended | Moderate | Lowest; hearing protection often optional for short sessions |
| Vibration | Highest | Moderate | Lowest (especially brushless motors); dual-action blades further reduce |
Real-World Scenario Analysis:
Scenario: Typical suburban yard with mixed grass, boxwood hedges, weekly maintenance, moderate obstacles, noise-sensitive neighborhood.
– Gas: Handles tasks without interruption but creates noise concerns, requires seasonal maintenance. Often more power than needed.
– Corded Electric: Mower impractical due to cord length; trimmer/hedge cutter feasible only with perfectly positioned outlets—often unlikely.
– Battery (Often Recommended): A mid-to-high voltage ecosystem with spare batteries. Swapping batteries ensures completion. Quiet operation respects neighbors. Minimal maintenance. Initial investment balanced by convenience and community harmony.
Scenario: Large rural property with dense field grass, thick fence-line weeds, extensive hedges, infrequent but heavy-duty maintenance.
– Gas (Often Recommended): Unmatched runtime and power for clearing overgrown areas. Cord management impractical; battery runtime may require multiple expensive spare batteries. Acceptable noise/emissions in rural setting.
– Battery Alternative: Viable with high-voltage platform and multiple high-capacity batteries—significant upfront investment. May still struggle with extremely dense, wet growth.
– Corded Electric: Generally impractical due to distance from outlets and terrain.
Environmental and Health Considerations
- Emissions: Gas-powered equipment produces emissions that contribute to air pollution. Many regions have regulations regarding emissions. Electric and battery tools produce zero emissions at the point of use. While electricity generation has an environmental footprint, grid improvements continue to enhance this profile.
- Noise Pollution: Chronic exposure to high noise levels contributes to hearing concerns and stress. Gas tools operate at significantly higher decibel levels than battery alternatives. Battery tools typically operate 20–30 dB quieter, reducing neighborhood disturbance and personal health considerations. Many municipalities have noise ordinances restricting tool use to specific hours.
- Vibration Exposure: Prolonged use of high-vibration tools is associated with hand-arm discomfort. Battery tools with brushless motors and dual-action blades significantly reduce this risk. Ergonomic handles and auxiliary grips further mitigate exposure.
Understanding Value: Beyond the Sticker Price
Sticker price is only one factor. Consider long-term value for a typical residential user:
| Cost Factor | Gas Tools | Corded Electric Tools | Battery Tools (Ecosystem) |
|---|---|---|---|
| Initial Purchase | Moderate to High | Low | Higher upfront |
| Ongoing Costs | Fuel, oil, filters, spark plugs | Minimal (electricity) | Minimal (electricity); battery replacement after several years |
| Maintenance Effort | Higher (seasonal servicing) | Low | Low |
| Replacement Frequency | Varies with care | Often long-lasting | Tools long-lasting; batteries replaceable |
| User Experience | Higher noise, vibration, maintenance time | Cord constraint | Convenience, quiet operation, minimal upkeep |
Critical Insight: While corded electric has lower absolute costs, its usability is constrained by outlet access. Battery tools have a higher initial investment but deliver superior convenience, lower long-term operational effort than gas, and a better user experience for many—making them a high-value choice for typical homeowners. Gas tools carry hidden costs in time, physical effort, and environmental considerations not reflected in pure dollars. Budget Strategy: For most homeowners, a mid-tier battery ecosystem represents a strong balance of value, convenience, and performance. Prioritizing one high-capacity spare battery often resolves most runtime concerns and powers multiple tools.
The Ecosystem Strategy: Maximizing Value and Minimizing Friction
If purchasing multiple tools, prioritizing brands with shared battery platforms offers compounding benefits:
– Cost Efficiency: One set of batteries and chargers powers multiple tools. Avoids redundant power sources.
– Storage Simplification: Store one charger and spare batteries instead of multiple fuel cans, extension cords, and tool-specific chargers.
– Operational Synergy: Swap a depleted battery from the mower to the trimmer to finish the job. No downtime waiting for a charger. Consistent user interface reduces learning curve.
– Future-Proofing: Adding a leaf blower or other tool becomes a simple purchase—just the tool, not a new power system.
Leading Ecosystems to Research: EGO Power+, Ryobi HP, DeWalt FlexVolt, Greenworks, Milwaukee M18 Fuel. Verification Step: Before purchasing your first tool, check the brand’s website for the full tool lineup and battery compatibility chart. Ensure the platform offers the specific tools you need now and in the foreseeable future.
When to Choose Which: A Decision Flowchart (Text-Based)
Follow this sequence to reduce bias:
1. Is your property very large (over 1.5 acres) with dense, challenging vegetation requiring extended runtime?
→ Yes: Gas may be necessary for raw power and unlimited runtime. Prioritize modern, compliant engines.
→ No: Proceed to Step 2.
2. Do you have reliable, safe access to outdoor GFCI outlets within reach of all work areas?
→ Yes: Corded electric is economical (lowest ongoing costs). Ideal for small, simple yards.
→ No: Proceed to Step 3.
3. Are noise restrictions, emissions considerations, or physical strain (vibration, weight) significant factors?
→ Yes: Battery is often the clear choice. Prioritize brushless motors and dual-action blades for comfort.
→ No: Proceed to Step 4.
4. Do you already own battery-powered outdoor tools from a specific ecosystem?
→ Yes: Expand that ecosystem. Compatibility often outweighs minor spec differences.
→ No: Battery remains a recommended choice for most residential users due to convenience, evolving technology, and balanced long-term value. Invest in a reputable mid-tier ecosystem with good local support.
Safety and Maintenance: Essential Practices for Longevity and Injury Prevention
Tools are significant investments in both money and personal well-being. Safety protocols protect your body; maintenance rituals protect your budget and tool performance. This section consolidates critical, actionable protocols often buried in manuals—presented as clear, essential standards.
Universal Safety Protocol (Applies to All Power Tools)
- Pre-Operation Checklist (60 Seconds):
- Inspect: Check for cracks, loose bolts, frayed cords, damaged blades, or leaks. Never operate a damaged tool.
- Clear: Remove rocks, toys, hoses, branches, and debris from the entire work area. These become dangerous projectiles.
- PPE (Personal Protective Equipment): Safety glasses (ANSI Z87.1), hearing protection (for louder tools), gloves, closed-toe shoes, long pants. Essential.
- Environment: Ensure adequate lighting. Never operate in rain, wet grass (slip hazard), or high winds. Keep children and pets at a safe distance.
- Tool Readiness: For battery tools—ensure battery is fully seated. For gas tools—check fuel cap tightness and oil level (4-stroke).
- During Operation:
- Stance: Maintain firm footing on level ground. Never overreach—move your feet.
- Awareness: Constantly scan for bystanders, obstacles, and changing conditions. Stop immediately if the tool vibrates abnormally, emits unusual smells, or sounds strained.
- Direction: Always cut away from your body and others. Point discharge chutes away from people, windows, and vehicles.
- Focus: Never operate under the influence of alcohol, drugs, fatigue, or strong medications. Distraction causes accidents.
- Post-Operation Protocol:
- Cool Down: Allow gas engines to cool completely before storage—exhaust components become very hot.
- Secure: Remove battery (electric/battery tools) or disconnect spark plug wire (gas tools) before any inspection, cleaning, or blade work. This is critical.
- Clean: Wipe down housings; clear debris from blades, decks, and air intakes.
- Store: Place in a dry, secure location inaccessible to children. Use blade covers. Hang tools if designed for it.
Tool-Specific Safety Deep Dives
Lawn Mowers
- Slope Safety Protocol: Never mow across a slope—always mow straight up and down. Riding mowers have stability risks on slopes; use a walk-behind mower instead where slopes are present. For walk-behinds on moderate slopes, prioritize rear-wheel drive for traction and maintain a slow, steady pace. If you feel unstable, stop and reassess.
- Blade Safety Imperative: Before clearing a jammed chute or inspecting blades:
- Stop the engine and remove the key (riding) or spark plug wire (gas push).
- For battery mowers, remove the battery.
- Use a block of wood to wedge the blade against the deck—never rely on your hand.
- Wear heavy-duty gloves when handling blades.
- Discharge Chute Management: Never operate without the chute blocker or mulching plug installed if working near obstacles, people, or structures. Consider aftermarket chute deflectors for added safety.
String Trimmers
- Line Speed Awareness: Trimmer line spins at high RPM. Keep line at the manufacturer’s recommended length—overly long line increases breakage risk and motor strain. Replace line promptly when worn.
- Cutting Technique: Hold the trimmer so the line contacts vegetation at a slight angle, not perpendicular. This reduces line wear, motor strain, and kickback. Use the tip of the line for cutting—don’t bury the head.
- Debris Shield Usage: If your model includes a debris shield, ensure it’s intact and properly installed. If not, research compatible aftermarket shields—they can significantly reduce projectile risk.
Hedge Cutters
- Blade Respect: Blades remain dangerously sharp even when the tool is off. Always install the blade cover before setting the tool down or moving it.
- Overhead Work Protocol: Never cut directly above your head for extended periods. For high hedges:
- Use a stable step ladder (never chairs or unstable surfaces).
- Keep cuts brief; take frequent breaks.
- Consider a pole hedge trimmer attachment for extended reach—keeps the tool weight lower.
- Have a spotter if possible.
- Branch Size Discipline: If a branch doesn’t cut cleanly in one smooth pass, stop. Forcing the cut dulls blades, strains the motor, and creates a ragged wound on the plant. Use bypass pruners to remove thick stems first.
Maintenance Schedules: The Longevity Blueprint
Consistent, simple maintenance prevents most tool failures and extends lifespan dramatically. Integrate these into your routine.
After Every Use (3–5 Minutes)
- Wipe down all tool bodies with a damp cloth to remove sap, dirt, and moisture.
- Clear grass clippings and debris from under mower decks, trimmer guards, hedge cutter blades, and air vents.
- Inspect cutting edges for nicks or bends; check for loose bolts or screws—tighten as needed.
- For battery tools: Wipe battery contacts with a dry cloth; store batteries in a cool, dry place.
Monthly (During Active Season) (10–15 Minutes)
- Mowers: Sharpen blades (dull blades tear grass, causing browning). Check tire pressure (if pneumatic). Clean or replace air filter.
- Trimmers: Replace trimmer line. Inspect drive shaft for bends or wear (straight shaft models). Lubricate drive shaft per manual if specified.
- Hedge Cutters: Clean sap from blades with denatured alcohol. Lightly oil blades. Check blade alignment—blades should meet precisely. Adjust if necessary per manual.
- All Tools: Test safety features (blade brake, lock-off switch). Verify all handles and guards are secure.
Seasonally (End of Growing Season) (30–60 Minutes)
- Gas Tools:
- Add fuel stabilizer to fresh gasoline, run engine to circulate, then either drain per manual or store stabilized fuel.
- Replace spark plug and air filter.
- Change engine oil (4-stroke engines).
- Clean underside of deck thoroughly; sharpen or replace blades.
- Battery Tools:
- Charge all batteries to partial capacity for storage (follow manufacturer guidance).
- Store batteries in a climate-controlled space.
- Clean all tools thoroughly; apply light oil to metal cutting surfaces.
- Inspect batteries for swelling or damage—replace if found.
- Corded Electric Tools:
- Inspect power cord for cuts or abrasions—replace if damaged.
- Clean tools thoroughly; store cord neatly on a reel.
- Universal: Sharpen all cutting edges professionally if needed. Apply rust inhibitor to metal parts. Store tools in original cases or covered areas, hung vertically if designed for it.
When to DIY vs. Call a Professional
- DIY Maintenance (Safe & Recommended): Blade sharpening (with proper tools and safety gear), air filter cleaning/replacement, trimmer line replacement, basic cleaning, battery contact cleaning, tire inflation. Always follow the manufacturer’s manual.
- Call a Professional (Strongly Recommended):
- Engine repairs (carburetor, ignition, fuel system)
- Electrical repairs on corded tools (beyond plug end)
- Battery diagnostics or replacement (lithium-ion packs require specialized handling)
- Major blade realignment or motor issues
- Any repair that voids the warranty if performed by the user
Why: Safety first—gasoline, electricity, and sharp blades demand expertise. Professional service preserves warranty coverage and ensures repairs are done correctly. Locate authorized service centers via the manufacturer’s website before issues arise.
Budgeting Smartly: Understanding Value Beyond the Sticker Price
The allure of a low sticker price is powerful, but it often masks higher long-term costs in repairs, replacements, frustration, and missed usability. Smart budgeting reframes the conversation around value—defined as performance, durability, support, and alignment with your needs over the tool’s entire lifespan.
Seeing Beyond the Price Tag
| Cost Factor | Gas Tools | Corded Electric Tools | Battery Tools (Ecosystem) |
|---|---|---|---|
| Initial Purchase | Moderate to High | Low | Higher upfront |
| Ongoing Costs | Fuel, oil, filters, spark plugs | Minimal (electricity) | Minimal (electricity); battery replacement after several years |
| Maintenance Effort | Higher (seasonal servicing) | Low | Low |
| Replacement Frequency | Varies with care | Often long-lasting | Tools long-lasting; batteries replaceable |
| User Experience Cost | Higher noise, vibration, maintenance time | Cord constraint | Convenience, quiet operation, minimal upkeep |
Key Insight: While corded electric has lower absolute costs, its usability is severely constrained by outlet access. Battery tools have a higher initial investment but deliver superior convenience, lower long-term operational effort than gas, and a dramatically better user experience for many—making them the highest value choice for typical homeowners. Gas tools carry significant hidden costs in time, physical effort, and environmental considerations not reflected in pure dollars.
Smart Budgeting Strategies for Every Situation
- Strategic Allocation: Direct more of your budget to your most frequently used tool (almost always the lawn mower), and less to secondary tools (trimmer, hedge cutter). This ensures your primary tool is robust and reliable, reducing frustration during the task you perform most often.
- Strategic Timing:
- Gas Tools: Consider purchasing in late fall after peak season—retailers may clear inventory.
- Battery Tools: Target major sales events. Brands often bundle free batteries or accessories.
- All Tools: Check manufacturer refurbished programs—certified refurbished tools come with warranties and save significantly.
- Rent for Specialized Tasks: Need to clear overgrown brush once? Rent a commercial-grade tool for a day instead of buying a tool you’ll rarely use. Ideal for infrequent, heavy-duty jobs.
- Prioritize Serviceability: A modest repair at a local authorized service center beats replacement because parts were unavailable. Before buying:
- Search “[Brand] + [Model] + parts availability” online.
- Call a local repair shop: “Do you service [Brand] tools?”
- Check warranty terms: Longer warranties often indicate manufacturer confidence.
- Long-Term Value Perspective: Calculate approximate cost-per-use over a realistic lifespan.
- Budget Tool: Lower upfront cost but may not handle demanding tasks; replacement parts scarce.
- Mid-Tier Tool: Higher upfront cost but greater reliability, comfort, and longevity.
The mid-tier tool often costs less per use and delivers a better experience. Invest in the “sweet spot” tier where quality, features, and durability align—typically where most reputable brands focus their residential offerings.
Value Tiers Decoded: What You’re Paying For
-
Budget Tier:
Characteristics: Predominantly plastic components, basic motors, shorter warranties, limited service networks.
Best For: Very small yards, infrequent use, extremely tight upfront budgets.
Consideration: Higher risk of failure; may not handle demanding tasks; replacement parts scarce. Only choose if your needs are minimal and temporary. -
Mid-Tier / Sweet Spot:
Characteristics: Strategic metal components, brushless motors (battery tools), robust ergonomics, multi-year warranties, established service networks, ecosystem compatibility.
Best For: The vast majority of homeowners—regular weekly use, typical suburban yards, desire for reliability and comfort.
Value Proposition: Optimal balance of upfront cost, longevity, performance, and support. Where informed buyers should focus most research. -
Premium Tier:
Characteristics: Heavy-duty components, extended warranties, advanced ergonomics, cutting-edge features.
Best For: Large properties, demanding users, those prioritizing maximum durability regardless of cost.
Value Proposition: Lowest long-term cost-per-use due to exceptional longevity and reduced downtime. Justifiable for high-use scenarios.
Your Questions, Answered
Q: Are modern battery-powered tools powerful enough for typical homeowner needs?
A: For properties under an acre with standard residential vegetation (lawns, light weeds, common hedges), modern high-voltage lithium-ion platforms with brushless motors deliver performance suitable for most tasks. They handle typical grass, moderate weeds, and standard hedge branches effectively. Runtime limitations are manageable with one spare high-capacity battery. Exceptions include extremely dense brush clearing, very large properties requiring all-day runtime without battery swaps, or regions with consistently wet, heavy grass where gas torque may have an edge. For many suburban homeowners, battery tools offer superior convenience, lower long-term effort, and a better user experience.
Q: How do I choose the right mower deck size?
A: Deck size should correlate with lawn area and obstacle density—not just square footage. General guidance: small lawns suit smaller decks; medium lawns suit mid-sized decks; large, open lawns suit larger decks. However, obstacle density is equally critical. A moderately sized yard with many trees and narrow pathways benefits more from a nimble deck than a larger one. Conversely, a wide-open lot of similar size is well-suited for a larger deck. Walk your yard: if you make frequent tight turns, choose the smaller deck. Sacrificing a few minutes of mowing time for significantly easier navigation reduces frustration and leads to more consistent maintenance.
Q: Can I use the same battery across my mower, trimmer, and hedge cutter?
A: Yes—if you select tools from the same brand’s dedicated outdoor power ecosystem. Leading examples include EGO Power+, Ryobi HP, DeWalt FlexVolt, Greenworks, and Milwaukee M18 Fuel. Verify compatibility before purchasing by checking the manufacturer’s website for a battery compatibility chart. Benefits include cost savings (one set of spare batteries), simplified charging/storage, and seamless workflow (swap a depleted mower battery to the trimmer to finish the job). Avoid “universal” battery claims from obscure brands—stick with major ecosystems with proven reliability and widespread retail support.
Q: What’s the difference between a string trimmer and a dedicated edger? Do I need both?
A: A string trimmer uses nylon line to cut vegetation at various angles for trimming and light edging. A dedicated edger has a small rotating blade designed specifically to create a clean vertical trench along hard edges (sidewalks, driveways). Most modern string trimmers include a rotating or pivoting head that allows vertical edging, making a separate edger unnecessary for many homeowners. If you desire exceptionally crisp, defined edges along hardscapes and perform this task frequently, a dedicated edger can save time and effort. For most residential needs, a quality string trimmer with a pivoting head provides sufficient versatility.
Q: How often should I sharpen my mower blades?
A: Sharpen mower blades at least once per season, or more frequently if you notice ragged grass tips, brown edges on your lawn, or if the mower struggles to cut cleanly. A good rule of thumb: sharpen after every 10–15 hours of use. Dull blades tear grass instead of cutting it cleanly, which stresses the lawn, invites disease, and gives your yard a brownish cast. Many local hardware stores or equipment dealers offer affordable sharpening services, or you can learn to do it yourself with a file or grinder and proper safety gear.
Q: What safety gear is absolutely essential for string trimmer use?
A: Essential safety gear includes ANSI Z87.1-rated safety glasses or goggles (regular sunglasses are insufficient), sturdy closed-toe shoes with slip-resistant soles, long pants, and hearing protection—especially for gas trimmers or prolonged use. For gas trimmers, hearing protection is strongly recommended due to higher noise levels. Additionally, ensure your trimmer has an intact debris shield and that you use the auxiliary handle if equipped. Never operate without eye protection; debris ejected from the trimmer head can cause serious injury.
Q: How should I store battery-powered tools during winter?
A: For battery-powered tools, follow manufacturer guidelines, but general best practices include: fully clean the tool, charge batteries to approximately 40–60% capacity (not full charge), store batteries in a cool, dry place indoors (not in an unheated garage or shed where temperatures drop below freezing), and store the tools themselves in a dry location with blade covers installed. Avoid storing batteries fully charged or completely depleted for extended periods, as this can reduce battery lifespan. Check battery charge levels periodically during storage and top up if needed per manufacturer advice.
Q: Is a self-propelled mower worth it for a flat yard?
A: Even on a flat yard, a self-propelled mower can be worthwhile if you have a medium to large lawn, experience any physical discomfort from pushing, or simply prefer reduced effort. Self-propelled mowers eliminate the need to push, which can make mowing less tiring and more consistent—especially on hot days or when the grass is slightly damp. If your yard is very small (under 3,000 sq ft) and you enjoy the physical activity of pushing, a standard push mower may suffice. But for most homeowners with average-sized lawns, the convenience of self-propel enhances the mowing experience regardless of slope.
Q: What should I look for in a hedge cutter for thick branches?
A: For thicker branches, prioritize cutting capacity (check the manufacturer’s specified maximum branch thickness—choose one exceeding your typical branch size), dual-action blades (for reduced vibration and smoother cutting), and sufficient power (higher voltage platforms for battery tools; appropriate engine size for gas). Also ensure the tool has a comfortable rotating handle for different cutting angles and good weight balance. Never force cuts on branches beyond the tool’s capacity; for branches consistently thicker than your cutter’s rating, use bypass pruners first to remove the largest stems, then finish shaping with the hedge cutter.
Q: How can I extend the runtime of my battery-powered tools?
A: To maximize runtime: keep batteries clean and contacts free of corrosion, store batteries at room temperature (extreme cold reduces capacity), avoid letting batteries fully deplete before recharging (partial discharges are better for lithium-ion longevity), purchase one high-capacity spare battery for your most-used tool, and ensure blades and cutting mechanisms are sharp and well-maintained (dull blades force the motor to work harder, draining battery faster). For mowing, mow when grass is dry and not excessively tall, as wet or tall grass significantly increases power demand.
Q: Are corded electric tools a good option for a small yard?
A: Corded electric tools can be an excellent choice for small yards (under 1/4 acre) with reliable, safe access to outdoor GFCI outlets within reach of all work areas. They offer consistent power, lower upfront cost, minimal maintenance, and quiet operation. The primary constraint is cord management: you must carefully measure distances, use heavy-duty outdoor-rated extension cords, secure the cord away from the cutting path, and remain vigilant to avoid cutting the cord. If your yard layout allows for safe, convenient cord use without constant repositioning of outlets, corded electric provides strong value with the lowest ongoing costs.
Q: What is the most common mistake people make when buying outdoor power tools?
A: The most common mistake is selecting tools based solely on price or perceived power without matching them to their specific yard size, obstacle density, physical capabilities, and actual usage patterns. This leads to mismatch: oversized tools that are cumbersome to maneuver, underpowered tools that struggle with the task, or tools that cause physical strain leading to abandonment. The Yard Assessment Framework in this guide exists to prevent this—taking 15 minutes to honestly evaluate your space, workflow, and reality before shopping saves frustration, money, and regret later. Always prioritize fit over features.
Conclusion and Next Step
Recap: The Three Pillars of Confident Tool Selection
- Assess Before You Buy: Your yard’s size, obstacles, vegetation, and slopes—not marketing specs—should dictate your tool choices. The Yard Assessment Framework turns guesswork into evidence-based decisions.
- Match Power Source to Context: There is no universal “best” power source. Gas suits large, demanding properties; corded electric works for small, outlet-accessible yards; battery ecosystems deliver optimal balance for most suburban homes. Let your reality—not hype—guide this choice.
- Prioritize Long-Term Value: Look beyond sticker price. Consider maintenance effort, parts availability, comfort features, and ecosystem compatibility. A thoughtfully chosen mid-tier tool used consistently for years delivers far greater value than a cheap tool abandoned after one season.
The 24-Hour Rule: Your Tiny, Transformative Action
Within the next 24 hours, spend just 10 minutes walking your property with a notebook. Sketch a simple map. Note: approximate lawn size, count major obstacles (trees, beds, slopes), identify the thickest branches in your hedges, and measure storage space. This single act transforms you from an overwhelmed browser into an informed buyer. You now hold the foundational data every subsequent decision will build upon. No purchase required—just clarity.
The Big Picture: Tools as Enablers of Joy
The right outdoor power tools do more than cut grass or shape hedges—they remove friction between you and the yard you envision. When tools align with your space, body, and values, maintenance shifts from a dreaded chore to a satisfying ritual. You’ll spend less time wrestling equipment and more time enjoying the results: a thriving lawn, crisp edges, sculpted hedges, and the quiet pride of a space tended with intention. This guide isn’t about selling tools; it’s about empowering you to build a sustainable, enjoyable relationship with your outdoor space—one confident choice at a time.
Explore Our Complete System:
Mastering Lawn Mowing Patterns for a Professional Finish | Seasonal Yard Maintenance Calendar: Month-by-Month Guide | Ergonomic Gardening: Reducing Strain While Maximizing Results | Building a Sustainable Tool Shed: Organization and Care | Hedge Shaping 101: From Formal to Natural Styles | Understanding Grass Types: Care Tailored to Your Lawn | DIY Blade Sharpening: A Step-by-Step Visual Guide